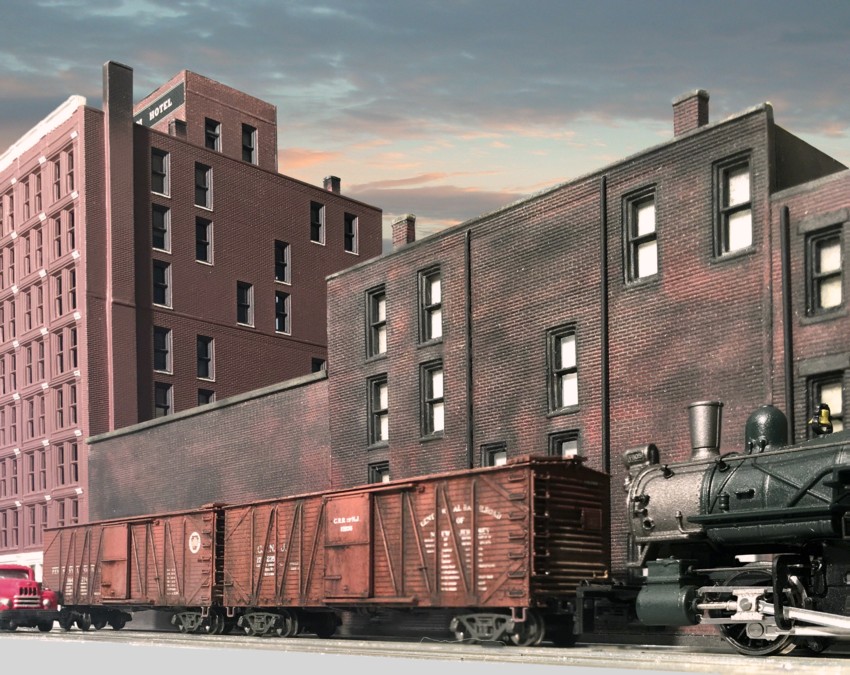
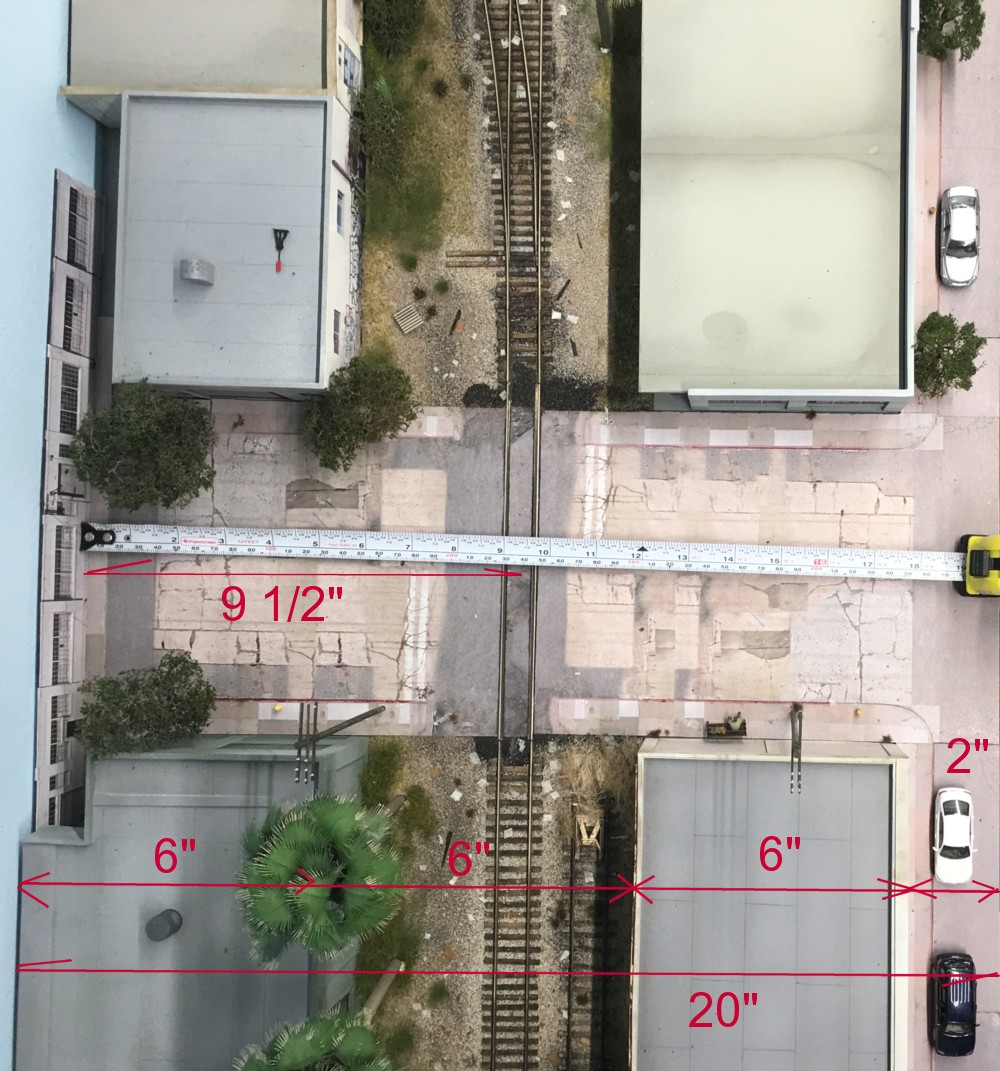
Model Railroad Blog

Brooklyn Terminal ProRail Ops

Wayland Moore and Riley Triggs running the Brooklyn Terminal during ProRail 2018


ProRail, the national operations convention, is now in the bag. I was a little surprised how drawn the attendees were to running the BT layout.  For the most part it ran well although some minor track tuning issues cropped up.  Approaches to this entire “operations” thing varies from person to person and layout host to layout host.  For my part, when I stage a session I put a lot of effort into trying to get the operators away from the natural tendency to fall into what I call a “check list” mentality when it comes to an operating session.  By that I mean where the mindset becomes one of “give me a list so I can work through that list”.   I want it to be of a case of “experiencing” what it would be like to be in a specific time and place and to be able to enjoy that experience without undo pressure or frustration.  There are a few ways to help this along.

  1. One is to not overload the session with too many moves.
  2. Another is to avoid building in operational “gotchas”.
  3. The third is to let the operator know that it doesn’t matter if the switch list is completed or not.  After a set time period, the session will be declared “done” and the power to the layout will be turned off.
  4. Encourage the crews to take real time coffee breaks during the session.
  5. For switching layouts, emphasize that you’d like the speed limit not exceed the third speed notch on a throttle.

This takes the pressure off so hopefully they can just relax and get a sense of what it would feel like to be in say 1945 Brooklyn.  I staged the layout with only 13 cars and set up a simple switch list.  Over the course of the event three operators ran the layout on successive days and to my surprise the relatively small 13 piece car count  took about an hour and half to spot.  The fact that only a dozen cars will fill out a session takes some pressure off me as it will be a lot easier to fine tune the rolling stock. I see the exceptional BLMA replacement trucks are back in stock so the focus in the next month will be on lowering the cars, tuning couplers, and adding weight.  I’ll also be working on some track fine tuning.

I’ve never understood the hobby culture in terms of how smaller layouts are often viewed.  It seems to be one of “settling”.  One of making the best of a bad situation (limited space).  During ProRail I had all three layouts running.  They ranged in size from the Downtown Spur at 400 sf to the Brooklyn Terminal at 30 sf.  Watching the guests run the layouts I really didn’t notice any difference in how much they enjoyed the larger vs. smaller railroads.  Without feeling contrived, something like the Brooklyn Terminal will easily spin out a relatively long operating session and will serve up many, many years of construction enjoyment and it’s of a size attainable to anybody with any living situation.


Here’s the switch list I used for ProRail 2018. It’s just a simple Excel spreadsheet and took operators a relaxing ninety minutes to run through.

LAJ Video

I always look forward to the LAJ videos put out by Los Angeles Rail Productions.  For those that share my interest in the LAJ, check out his excellent video from January.  Link HERE.  He shot this in HD so treat yourself to watching it in full screen.  Some things that jumped out at me:

-At the :47 mark notice the conductor locking the crossing signal box.

-At the 1:27 mark note how how the trains stops at the grade crossing to pick up the conductor.

-Note the ARMN reefer in the opening sequence

-Note overall the really slow running speeds, an aspect of prototype operations many modelers struggle to represent.

-At the 12:50 mark there is a super cool sequence where the LAJ switch job “meets” with a UP  switch job.  Don’t see that very often.

Enjoy!

Brooklyn Terminal 4/15/18

This weekend’s activities involved getting some more structure mock ups on the layout.  I also kept most of the structures from my old Monon layout and they’re serving as hand stand ins for now.   Everything is up and fully operational at this point.  The plan is to operate it for a few months and then move to replacing the mock ups (track and structures) with the final detailed pieces.

Time

The timeless 80/20 rule, model railroad planning is not immune. All too often we have our 80/20 priorities backwards.  We spend eighty per cent of our time wringing our hands over what I would consider more tactical issues and only twenty per cent on the much more important strategic questions.  What curve radius to employ, how many staging tracks to use, what type of bench work footprint is best?  These are all tactical issues.  They do matter, but they are of much less importance than the one central litmus test.  The hallmark of a good design?  It’s pretty basic when you step back and think about it.  A “successful design” is one that results in a model railroad that produces the maximum level of enjoyment given your own personal interests, skills, weaknesses, and lifestyle. It’s a design that targets and hones in like a laser on the areas of the hobby you find most satisfying and maximizes the timeyou spend on them.  It also minimizes, to the extent possible, time spent on those areas you find less enjoyable.   Maximizing ‘fun time’, that’s the target, that’s the “eighty per cent” that should be our strategic focus.   It seems so basic, so obvious, and yet it’s all to easy to give it lip service, not see the forest for the trees, even for  experienced modelers.

Model Railroading is recreation, and the hallmark of a good design is one that recognizes that reality and zeroes in on it.  We all have an intuitive sense of whether we are enjoying our hobby or not.  Sure, there may be times when we need to grind through a mundane task such as wiring, but at some point we become aware of whether we are enjoying the model railroad we are building (or have built) or whether we are not.

Reducing a successful design to its most basic level, the bottom line becomes a) how much enjoyment we are having  b) how long  that enjoyable period lasts and c) how often are we able to get into the layout room.  In other words how much fun we are having, for how long, and how often. A times B times C.   It’s the time element I’d like to delve into here and how it impacts all facets of design, construction, and operation.  Long before we get to the tactical issues of design, the minutiae of the X’s and O’s, it behooves us to address the more important strategic issues and do so effectively.  If you don’t address those big picture questions, you run the risk of correctly drawing the wrong design, a design that is technically correct but leaves you flat and unmotivated to interact with the layout.  Before you pick up that pencil and straight edge, or open up your CAD program, give some serious thought to TIME and how important it is to what you’re trying to do.  Here are some questions to get you started:

-Once I start construction, ideally how long do I want it to be before I can at least do a little bit of train running (say over 20 feet of track)?

-How long do I want it to be before I can run my full schedule?

-A layout never needs to be totally finished but it’s nice to have enough done that you and your visitors can see at least some portion of your vision.  How long will it be before, say a third, of my layout is totally done (track, scenery, structures)?

-What aspect of the hobby do I want to spend most of time on? Scenery? Structures? Operation? Freight car assembly? Other? A good design will be skewed so that is in fact where you are spending your time.    If you love scenery and don’t give a rat’s rear about operation do you really need a plan with a hundred turnouts?  If you love structures, but are ambivalent about scenery, do you really need bench work that is three feet deep?

-Whether you are a die hard operator or railfan, how long do you want your ‘running sessions’ to last?  Twenty minutes, three hours?

– How often will you run.  A few times a week, once a month, once a quarter?

-How much “high energy” time do I have to work on the hobby?.  You may have three hours of time in the evening but, if you’re totally fried after a long work day and commute, that time isn’t something you’ll be able to take advantage of.

-Where are the potential time sinks and how can I minimize the chance of getting bogged down by them?  For example, if you want detailed hand laid track, you could quickly tack down some flex track temporarily, get trains running, and then gradually replace it with more detailed track at your leisure.

A design isn’t complete until it can honestly and accurately address these types of time related questions.

In my experience I often see designs (again, often from very experienced modelers) where the owner has designed in a lot of hoops they must jump through before they get to the ‘good stuff’, the ‘fun stuff’, what they truly enjoy.  Sadly, they frequently burn out before getting to the promised land.  Or, they design in complex, time-consuming-to-build, features that they don’t really care about.

We increase the odds of maximizing how much we enjoy our hobby if we put TIME, in all its iterations, front and center and at the absolute earliest stages of the planning process.


Shown above is an example of how awareness of time can be applied to layout design.  Let’s say an individual is:

  • Primarily a rail fan and, as such, wants a relatively long main line run
  • Enjoys building rolling stock
  • Is less interested in building structures and scenery
  • Has limited time

The bench work depth has been minimized to speed up construction.  Scenery is relatively simple and would go quickly given the narrow bench work. The turnout count is low as is the amount of track.  An optional staging yard is shown to store additional rolling stock.  Putting it all together, we have a layout that would relatively easy to build in a short time and is skewed to the owner’s specific interests.

Dealing with Oversize N Scale Track

Model Power’s new Mogul easily traverses code 40 track soldered to PC ties.

The oversize appearance of N scale rail is an issue visually, particularly in photographs.  Actually, the oversize nature of many N scale components is a visual issue but for today let’s focus on the rail.

With track appearance you are dealing with two components that really stand out if they are oversize, the rail web itself, and the spikes.  Of the two, the spikes are the biggest offenders.  For the Brooklyn Terminal project I’m fortunate in that one of the advantages of street track is that the rail web and spikes are embedded in the pavement.  All you can see is the top of the track.  Problem solved for those areas.

Model Power’s recently released Mogul has proven to be a total blessing in terms of running quality.  The question now becomes, how far can I push things with it in terms of  going to smaller rail?  The driver flanges are oversize but not grossly so.  The size of the flanges isn’t that apparent.  The tender wheels are huge but, unlike the drivers, they can be easily replaced.  How will it react when placed on code 40 track?

I took the loco and pushed it down a section of Micro Engineering code 40 flex track.  As expected, I could feel the flanges riding up on the spike heads.  What if I removed the spike heads?  I took some code 40 track, removed the plastic ties and spikes, and replaced them with PC ties, and hooked up the power.   Success!  The steamer would easily glide back and forth without so much as a hiccup.  Problem solved for the exposed/non-street track, just use PC ties.

The remaining issue will be the turnouts.  Hand making N scale code 40 turnouts on PC ties is pretty easy once you get the hang of it.  The issue is, how do you throw them?  They are super delicate and there isn’t much material around the throw rod.  I don’t want to go with Tortoise switch machines nor do I want to deal with manual linkages as that would break up the clean look of the fascia.  For switching layouts I prefer manually/finger flipping the points.  Both Micro Engineering and Peco have that spring loaded feature built in.  How to incorporate that in code 40?  One thought is how would a Micro Engineering code 55 turnout would look if I trimmed off the spikes and could somehow slim down the look of the guard rails and frog?  To be determined…………