The approach a modeler takes to track detail depends on a number of factors and personal preferences. Two of them are the volume of track that needs to be detailed and how far away you’ll be standing when you look at the rail. Obviously, if you have several hundred feet of track, hand laying with individual tie plates becomes pretty impractical! Secondly, if you’re only going to view the work with the naked eye, and possible from several feet away, any time spent on fine scaling things isn’t going to produce noticeable results. If, however, the amount of track you’re working with is a manageable volume, then spending more time detailing it becomes more feasible. If you plan to take up close and personal photographs, oversize rail and spikes, previously un-noticed from normal viewing distances, really stand out. In N scale, the extra heft of code 55 becomes pretty noticeable when you zoom the camera in. Flex track spikes also tend to be very large.
I’ve written a number of times on the advantages of getting a layout up and running quickly and, to that end, quickly tacking down some temporary flex track allows you to enjoy your layout while you’re detailing smaller sections. Since there isn’t that much exposed rail on the Brooklyn Terminal project to begin with, and I’m already operational with the Peco code 80 track I put down, I have the luxury of doubling back and detailing the rail one small section at a time.
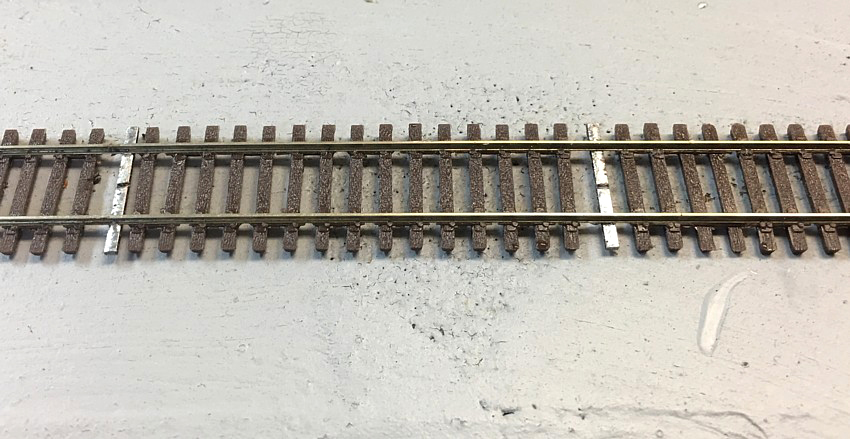
Micro Engineering’s code 40 flex track does give a very nice look for the N scaler modeling secondary track. You run into two issues though. First, many locomotives, particularly older ones, have larger flanges that ride up on the spikes. Second, in a tighter angle photo, the spikes still are pretty large. In short, the problem is the spikes, not the rest of the track. To get around this I’ve set up a system of removing the spikes on the flex track. First, I solder in some PC ties to keep the track in gauge once the spikes are removed. Next, I run a number 11 blade down the web shearing off the spike heads. A few passes with a file knocks down any high spots I might of missed. When you’re done, although the spike heads are still there they don’t jump out in photos, most locomotives will easily glide down the rail, and you still have the nice looking tie plates molded onto the ties.