While waiting for supplies to come in for the Brooklyn Terminal layout, I doubled back to other areas.
As a host layout for the upcoming ProRail national operating convention, it’s time to make sure all of my ducks are in a row. I’ll be running both the Downtown Spur and LAJ layouts simultaneously so will have my hands full. Since I’ve never had a guest operate the LAJ, I needed to put that through the paces while trying to get a sense for what the experience would be like for a newcomer. I’m not a big believer in random car movement generators because I feel you can create a much more believable operations scenario if you plan it manually. That’s not hard to do for a small layout.
Running running through the whole work order took about an hour without breaks. My guess is somebody that’s not as familiar with things would take longer and also need a break now and then.
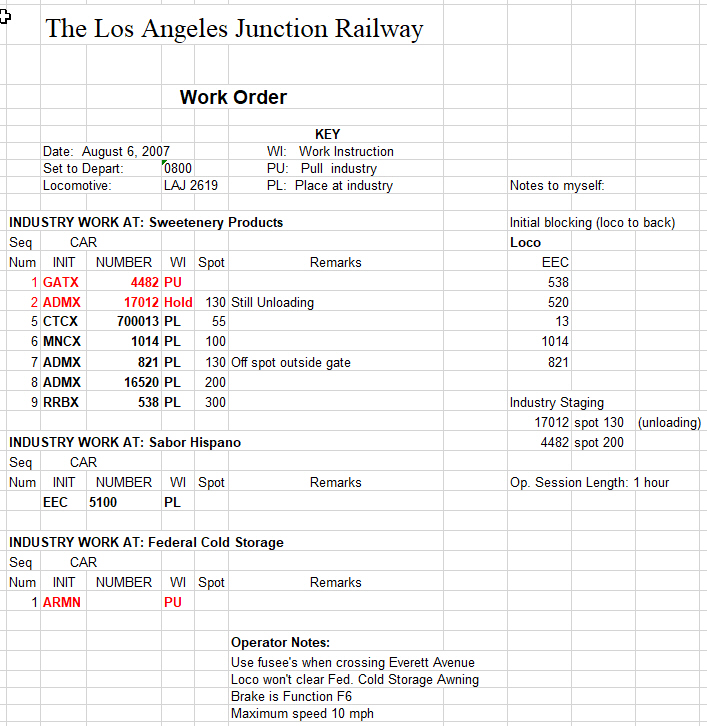
Shown above is the work order I came up with. The column on the right represents “notes to self” and wouldn’t be seen on the copy the guest operator gets. The spot number refers to the location for unloading each specific grade of corn syrup. Each incoming tank car carries it’s own unique grade of product and must be spotted correspondingly.
I’m glad I ran the session as there were a few takeaways that need to be addressed:
- Shelf couplers, while very prototypical, a very thorny to use in actual practice. All of the tank cars will have them replaced with standard scale couplers by the time of the convention
- It would be super helpful to have enough length on the Sabor Hispano spur to stuff a third car in there during the car shuffling process. I’ll extend that lead about four inches.
- It would be all to easy to get forward and reverse on the throttle confused and push an entire cut of cars off of the Sweetener Products spur into the great abyss. I’ll supplement the cosmetic rail stops with a nail spiked into the fascia.
Other than that, it was a thoroughly enjoyable way to spend a morning over a cup of coffee. Those interested primarily in industrial switching have life so much easier than those that prefer the more traditional approach of moving freight traffic from town A to town B. With a miniscule footprint, and for very little cost, the LAJ project has provided many hours of enjoyable research and construction time and is a joy to operate.
I wrote a blog on my business site on “Choosing Your Theme, Setting Your Project Scope”. You can read it HERE.