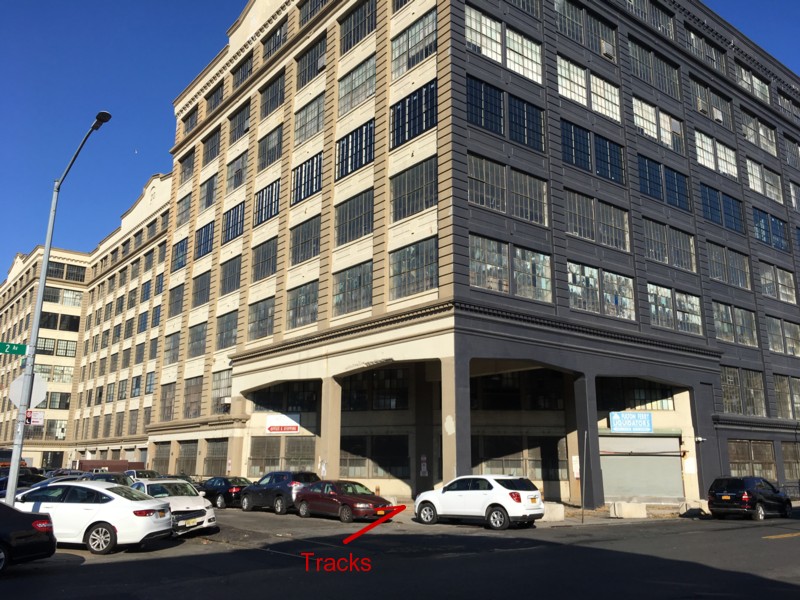
Model Railroad Blog

Crossing District Blvd.

I’ve always loved the mood and look created by the long shadows of late afternoon as well as the vivid colors you get on a cloudless day.  Compared to some of my other shots, this one was a little easier to get the equipment positioned since it was taken at the end corner of the layout.  I put my Canon Rebel on a tripod and dropped the viewing height to street level.  The overhead 3200K LED strip lights help with fill lighting.  The “sun” was a single Tota Light positioned to my right and sort of facing the camera.  Moving the light about six feet from the model gave me the shadows I wanted without frying everything.  Five exposures were taken and run through Helicon Focus.  The sky was a shot taken mid day on my trip to Cape Cod last month.  Corel Knockout2 was used to remove the background and crop in the more vivid blue sky photo in back.  A little pecking away with the clone tool to remove a few artifacts here and there and that was it.  A larger format version is on my Flickr site.

August 27, 2017

A look down the alley between the shops of Modern Pattern & Foundry. A larger format version of this image can be found on my Flickr page. Note the illusion of depth in the windows created by using glossy photo paper.


Yesterday I got a new wireless throttle in the mail for use with my EasyDCC system, a T5000 to be specific.  Love it.  I decided to put it through the paces by setting up an op. session.  The LAJ layout will probably accommodate somewhere between ten and twelve corn syrup tank cars.  Right now I’ve built the roster to eight.  Cutting a few corners on  procedures, it took me about forty minutes to run through the switch list. With additional cars that might stretch to an hour.  Being honest with myself that’s about the limit of my attention span.  During the week I’ll often run for ten or fifteen minutes moving a car or two.   The Downtown Spur in the basement could spin off a three hour session but that’s simply more than I want to deal with save for open houses or when I have out of town guests.


Sweetener Products


Now that the LAJ layout is essentially done, I’m circling back and re-shooting some of the photos.  The Sweetener Products “back alley” is shown above.  A larger format version can be seen/downloaded on my Flickr page.  Realistically, a facility like this would probably have a slightly more modern look.  I wanted to leave the option open for backdating so fudged a little so that this could serve as a warehouse if I go that route.  Note the unloading pipes and hoses fashioned from Grandt Line O scale piping and coils of solder.  The image was shot using my Canon Rebel Xti and run through Helicon Focus and Corel Knockout 2.


One turnout, two years of satisfaction and going strong

Extra track space is at a premium when switching Sweetener Products. In this view, two corn syrup tanks are temporarily stuffed into the Sabor Hispano spur while the car sorting and spotting takes place.


I’ve never been one for artificially designing  un-realistic switching nightmares into a track plan.  The prototype offers up enough to keep you thinking as is and does so with relatively little track. Switching Sweetener Products is challenging on a few fronts.  First, this is a car spot driven industry.  Each tank car contains a different grade of syrup and must be spotted at the appropriate unloading hose to prevent contamination.  Second, there isn’t a lot of track to work with, especially when taking into account the relatively large number of cars being dealt with.  Finally, thinks are further complicated by the fact that the tank cars look almost identical making it difficult to keep track of them while you work.  Working this industry is an exercise in concentration!

Why is this important?  It’s important because it illustrates the point that a layout that occupies a tiny footprint that is within the reach of any hobbyist, is inexpensive, and only has one turnout(there are two turnouts but the second isn’t used much) can be both highly plausible and fulfilling to operate.  The construction aspects of the LAJ kept me busy and happy for several years and I’ve yet to grow bored with it.  An operating session would easily extend longer than an hour and entail so much focused concentration that you’d likely be ready for a break at that point anyway.  Here’s how a session might unfold.


Every prototype is different but, from the conductors I’ve spoken to, generally  the yard job doesn’t pre-sort the cars for the local prior to sending it on the road.  The local needs to do that when it gets to the industry.  Using that as a guide, a local would come down The Horn Lead with the corn syrup tanks bound for Sweetener Products and need to sort them prior to spotting.


Maybe my professional rail buddies will set me straight, but this is how I’d approach things.  First, I’d dump the cut of incoming loads temporarily on the Federal Cold Storage lead.  Next I’d pull the entire cut of empties including the car in the process of being unloaded.  Using the cut of empties as a “handle”, I’d begin the long push/pull process of spotting the loads at their dedicated hoses, including re-spotting the car that yet to be un-loaded.


The car that wasn’t fully un-loaded throws a wrench into things because now we don’t have enough room for all of the incoming cars.  Rather than take the extra car back to the yard, it’s spotted outside the gate to be dealt with by another shift once space opens up.  All of this is going to take you “awhile”.  In the end it’s an approach that offers a lot of entertainment per square foot and per dollar of hobby budget.


“Sounds of the J” Movie Short

Sound of the J


It took a good month of fairly hard work, but I’ve completed my first all out effort in the area of model railroad video.  “The Sound of the J” can be seen on YouTube HERE.  Seeing how much work it took to put together a seven minute “short” sure gives you a new appreciation for the pros that have to produce two hour long movies under much more difficult conditions.  For those that want to venture down this path here are some random thoughts that may be helpful, most of which I picked up from online tutorials and published interviews of movie pros.

Know what you want to accomplish going in

It’s human nature to want to whip out the camera and immediately hit the record button.  However, to get a decent result you need to hit the mental pause button, and take some time to think through what your end game is. Who is your audience? Just yourself? The hobby YouTube universe?  Sales prospects?  Are you trying to instruct, tell a story, sell a product, or instill a mood by taking the viewer on a journey?  In my case the audience was only myself. I wanted to be able to experience my layout in a way I couldn’t with the naked eye.  I wanted to capture the sense of mass and power that is unique to railroading.  I wanted to highlight the sounds of railroading.  It took some discipline along the way from the standpoint that I knew that the format wasn’t that of a traditional model railroad video and wouldn’t appeal to a mass audience.  I was tempted at times to truncate the long freight car crawl sequences and had to constantly remind myself that if a cut appealed to me, if it captured the feel I wanted, it needed to stay in.  Producing to entertain a broad audience, to be a “pleaser”, is necessary in many cases but it also can be a slippery slope that can temper more creative efforts.

Composition and creativity leads the train, not  tools

It’s so easy to get caught up in the technology that the central goal is lost.  That central goal is composition, producing something that is creative and artistic.  Anything beyond that is simply a supporting tool, a means to an end.

Have a plan

Write a “script” or outline beforehand that lays out the scenes, sequences, sounds, and editing approaches before you start filming.  In my case this was just a simple chart on piece of notepaper.

Break with tradition

Model railroad video traditionally follows a very specific format.  Try to break away from that approach and explore different techniques.  The best way to do that is to study films, long and short, outside of the hobby.  Video is a large hobby in it’s own right with a passionate following constantly pushing the envelope with new approaches.

Know the challenges going in

Depth of field:  The shallow depth of field of close up photography creates challenges unique to our hobby.  A smartphone’s small sensor appears to give you more depth of field than a traditional video camera or DSLR.  The small dimensions of the phone also give you viewing angles and camera locations that would be simply impossible with other devices.  You can work around the depth of field issue by working primarily with broadside shots or viewing angles that are controlled in a way that the camera doesn’t pick up much in the distance.

Backdrops:  Traditional model railroad backdrops tend to be problematic from the standpoint of either being distracting, un-realistic, or having a tendency to wash out to a muddy, gray blue behind the camera.  I contacted Dave at Backdrop Junction and bought a six foot long plain sky backdrop and had him bump the saturation up twenty percent.  I then taped the backdrop to the wall behind the shot.

Sound: Ambient model railroad sound is totally un-usable.  My first step in the editing process is to delete the recorded sound and cut in audio from sources such as Freesound.org, Sound Dogs, YouTube, Scanner captures, etc.

Lighting: The same rules apply as still photography.  Flourescent bulbs will give you a flat, low contrast, muddy look.  I used photo floods and overhead LED strip lights.

Upgrade with a video app

It is much, much easier to produce a decent iPhone video with the FiLMic Pro app.  You get independent focus and exposure control, better white balance, and numerous other tools that make your life easier.  As an example of what FiLMic can do, jump to the sequence at the 5:30 mark.  You’ll see that I started with the cross bucks as the focal point and used the FiLMic focus wheel to transition to a focal point on the boxcar.  Night photography can be tricky in that the video is always grainy and glittery.  I shot the night scene under room light but spun the FiLMic exposure wheel to an underexposed setting to give the illusion of darkness.

Finally, a shout out to Scott Jordan for allowing me to use the audio on his YouTube video as well as the several blog readers that explained to me how to capture scanner audio.


Summary

Camera: iPhone 6sPlus

Software: FiLMicPro

Sound: Clips from Sound Dogs, Freesound.org, YouTube (with permission!), scanner captures

Backdrop: Plain “sky” on 6 foot vinyl roll with increased saturation

Phone mount: A variety of methods were used from leaning the phone against a weight, clamping it with spring clamp, to using a dedicated camera phone holder on a tripod

Editing Software: Adobe Premiere Elements 15

Lighting: Overhead 3200K LED strip lights and/or Tungsten photo floods