Advancement in our hobby is driven by leadership. In our case it seems to run in twenty year waves. Somebody comes along, moves the needle, and we ride it for several decades. As things begin to peter out, a new visionary comes along and the cycle repeats. In the late 1970’s the triumvirate of McClelland, RMC, and Koester dropped the bomb resulting in a revolutionary improvement in how we viewed and interacted with our model railroads. An idea alone isn’t enough. It has to be communicated. Although McClelland had the concept, I doubt there would have been much impact had not Tony recognized the value and communicated it so effectively.
Historically, what wave are we riding now? Again it’s a triumvirate – David Barrow’s planning and design concepts, Paul Dolkos’ scenery methods, and Tony Koester recognizing the value and communicating it to the masses. Although I’m flattered, I have to laugh when somebody refers to a design style as a ‘Lance Mindheim’ design. I’m just the student. My influence is David Barrow. The same could probably be said for my friends Tommy Holt and James McNab whose ‘Barrow Stamp’ is clearly evident in their designs.
For some a career is a job, for others it’s a calling. For David Barrow it’s the latter. Still a practicing architect, his career spans almost six decades. During my recent trip to Austin I was fortunate enough to be invited over to his home which he both designed and built. Designed in the Texas Hill Country style, I’ve never scene a residence that is so cohesive, that fits into it’s environment so well. Everything fits and flows together with nothing included that doesn’t tie into the overall effect. The guy is good. When you get somebody that gifted in art, and that experienced, it would be wise to pay attention when they apply those same skills to model railroad design.
Following my visit, David forwarded the following quote from noted architect John Pawson. “John Pawson maintains that minimalism is not merely a case of “throwing out the sofa and painting the walls white.” This is not architecture of absence, it is defined not by what is not there, but rather by the rightness of what is. You reduce, you simplify and at first there is less and less to look at. Then, as you go on attenuating and compressing, you come to a point at which you go through a barrier and pass through into…a kind of mirror world in which you see, looked at with enough clarity, not emptiness but a sense of richness.”
In the intro to Pawson’s book “Minimum” he writes: “The minimum could be defined as the perfection that an artifact achieves when it is no longer possible to improve it by subtraction. This is the quality that an object has when every component, every detail, and every junction has been reduced or condensed to the essentials. It is the result of the omission of the inessentials.”
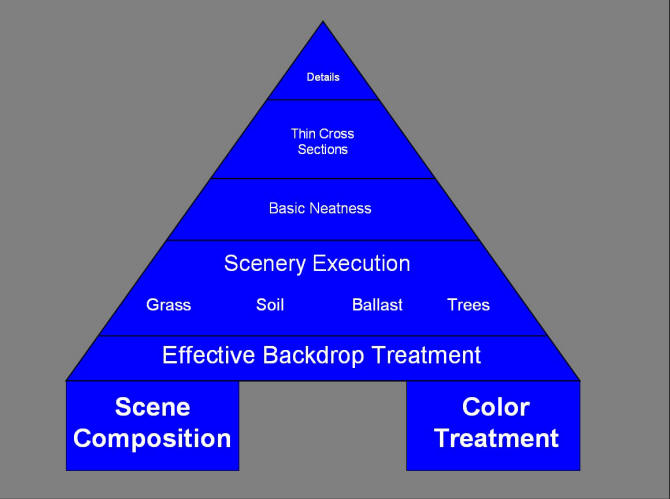
This is where David is coming from with his approach to the hobby and it bears close study by anyone seriously interested in looking for ways to improve their experience and increase their enjoyment. If I had to summarize his primary lessons they would be:
Scene Composition
Studying David’s work, the one of the biggest lessons I learned is that scene composition is the number one, overriding factor in determining how realistic a model railroad appears. Scene composition has to do with the elements we include, their size and shape, and of particular importance, the spacing between them. The Lubbock layout in the 2006 issue of MRP (shown below) to my eye was one of the most realistic I’ve ever seen….and it was totally unsceniced and unpainted. Stripped of the extraneous, leaving only composition, drove the point home that this is where our primary focus should be.
Linear Design Emphasis
You will never get lost operating on a Barrow design. When you see it in front of you, you don’t need a track plan. You start at one end and the track logically goes where you would expect it to. Railroads go from point A to point B, taking the shortest and simplest route possible. They don’t like loops to increase mainline run. They don’t build over/under bridges because they look cool. It’s almost condescending to assume that we need ‘tricks’ in order to make our craft interesting. In it’s actual form, railroading is more than fascinating enough without muddying things up with visual overload and over compression.
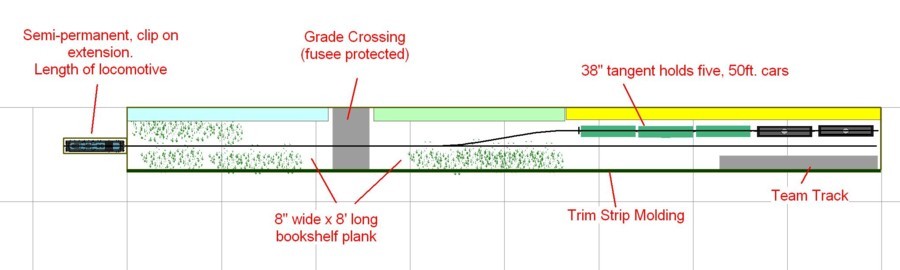
Quick launch/simple construction
Once an individual is drawn to our hobby, it is critical that we keep them in the fold and develop them. To do this we need to maintain their morale and enthusiasm. This is done by giving them successful experiences early on. We need to give them realistic, yet simple to build, layouts that give them a ‘quick launch’. David’s construction methods are the epitome of ‘quick launch’. Once you have the layout up and going you can always go back and add details.
Ergonomics
Comfort is one of those subtleties we are often not aware of. It’s absence however, stealthily saps our interest without us being aware of it. David is a pioneer and fierce advocate of ergonomics. Layout comfort is the FIRST step in the design process. He is unyielding in this point. No duckunders, no narrow aisles, no Rube Goldberg devices. Everything is labeled. Framing the presentation and cleanliness rule the day.
Further Reading
If you want to delve more deeply into this subject I suggest the following issues of Model Railroad Planning: 2004, 2006, and 2007 (especially the ’06 issue). As an alternative you can purchase all of the MRP back issues on DVD.
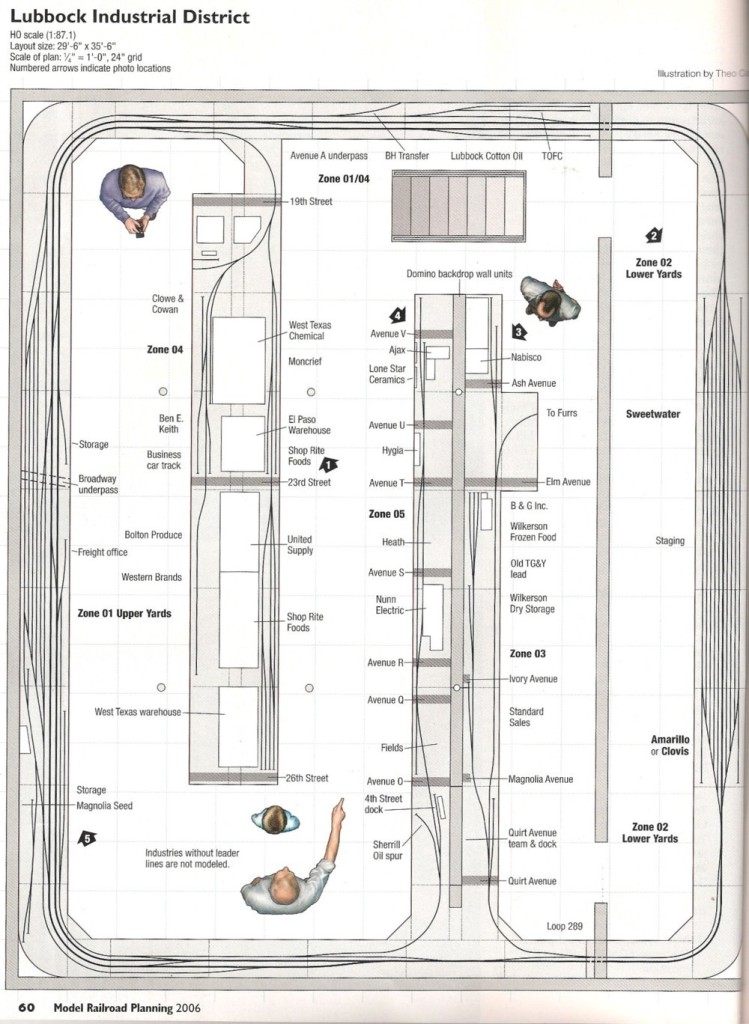
An argument could be made that David Barrow’s Lubbock Industrial District track plan (MRP 2006) is one of the best model railroad designs of all time. Realistic, perfectly composed and visually balanced, operationally interesting, ergonomically perfect, it hits all of the bases.
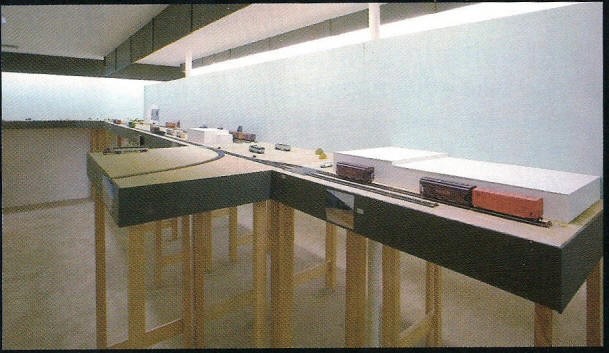
Take note of the visual impact and realism of this scene (MRP 2006. T. Holt photo). Notice that it is completely un-sceniced and uses code 100 track. This drives home the point that scene composition is the primary visual factor in driving realism.