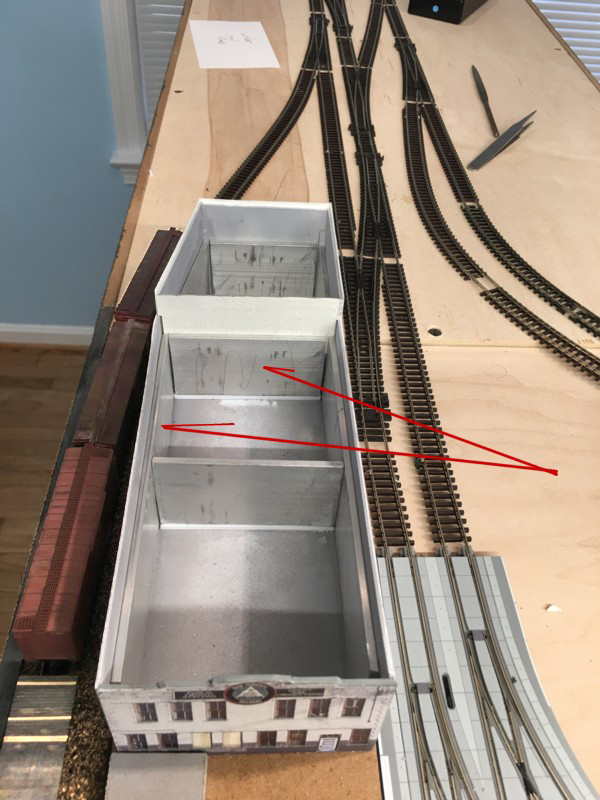
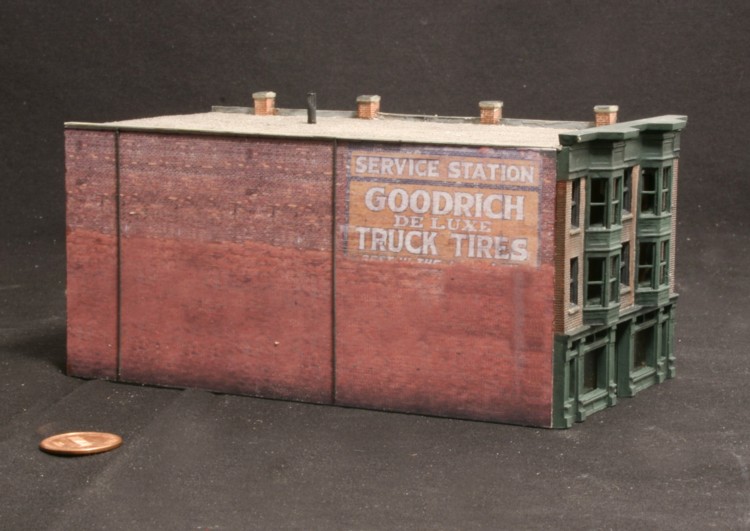
Model Railroad Blog

Enhancing Code 40 Flex Track

Micro Engineering code 40 flex track with the spikes removed to enhance appearance and add clearance for deeper flange locomotive wheels.


The approach a modeler takes to track detail depends on a number of factors and personal preferences.  Two of them are the volume of track that  needs to be detailed and how far away you’ll be standing when you look at the rail.  Obviously, if you have several hundred feet of track, hand laying with individual tie plates becomes pretty impractical!  Secondly, if you’re only going to view the work with the naked eye, and possible from several feet away, any time spent on fine scaling things isn’t going to produce noticeable results.  If, however, the amount of track you’re working with is a manageable volume, then spending more time detailing it becomes more feasible.  If you plan to take up close and personal photographs, oversize rail and spikes, previously un-noticed from normal viewing distances, really stand out.  In N scale, the extra heft of code 55 becomes pretty noticeable when you zoom the camera in.  Flex track spikes also tend to be very large.

I’ve written a number of times on the advantages of getting a layout up and running quickly and, to that end, quickly tacking down some temporary flex track allows you to enjoy your layout while you’re detailing smaller sections.  Since there isn’t that much exposed rail on the Brooklyn Terminal project to begin with, and I’m already operational with the Peco code 80 track I put down, I have the luxury of doubling back and detailing the rail one small section at a time.

Micro Engineering’s code 40 flex track does give a very nice look for the N scaler modeling secondary track.  You run into two issues though.  First, many locomotives, particularly older ones, have larger flanges that ride up on the spikes.  Second, in a tighter angle photo, the spikes still are pretty large.  In short, the problem is the spikes, not the rest of the track.  To get around this I’ve set up a system of removing the spikes on the flex track.  First, I solder in some PC ties to keep the track in gauge once the spikes are removed.  Next, I run a number 11 blade down the web shearing off the spike heads.  A few passes with a file knocks down any high spots I might of missed.   When you’re done, although the spike heads are still there they don’t jump out in photos, most locomotives will easily glide down the rail, and you still have the nice looking tie plates molded onto the ties.

East Rail on Film!

Here’s a blast from the past….Splitting off of Miami’s “East Rail” siding, just south of the main industrial park, is a one track spur that dives into the weeds, and weaves through concrete canyons between closely packed structures.  At the end of the spur there is a blind crossing of 37th Avenue to reach an industry called Pan American Papers.  You couldn’t come up with a more interesting model railroad subject.  A few days ago Tolga Erbora, camera in hand, stumbled across the local actually working the spur.  Being able to catch this action unfold was rare and exceedingly lucky.  You can watch his footage HERE.

Brooklyn Terminal: More Questions Answered

This mock up of the Bush Terminal Freight house was a test to see if the photo wallpaper technique would scale down to N scale. It appears it will. In this attempt, my main goal was to test the print resolution which does check out. I’ll now rebuild the model adding more layers, depth, and stand off details.


Entering into the Brooklyn Terminal project I had a lot of questions I needed to work through in my mind to see if I had a fighting chance of building something that at least approached what I’d done with my HO layouts.  It wasn’t enough to be able to address the questions and challenges (at least what I personally viewed as challenges) but to do so in a way that didn’t involve excessive amounts of time.  I really wanted to have a realistic grasp on what the issues were and how hard they’d be work through.  At this point I do think I have a sense of what I’m dealing with and it appears the big questions and concerns I had are things that can be dealt with in a fairly straight forward manner.

Photo Wallpaper: Could this technique be scaled down to N scale? The main question I had was print resolution.  How would the photo laminates look when blown up in a photo?  As you can see from the shot above, it appears the resolution will be fine.

Photography:  I enjoy experiencing my models through photographs.  Would I be able to create N scale models that would stand up to the up close and personal photography I enjoy?  It appears so.  With careful weathering, the cast on details on rolling stock aren’t as noticeable as I had feared.

Code 40 turnouts:  Track tests a few weeks showed that the Model Power Mogul can handle code 40 track, as long as there aren’t spikes in the way.  Easy enough to fix that but what about the turnouts?  How to throw them?  It seems so basic in retrospect…Tortoise Switch Machines.  As I was mulling over the issue I recalled a post on one of the forums where a modeler had devised an ingenious method of modifying the throw wire for code 40.  He used the standard .037″ wire but at the end, at the point the wire would touch the throw bar, he soldered on a short, half inch extension of much thinner wire.  This approache gives you the stiffness you need to throw the points and a small enough wire at the top to allow the use of narrower throw bars.

Couplers: For now I’m going to stay with Z scale but I’ve been contacted by a modeler that has had some success modifying the Micro Trains scale couplers to make them more viable.  It sounds promising.

Keep Alive:  To be fair, the Model Power Mogul rarely stalls (even on complex track), but it does occasionally.  If I could find a way to get even a small capacitor tapped into the decoder it would be a game changer.  Litchfield Station has offered to dig into this if I’ll send them a unit to look at.  It’s not the kind of thing they can address unless they have the model in front of them with the shell off. I have to believe that at some time in the next year or two we’ll have the capability to add this feature in tight N scale quarters.

N Scale Rolling Stock Strategy

A tandem of Micro Trains boxcars sit temporarily in the street trackage of 1st Avenue.

We’d all like to have our cake and eat it too but, unfortunately, life rarely pans out that way.  An N scaler has the enormous advantage of being able to have a rather significant railroad virtually in their hip pocket.  The small size also opens up the ability to have much more realistic scene composition by virtue of having the space to spread things out as they appear in the real world.

For all its positives, however, the scale poses significant challenges, especially for the realism orient modeler. When it comes to rolling stock those challenges are:

-Truck mounted couplers

-Massive ‘pizza cutter’ wheel flanges

-Oversize couplers

-Unrealistic ride height to clear the truck mounted couplers

-Cast on details analogous to the HO scalers old “Bluebox” days or….

-or…if the details aren’t cast on they tend to be grossly over sized

Whew!  Did I miss anything or are you back to HO already!  The situation isn’t hopeless though.  The rivet and seam detail tends to be very finely cast to scale which is no small thing.  Also, the pad printing is typically well done.  So all is not lost.  However, if you hope to achieve any semblance of a plausible end result, and do so without spending weeks on each car, it’s important to come up with a strategy.

The starting point of attaining visual realism is the realization and acceptance of how much color treatment and weathering has on overall appearance, far more so than prototypical accuracy.  Once that realization is embraced, you can direct your efforts in that direction.  Since the overall casting detail is generally excellent, the use of dark washes will “pop” that positive attribute out.  Off the shelf, all rolling stock of any scale, has very vivid lettering.  For WW2 era that is usually white.  This brilliant white needs to be toned down but very subtly.  The cars above were first given a thin wash of burnt umber and black artist oils.  When that dried, I used an airbrush to fog on an ultra thin mix of Dullcote dulled with a drop or two of Model Master Army Helo Drab.  Dark brown and black chalk was then rubbed along the outside bracing. Surprisingly, with this color treatment the cast on details are less objectionable than cars that come with oversize stand off details.  In summary, apply a thin brush wash of dark artist oils followed by an airbrush hazing of US Helo Drab to knock down the brilliance of the white.

Moving on to ride height….stock wheels and couplers are immediately stripped of and consigned to the trash.  BLMA makes an exceptional N scale truck comprised of thin, small flange, metal wheels.  What’s particularly interesting is the bolster has an ingenious downward offset that lowers the car’s ride height.  Atlas has picked up the ball and integrated this product into their production line (I generally use BLMA #9045).  Putting these wheels in place and body mounting the couplers generally puts everything (car and couplers) where it needs to be vertically.

The final issue is the couplers.  Gosh, you HO scalers have it so nice.  This is a “down the road” issue I’ll need to experiment with and sort out in the weeks ahead.   For now I’m using body mounted Z scale couplers simply to have something there that isn’t so huge.  However, the Z scale couplers don’t really have a prototypical appearance and give cars in motion that maddening yo-yo/slinky effect.  I may be able to mitigate that a little by adding friction to the wheel bearings.    The new Micro Trains scale couplers look nice, don’t yo-yo, but have a massive coupler pocket that creates clearance problems in their own right.  If I can come up with some form of modified pocket that may be the best bet.  Stay tuned…..