When he was up here last weekend, Tolga Erbora filmed what was probably the best video ever produced of my Downtown Spur layout. It’s amazing to me that he filmed this…while operating..with a cell phone. Throttle in one hand, phone in the other. Great job my friend! I have to say I’m very happy with the sound of the offboard sound system you hear in the back ground. Click HERE to watch it.
Model Railroad Blog
Quick Start: PhotoShop Elements
I have to say I’m impressed. I thought I’d have everybody running for the hills after my last photography post. A crucial step in getting better photos is becoming comfortable with photo editors. As a review, my suggestion was to steer clear of the expensive, highly advanced programs as they will just overwhelm you with stuff you won’t ever use. Even with Elements you won’t use most of the tools on your screen.
Some bullet points on the subject:
-The biggest step is just getting the program on your machine. Buy a disk on ebay or Amazon and get it on your computer!
-The fastest way to learn is by loading a photo and just “pushing buttons” . Click the tools, move the sliders and you’ll quickly see the results. That will be quicker than reading manuals or watching tutorials.
-To avoid “not seeing the forest for the trees”, there are just a few tools you use over and over, cropping, adjusting brightness, and adjusting color. Their buttons look the same as anything else so I’m going to list them here so you can see them through the fog:
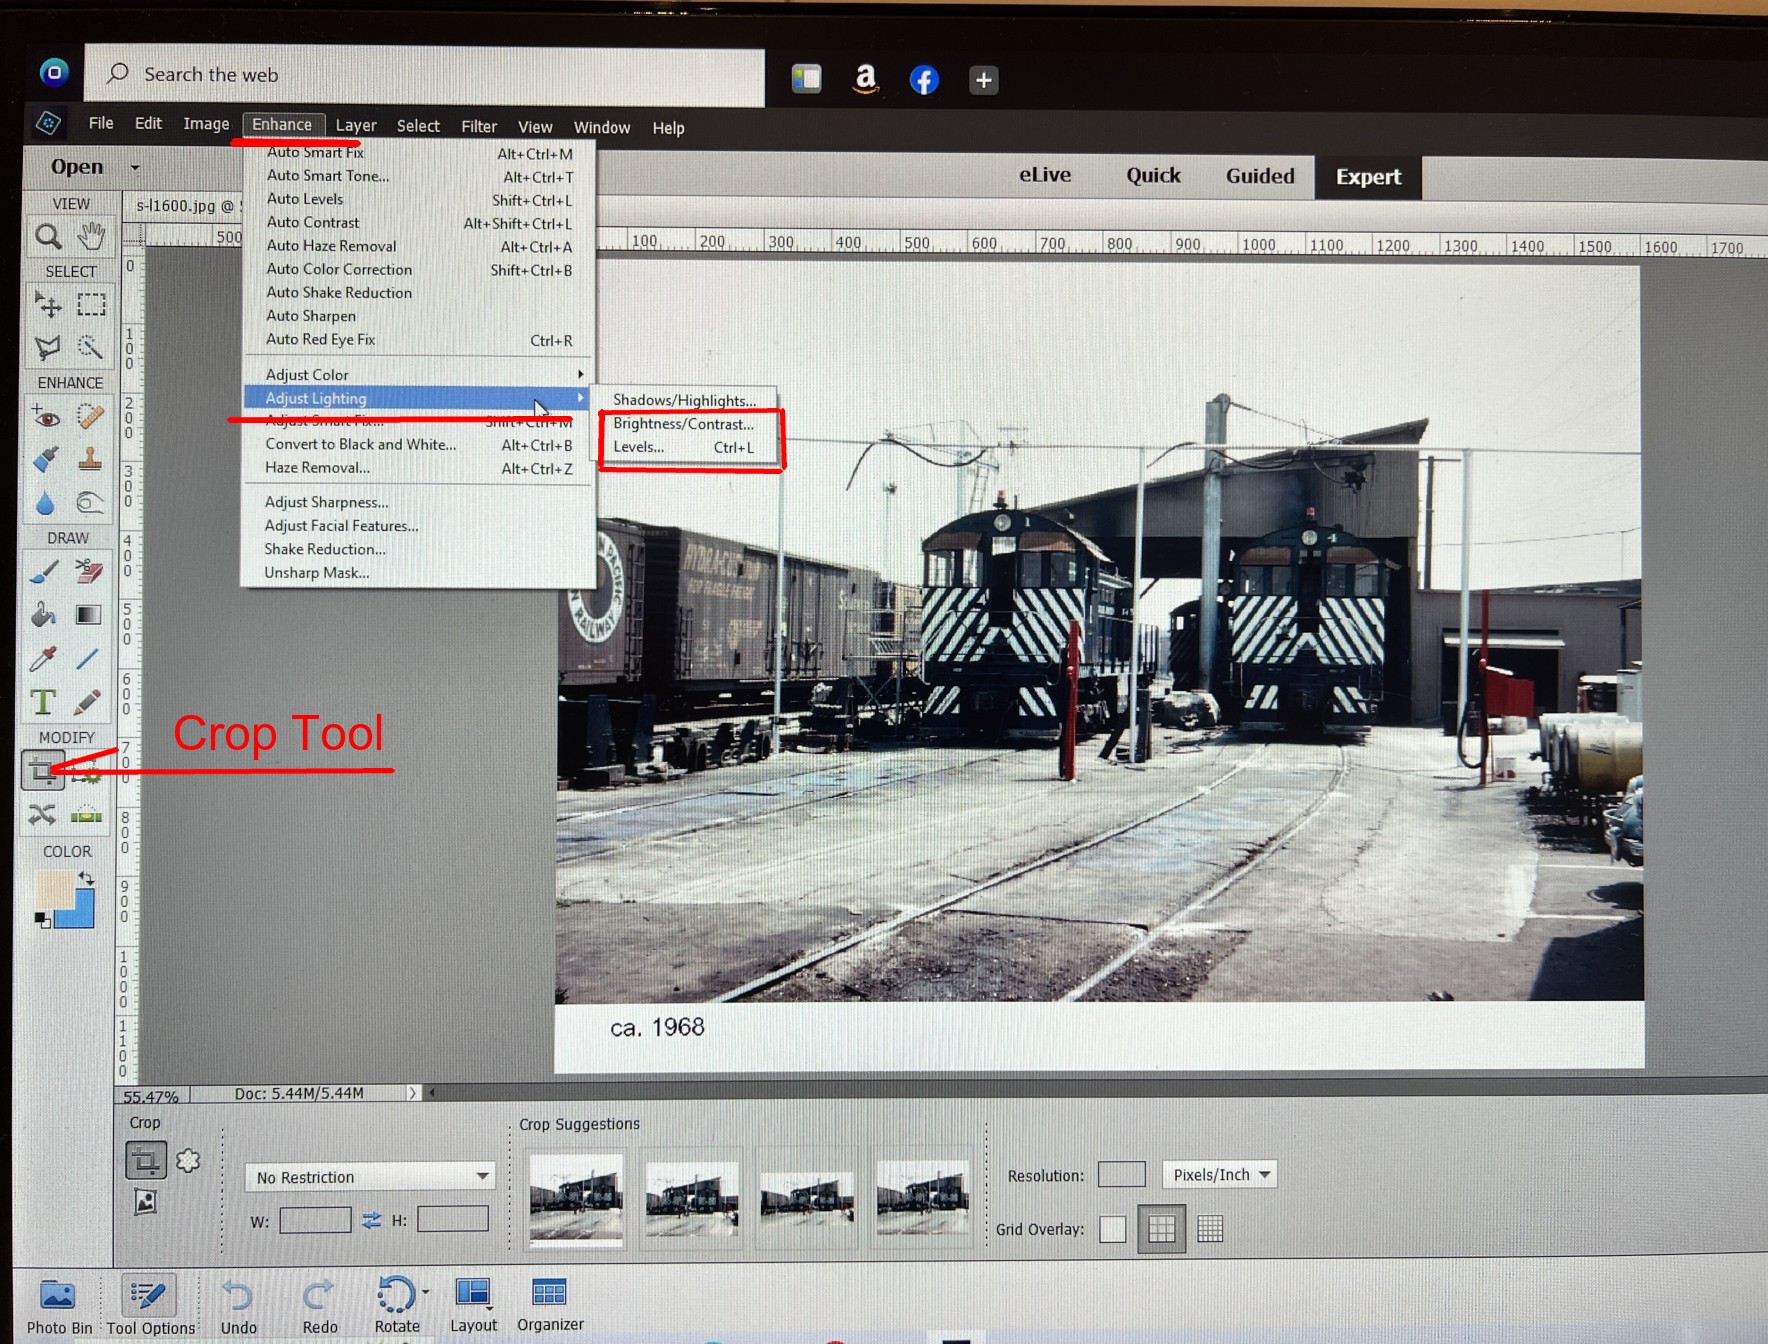
The most used tool is cropping. Click the icon shown, drag the borders to the area of the photo you want to keep and hit the check mark.
The second most common tool is “adjust brightness”. Go the “Enhance” and then scroll down to “adjust lighting”. Just move the brightness slider to get the results you want. The levels tool gives you more control. Just move the triangles to the edge of the histogram to see improvement. Move them around a bit to see how the impact. Experiment with the middle slider.

The next most used tool deals with color. It’s common to end up with a photo that has an odd hue, usually yellow or orange. This is easily fixed. Go to “Enhance” and “adjust color” Click “remove color cast” Use the eyedropper to click on area of the photo that is known to be white, a sign or rolling stock lettering for example. The color will instantly fix. If you want to add a little “pop” you can move the “saturation” slider a little but don’t overdo it.
Once you have those basics down, you can gradually fiddle around and become more comfortable with the other tools over time.
If I get the sense that people are actually taking the steps to move forward with this, actually getting the program, I’ll add a few more tutorials.
How A Photo Is Made
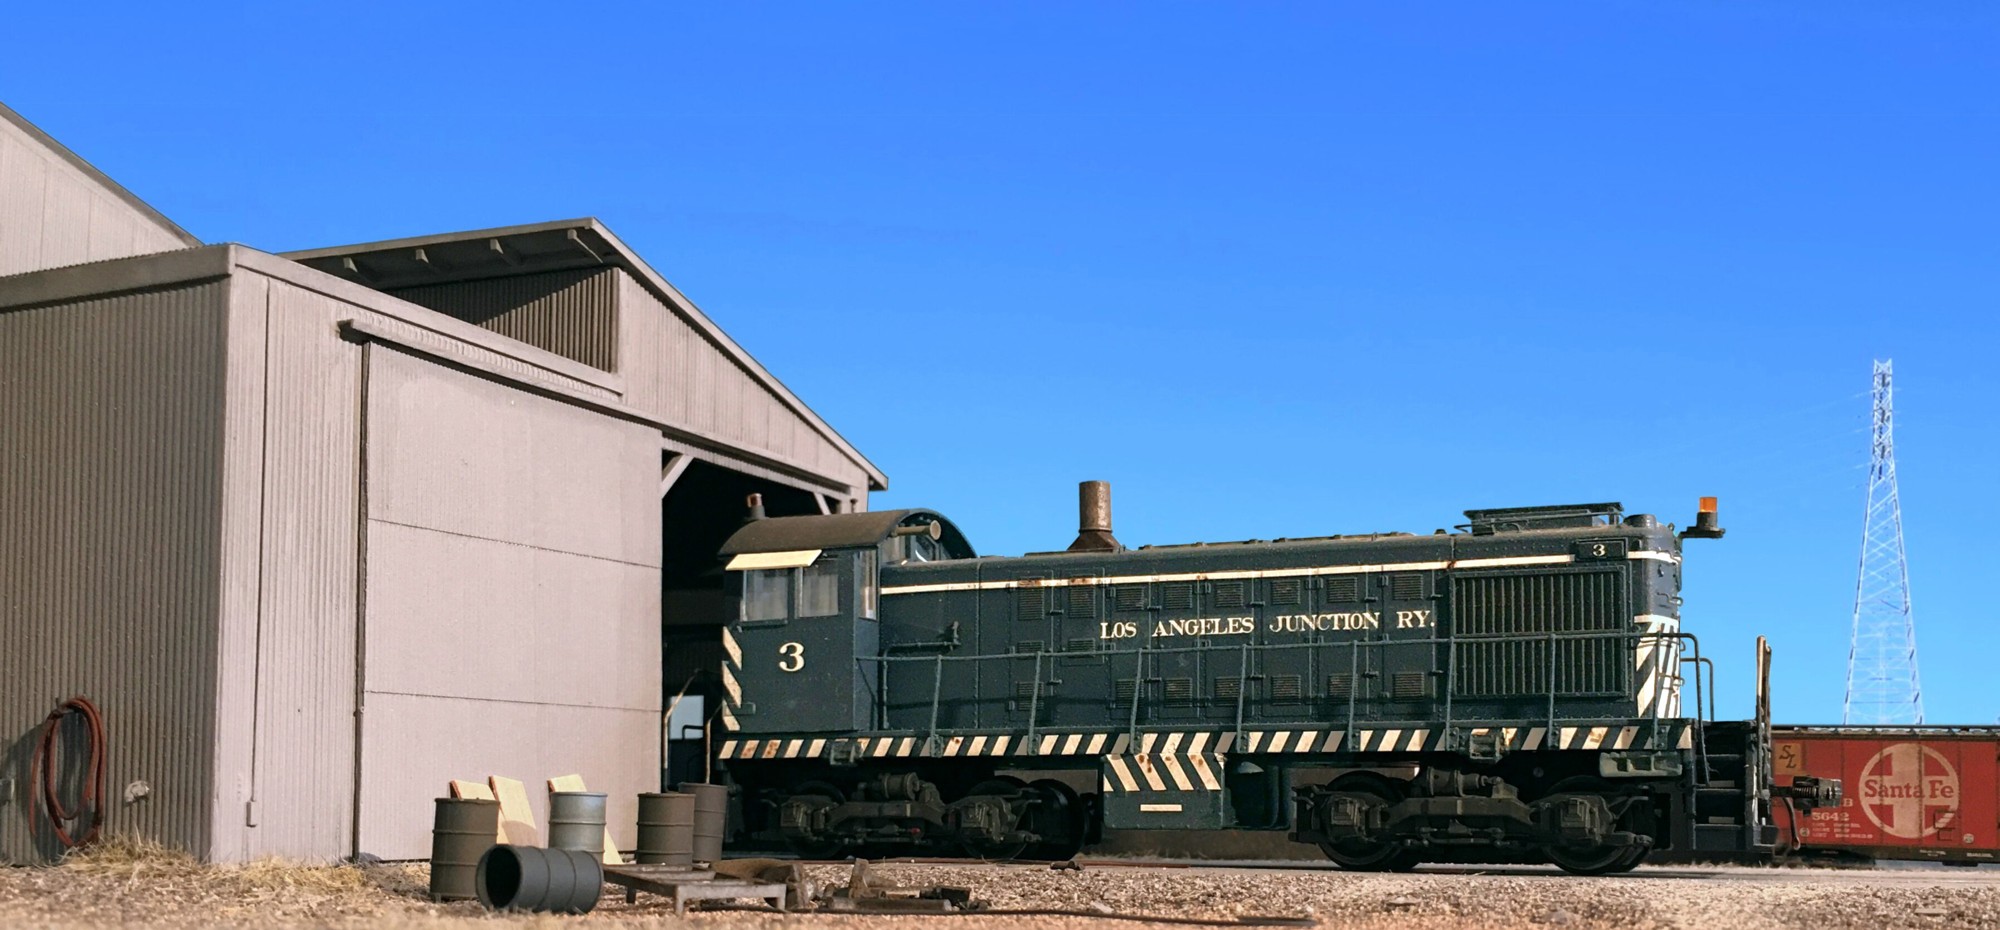
LAJ Alco S2 #3 sits in front of the engine house on this diorama I recently completed for photography.
Working off and on, here and there, over the past few months, I’ve been working on a photo diorama for my LAJ theme. Shown above is the final result. Let’s take a look at how it came together. (I can see it now, the old farts (of which I am one), have hit the escape button…and…are…outa here!) The adage, “you can’t teach an old dog new tricks, came together for a reason!” No shame, go do your thing, I’m not much better!
This is for the young folks age 12 to 40, for which there is still hope for learning a new skill. I hear from many of you throughout the month and am impressed by your efforts to master advanced skills such as scratch building, hand laying track, weathering, etc. You’ll only get better the more you stick with it and these skills will serve you a lifetime. As part of that skills development process, it’s to your benefit to learn how to take a photo of a model. Photographing miniatures is a different skill because of depth of field issues, lighting issues, and the need for background removal. Holding a cell phone at helicopter height and grabbing a quick snapshot under crappy light is not model photography!
You will need a single lens cell phone. One photo flood bulb (ten bucks), and Adobe Photoshop Elements (photo editor) on your computer (twenty bucks. just make sure you’re buying the disk, not a manual, and make sure it will be the right PC or Mac match for your specific machine.) Getting a really expensive, professional photo editor, is not only totally unnecessary, doing so will mire you in complexity. Don’t do it. It won’t give you better results. The analogy is a paint brush. Buying an expensive one won’t make you a better painter.
With your equipment in hand, the steps are: compose your scene, mount your camera at track level NOT helicopter level, light your scene. Take the photos. Edit them. Lighting is crucial and how you handle the shadows and avoid flash spots, will determine how well the photo turns out. Think of the process as “painting with shadows”. It may take you several rounds. The image above took me an entire afternoon to shoot and edit.
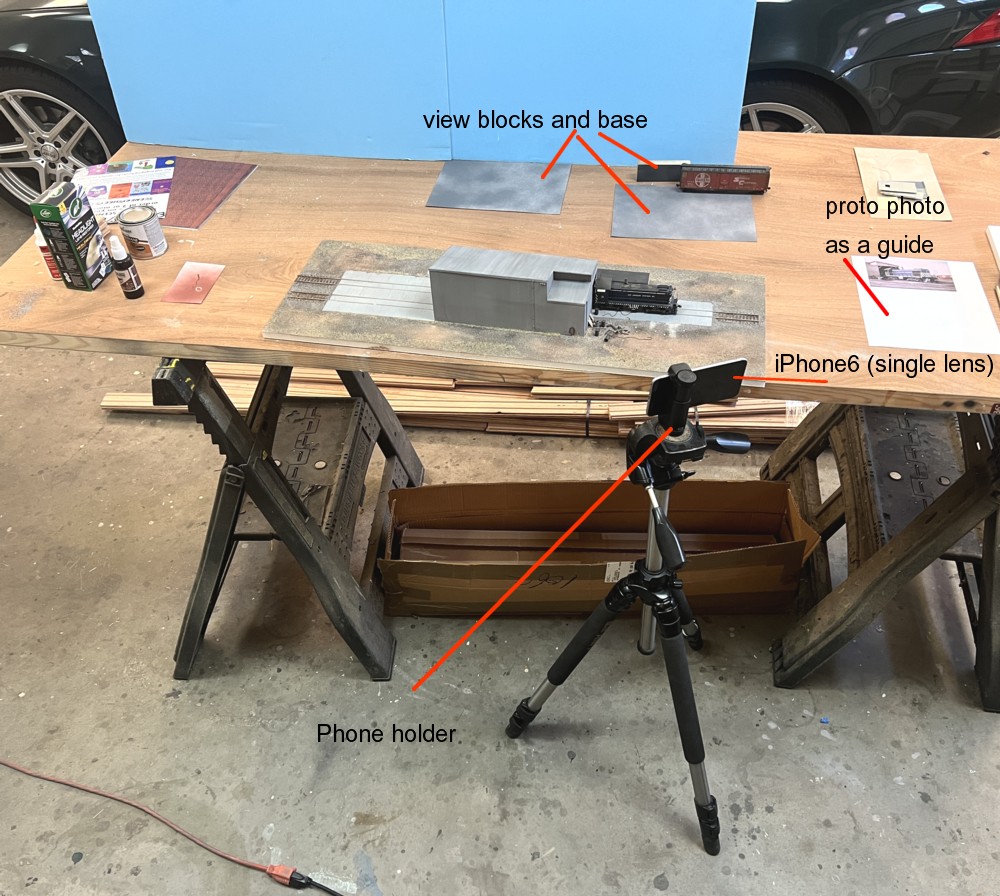
Here’s how the scene was set up. Working off of a prototype photo is a tremendous help as far as composing something that is plausible, so print one out and keep it next to you.
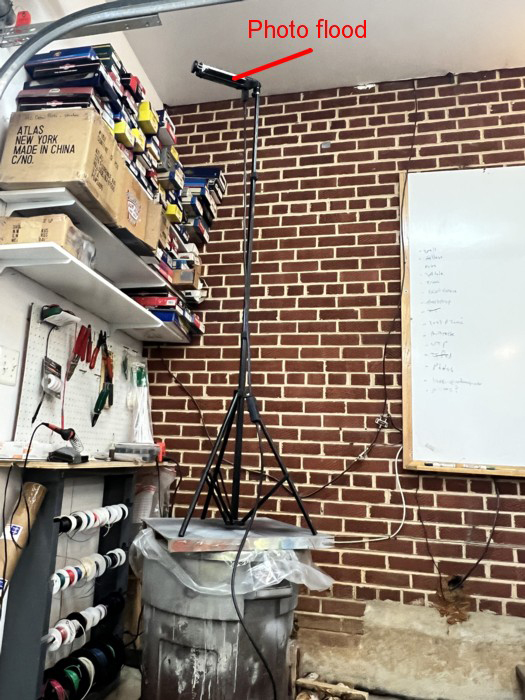
It took me four attempts to get the lighting down. In the end, what worked was putting the light really high, to my right, and about eight feet back. The light is pointed up at the ceiling not at the diorama. Every situation is different. “Usually” having the light four or five feet behind you, slightly elevated (say four of five feet), and pointed into the scene works best.

Getting full depth of field is the real challenge of model photography. (Depth of field means how much of the image is in focus. For us, we need ALL of it to be). I generally take four or five photos at different focal lengths, and them run them through a program called Helicon Focus (25 bucks. very easy to use) which creates a composite with (hopefully) full depth of field. This is called photo stacking. For this photo shoot, that wasn’t necessary. I got lucky and one of the shots had everything in focus except the Santa Fe boxcar (right photo). Keeping the camera in the EXACT same position I took a second photo with the boxcar in focus. I then did a copy/paste of the ‘in focus’ boxcar into the base photo.
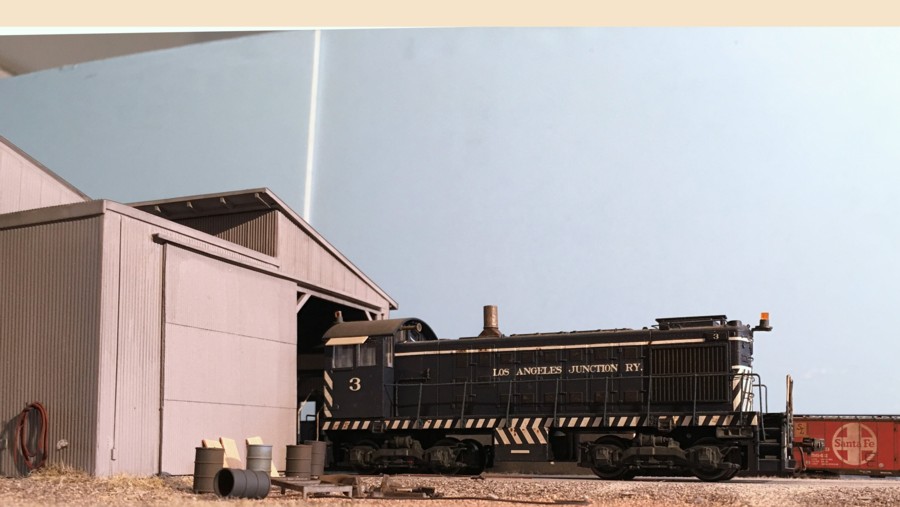
This is what the image looks like after pasting the boxcar into the image and cropping away the bottom portion of the photo. At this point, I know through experience that what I have here will work for the final image once I clean it up. Making progress but much work remains. The next step is to work on it with the photo editor. While the editing process is beyond the scope of this blog, it was fairly simple. I color corrected the tone, lightened the side of the locomotive, and used the clone tool to clean up some defects.
The next step is where the image will come to life. We’re going to select and delete the background and copy/paste the core of the photo onto a photo of an actual sky. A signature element of the LAJ skyline are the power lines. I took some sky/power line photos in the previous month in preparation for the photo shoot. You want both the sky and base image to be about the same size. Once you have the model scene copied onto the sky, slide the sky up and down so that the slightly lighter blue as at the horizon (as opposed to the darker blue). Notice also that I intentionally picked a photo with no clouds. You want the model to be the focal point, not a dramatic sky. All done. Hey, that only took five hours. Not so bad right? The results are worth it. You’ve now brought your hard work to life and have something you can look at and enjoy for many years.

Here’s a partial parts list. The hoses were made from ultra small, solid but insulated, hook up wire (super tiny). I used Northeastern Scale Lumbers 1/64″ plywood for the plywood leaning against the wall. The LAJ Alcos had an extended shack which I got via Shapeways.
My 2 Biggest Rail Fan Mistakes
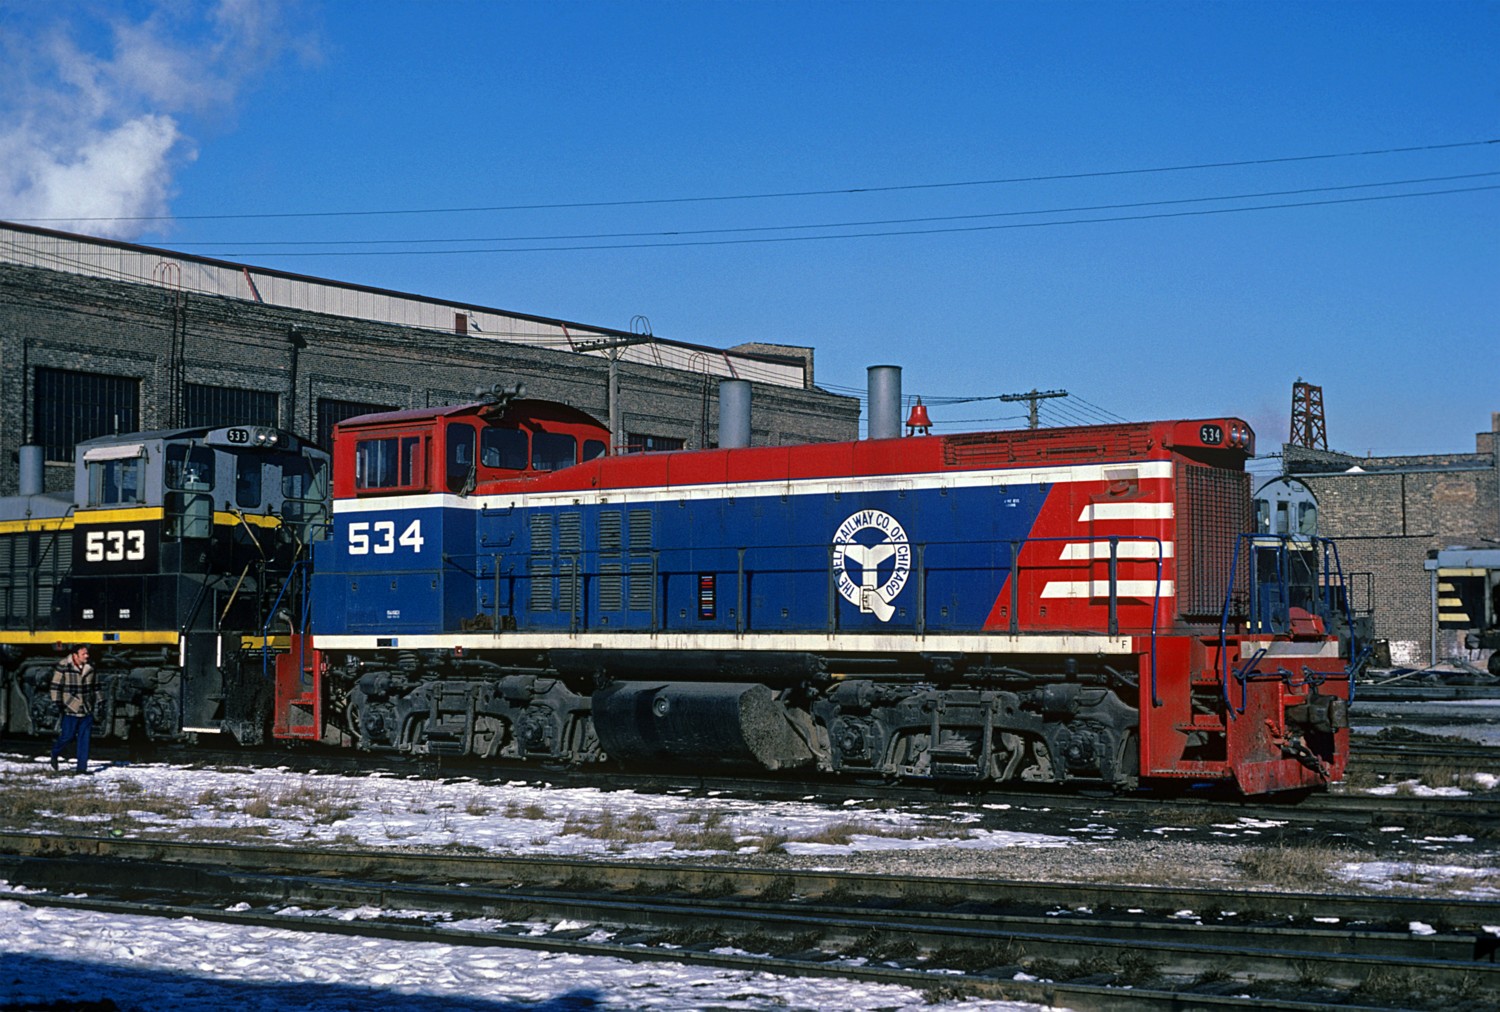
Gotta love that Kodachrome! I shot this in Chicago in the late 1970’s. Back then we didn’t have the luxury of taking mass photos. It was all film. I had no money. Every shot mattered. We had to “bracket” one over and one under on every shot to make sure we got it.
For the up and coming, rail fans out there….my two biggest rail fan regrets are:
2. Not taking shots of run-of-the mill lineside structures…subjects such as sheds, depots, ratty industries. Related to that was assuming these buildings would always be there and I could photograph them another day. Then you arrive on that “another day” and the wrecking ball has had the last say. They’re gone forever.
1. Only taking 3/4 view “glamour” shots. I should have taken a lot more 90 degree views of rolling stock and especially structures. I should have worked harder to shoot all four sides of subjects. The world has enough 3/4 views of trains but consider how often we search for hours looking for the shots that convey information not artistic intent.
I’ve learned my lesson but I can never go back in time. For the teens and twenty somethings out there, learn from mistakes.
A Lesson In Working With Vintage Photos
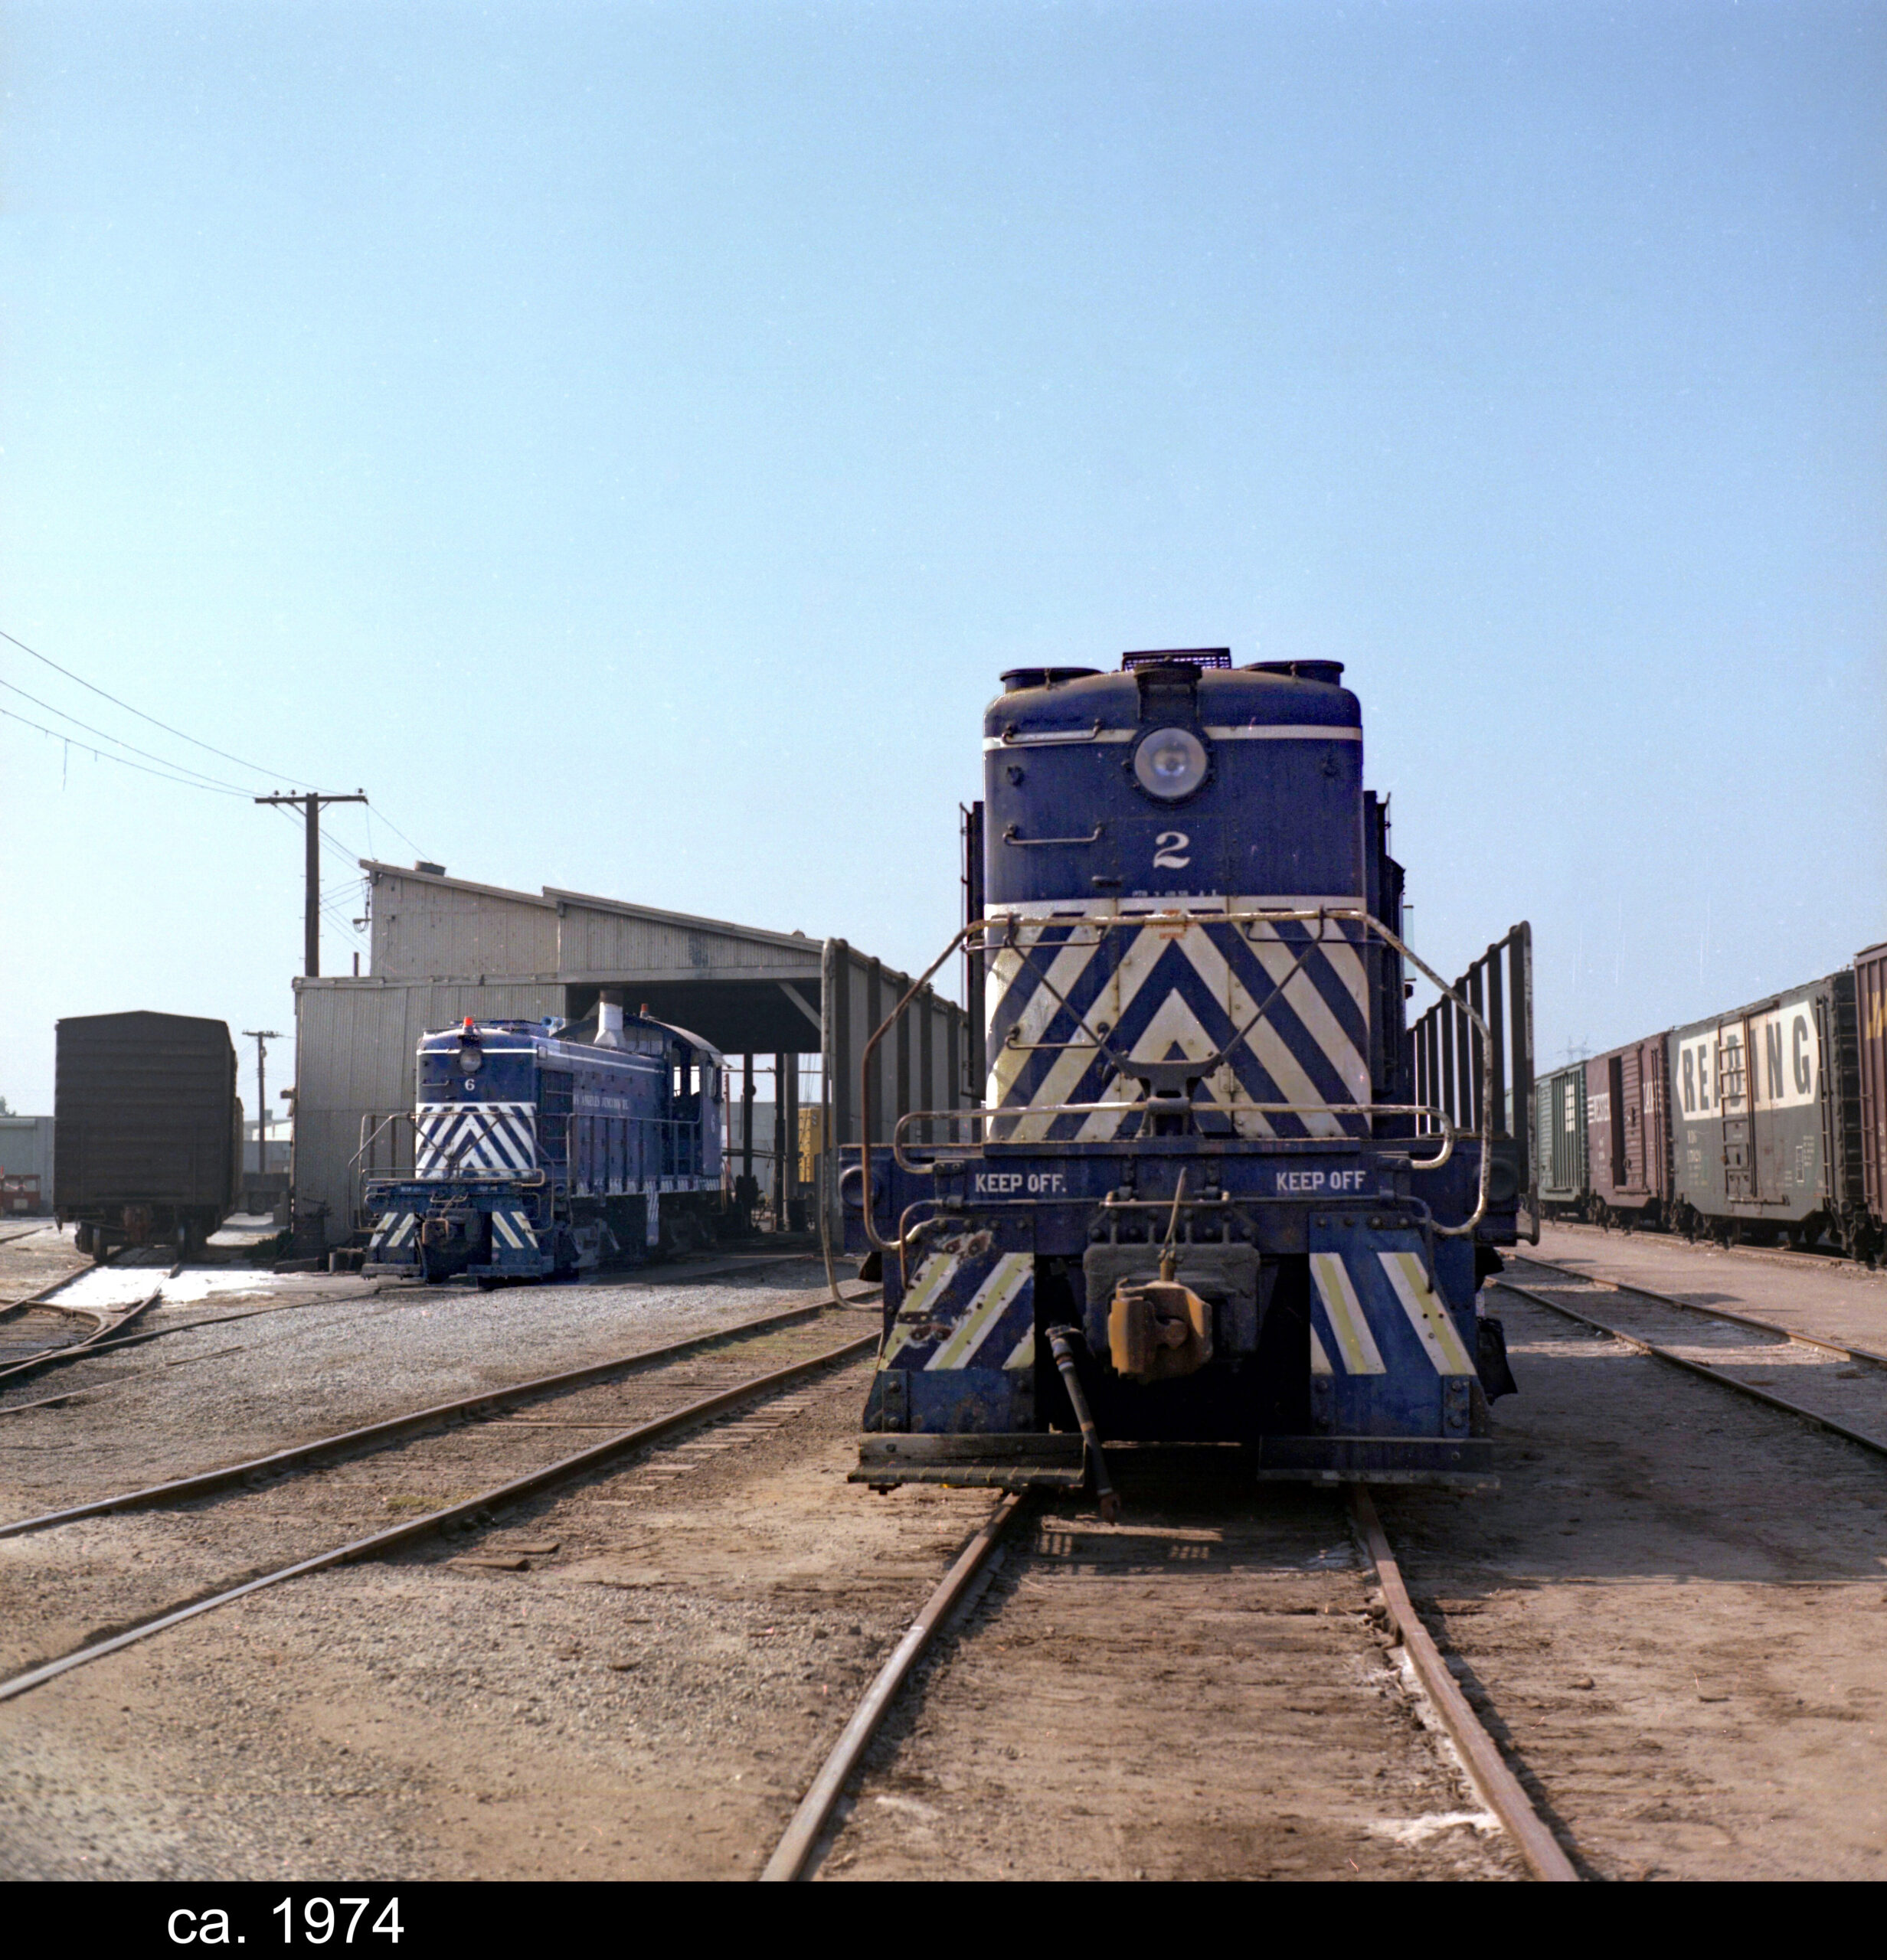
The vintage LAJ photo above is a real gem although it become more of a “project” than I thought going in. What makes it unique is it’s the only image I’m aware of that shows the northerly side of the engine house. I’ve always liked it so when it appeared on ebay I immediately snagged it. As a spoiler alert I’m not the greatest at reading directions. The package arrives promptly and I rip it open. What…the…heck is this? I’d never seen such a thing. Some digging revealed that it wasn’t the color slide I expected but rather what is called an “120mm color print negative”. I’d never heard of such a thing. Of course all of this was very clearly laid out in the ebay post. What now? What I’m going to do with it? I called Dominion Camera. “No problem, just bring it by”. I have to say they did an amazing job with the scan. Neat and tidy on a CD.
The second issue, and I knew this going in, was the image was backlit, a little washed out, and oddly colored. An afternoon on the net reading up on image restoration with a photo editor and, voila, major improvement. I was surprised how much I was able to clean it up. A lot of this is trial and error but the suggestions to color correct, employ the haze removal tool, fiddle with contrast and shadows all worked.
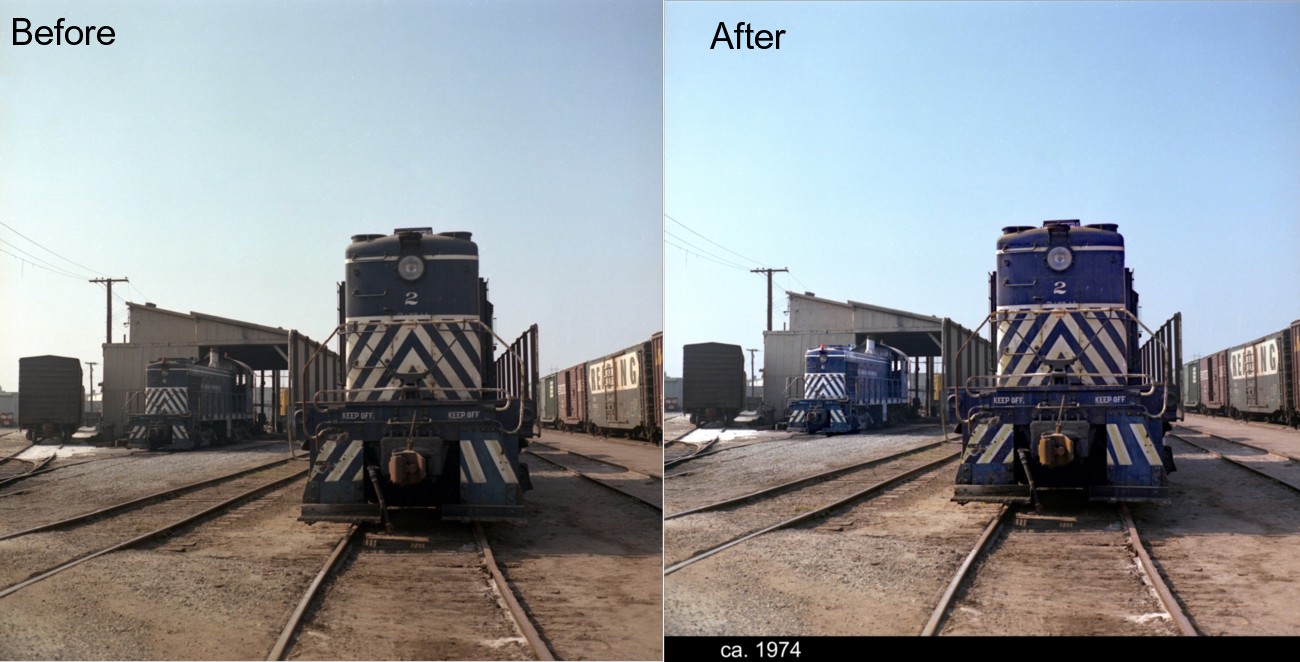
Here’s the before and after.
Finally, to the ruthless savage that crushed my soul and outbid me at the last millisecond, for the other image I wanted…..well….. respect given. It’s a cruel world out there!