How to Use Your Layout and Use it Often
How do we ‘play’ with our layouts? It’s an important question because it ultimately determines how much we enjoy our railroad or whether we enjoy it all. Fewer people than you’d expect can answer the question accurately. The result is layouts that sit idle, never serving their intended purpose of providing recreation and relaxation. In many cases layouts are never built because the modeler doesn’t feel he has the space for something that will be satisfying. In other situations layouts are so overbuilt in an attempt to ensure satisfaction that they suffer from overly dense scene composition, a toy like appearance, and un-necessary cost. How we plan to use and interact with our layout should be the first question we ask, and answer, when designing a layout. My guess is it is rarely asked or answered. If we don’t know how we plan to operate our model railroad, or how long our typical operating session will be, how can come up with a design that satisfies us?
It’s an important issue. If we can teach modelers how to interact with their layouts in a manner that is both fulfilling and easily attainable, the end result will be a more vital hobby as they learn to extract more satisfaction from them. This evolves into becoming more passionate about the hobby as a whole. It can also entice those outside of the hobby, or on the fringes, to jump in. Frankly, as things stand now there aren’t many compelling arguments being communicated to entice people to dive into model railroading or delve in deeper than they are now. It’s an issue of communication and marketing the hobby.
The key is to get people operating their layouts more frequently and in a way they find extremely interesting. I’m talking about frequent sessions that are easy to set up and can be run on a moment’s notice, 15 to 45 minutes at a time, and doing so three, four, five times a week. Such mini sessions are a wind down after work, after the kids are in bed, whenever you need to relax type of thing. Most people can find that amount of time several times a week. The more frequently we operate, the more we stoke our interest level and the better the layout runs. Operating this frequently (even if it’s only ten minutes) transforms the modeler from an observer of the hobby to an active participant. (Side note. Kids are much more interested in operations than model building. You’d be surprised to find how many of your kids and their friends would be interested in occasionally participating in these mini sessions from time to time).
When it comes to operating session length somewhere the notion crept into our culture that the sessions had to be several hours long and involve multiple operators. Not so. In theory it would be nice to have this capability on occasion. In the real world, however, even if our layouts could provide sessions this long, the reality is that most folks would only run such full blown sessions once or twice a year, if that. Sub-consciously modelers tell themselves that if they can’t do the full three hour session then they just won’t run until they can. It never happens. Layouts sit idle and the owner begins to wonder why he built the darn thing in the first place.
There is a direct relationship between the desired length of our operating sessions and layout design. If we don’t feel the design will provide enough operational interest or a long enough session, we compensate by adding more turnouts…..and more…..and more. Generally the problem isn’t a lack of opportunity for operational interest but rather a lack of information. As we learn more about how the prototype does it, additional tasks and interest are added. The more we know, the more tasks we have to model, the longer and more interesting the session becomes. By default, the longer it takes to switch a given industry, the fewer industries and less track we need in our designs. This means smaller and simpler layouts are needed to entertain us and it opens up the door to a broader spectrum of people that can enter and actively engage in the hobby.
To be clear I’m strongly against artificially induced complexity to make a task longer. Such an approach is totally counter to the way a real railroad is run. Artificial complexity equates to frustration., not enjoyment. Rather, I’m suggesting that we avail ourselves of the knowledge of how a crew actually goes about their work, modify it as necessary for model railroad use, and copy the work in our sessions. Railroading is hard and often tedious work. Each individual has to make their own decision as to where to draw the line in terms of what adds to the experience and what detracts. One person may want to simulate the full ten minutes it takes for a brake test, another may represent it with a several minute pause.
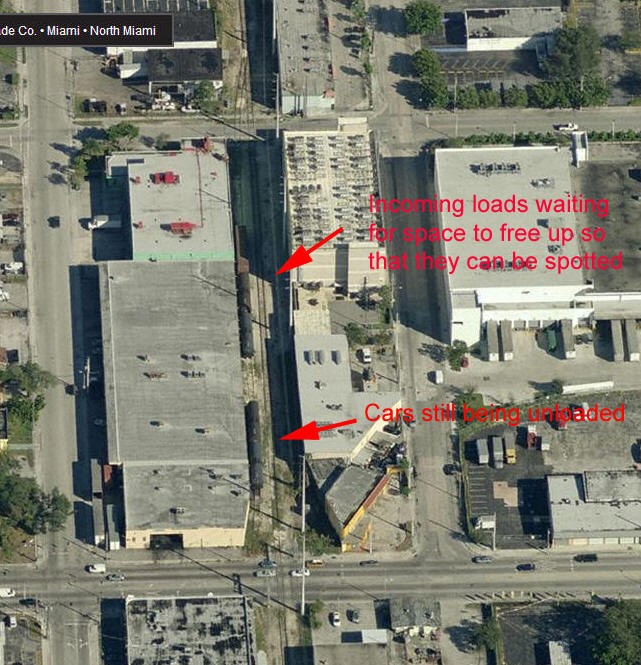
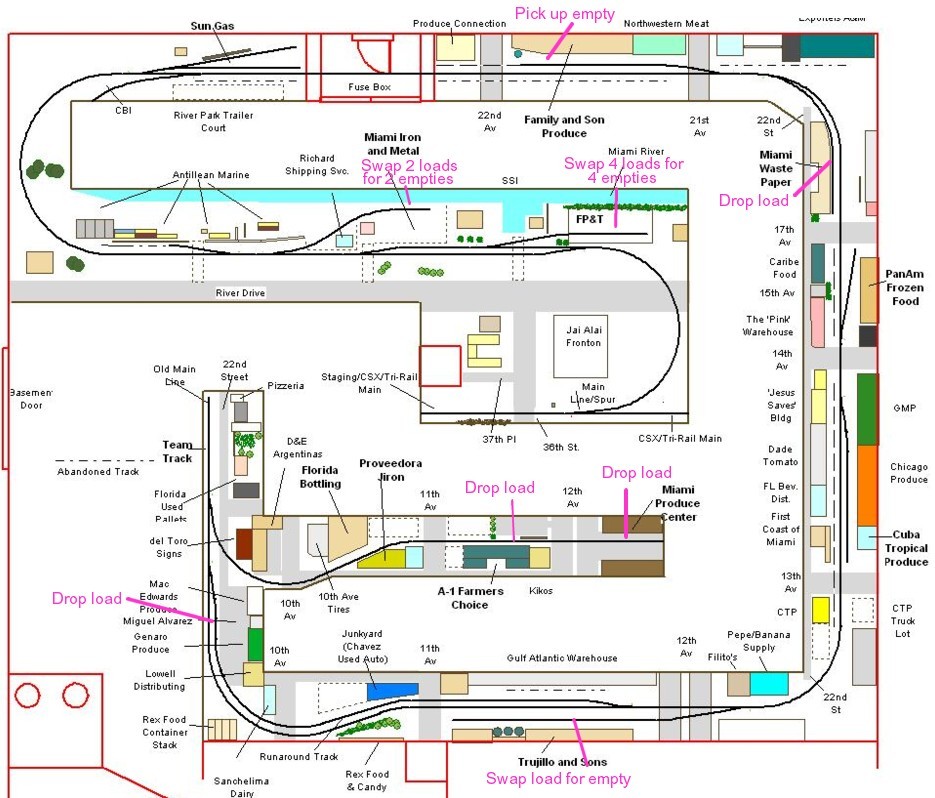
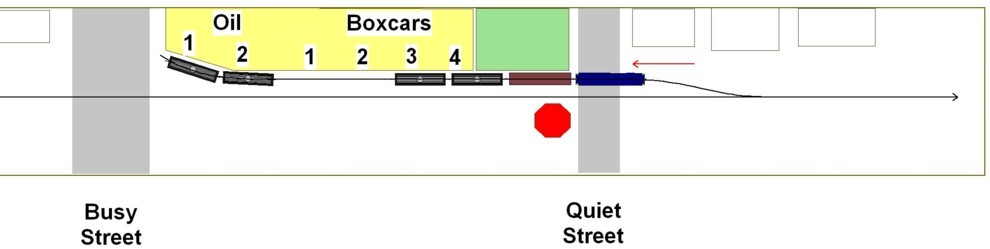
Pictured above is a rail served food producer typical of those found throughout the U.S. Track consists of a simple, single turnout. A bit of a wrinkle is thrown in by virtue of being hemmed in by two city streets, one of which has very high traffic volume. Rail traffic consists of incoming loads only, oil in tank cars (vegetable or olive oil) and boxcars probably containing rice. The oil tanks need to be placed adjacent to the unloading hoses and receiving tanks. The boxcars are spotted by freight doors. Looking at the picture above it appears the following happened: an incoming train arrived with two loads of oil and a boxcar. It couldn’t spot the incoming cars because two oil tanks were still being unloaded at the receiving tanks so there was no room or the incoming cars. It would make no sense to take the incoming cars back to the yard so they were temporarily parked nearby (called ‘off spot’) until the two oil tankers were unloaded and could be pulled to create room. This situation makes for a simple and relaxing ops. ‘mini session’. Here’s how it might unfold. In other words, here is an example of how you can occupy yourself for a full thirty minutes on a moment’s notice with very little track or equipment. The moves and tasks are simple, it’s just that there are a lot of them. Follow along.
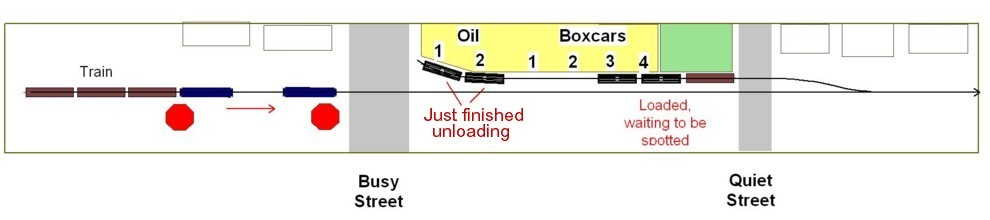
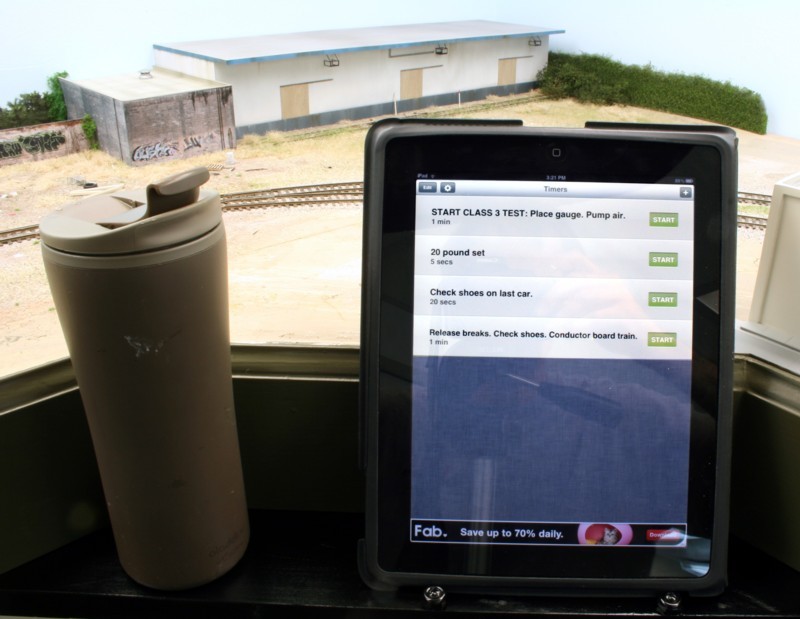
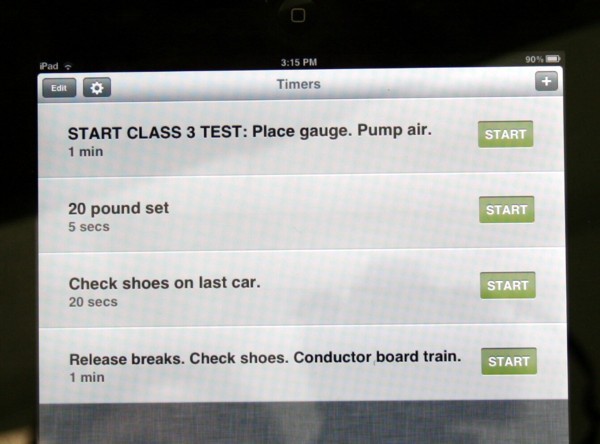
Step 1: You’ve just arrived at the industry. Your task is to pull the two oil tanks that just finished unloading and put them in your train. In addition you need to take the three ‘off spot’ cars that were left earlier for placement and move them into position at the oil tank unloading hoses and appropriate freight car door. Pull your train up towards the busy street, stopping four or five car lengths shy of the crossing. You’ll be cutting the engine off of the train and rules dictate you need to secure what will now be the engineless train left on the main. The conductor will dismount, walk to the train and secure the handbrakes on two or three of the cars. I model this hand brake operation with props (previous blog) but you could represent it with a pause. With the hand brakes secured the conductor gets on board the locomotive. Even with crossing gate protection it’s common practice to stop the loco prior to the street and then lay on the horn before crossing. The point is you want to get out of the typical model railroad habit of screeching to a halt, uncoupling and then blasting onwards in the span of a few seconds.
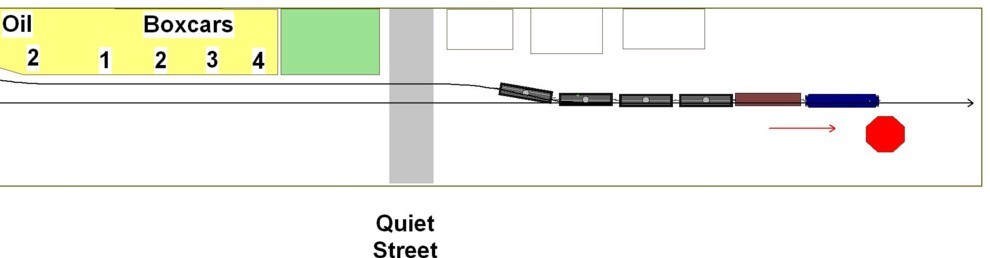
Step 2: The next task is to pull up to the industry switch and drop the conductor off at the switch. Once the conductor is on the ground the engine pulls forward to clear the switch. At this point the conductor needs to unlock the switch (a task which can be modeled as per a previous blog) and throw it. Rules dictate that after the switch is thrown the conductor must perform a visual to make sure the points did move across, a good idea on model railroads as well.
Step 3: Back the engine up to the three off spot cars with the conductor calling out car length distance. Once coupled, the hand brakes must be released before you can move them.

Step 4: Back down to couple onto the two empty oil tank cars. The hand brakes on the oil tankers must be released. Have the oil tank unloading hoses been un-hooked? Also, the ‘three step’ procedure must be employed while the conductor is between the cars lacing up the brake line air hoses. Last week a professional railroader contacted me and stated that since these cars had been ‘sitting’ an air test would have to be performed prior to pulling them. The test consists of pumping up the air line, applying a 20lb release, and making sure the brakes applied. Assuming they did, the brakes would be released. Even on a model railroad you should allow a few minutes for this. Take a break and refill your drink and make sure the kids are doing their homework.
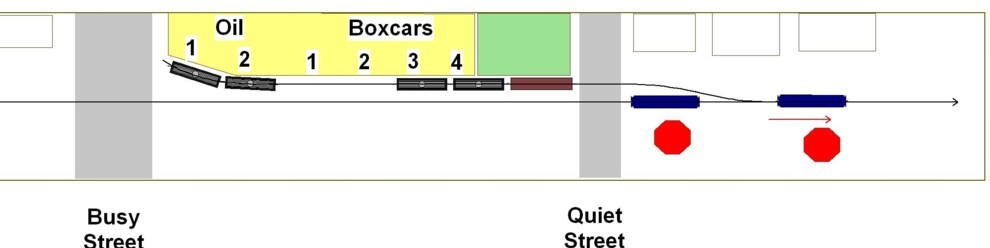
Step 5: Now, we need to get those two empty tankers back to the train. Pull forward to clear the switch. The conductor will throw the switch and then get on board the locomotive. Allow time for him to perform the logical walking path. He can’t fly!

Step 6: Back the entire cut back to your train. As you get close to the cut the conductor will need to dismount and call out car length distances until the couple is made.

Step 7: Let’s put those three off spot cars in their final position. Pull forward and repeat the steps of dropping off the conductor so he can throw the switch.

Step 8: The conductor will need to walk back to the position where the cars will be spotted so that he can radio distances to the engineer. Note that his move may be being done at night. Back the cut down to the oil unloading hoses. The conductor calls for three step protection before reaching between the cars. He’ll secure the hand brakes on the tankers and prepare to uncouple.

Step 9: The conductor will walk up to the door where the boxcar will be spotted and call out distance. Once in place it’s three step again and setting the hand brake on the boxcar.

Step 10: Pull forward to clear the switch. Throw the switch, lock it, and mount the locomotive.

Step 11: Back the locomotive back towards the train. The conductor will dismount beforehand and call out distance to the couple. Three step and hook up the hoses. Remember that you tied hand brakes on the train so those need to be released. Even though we did a brief air test previously, we now have a ‘new’ train with ‘new’ cars in it. Perform another air test.

All done, off you go to the next industry. That should have taken you at least thirty minutes. The entire session should be performed at an efficient but measured pace with loco. speeds between four and ten miles per hour. Try to avoid the habit of having your crew on one end of the layout and flipping your turnout toggles a scale 1000 feet from where the crew would be. If you don’t get the entire move done before you need to stop the session just kill the layout power walk away. There is nothing that says you have to finish it. Car spotting scenarios such as this are quick to set up and easy to run several times per week. Getting in the habit of this will keep the rails shiny and you engaged in the hobby.
Addendum
After reading the “Playing With Trains” blog, professional railroader Barry S. contacted me with the following edits. This is coming from a guy that does this for a living.
Barry writes:
- Second diagram, the conductor has just cut the engine off from the train and the light engine pulls ahead to the industry turnout. Having just cut off from the train, the conductor would most likely be on the rear of the engine so the engineer could pull the engine past the industry turnout before stopping to let the conductor off to throw the switch. Why stop before clearing the switch? If the engineer needed the conductor to assist in getting the engine across the busy street the conductor would have walked ahead of the engine when it stopped before crossing the busy street, flagged the crossing, then mounted the rear of the engine after it had crossed the street.Flagging busy street crossings is one of the most dangerous activities the conductor must perform. Putting ones body out on the pavement, even with reflective vests, flags, lanterns, and even fusees, especially at night, is dangerous as you never know what motorists are going to do!2. Fifth diagram. “Now, we need to get those two empty tankers back to the train. Pull forward to clear the switch. The conductor will throw the switch and then get on board the REAR TANK CAR”. On reverse moves, the point of the train (the leading part) must be protected. Also, you may not want to back all the way to the train standing on the main track because you will have to first cross the busy street, and two, in your diagram you will have the busy street blocked until the conductor can walk ahead and cut off the engine and three cars. It might be better to leave the two pulled tankers between the quiet street and the busy street while you go spot the three remaining cars. Don’t forget to set a hand brake on one of them. The conductor will ride the rear of the train and let the engineer know when they clear the switch. After spotting the three cars, you return to the main with the engine, back down and couple to the two tank cars, release the hand brake, the conductor rides the point (the rear tank car) as you back up across the busy street (if he can’t find a break in the traffic he will have to flag the crossing), couple into the train, and the busy street is not blocked while the conductor releases hand brakes and does a set and release, walks to the front of the train, and with both engineer and conductor on the engine, horn blowing and bell ringing, crosses the busy street on your way to the next industry to be switched (or make sure the kids are in bed).PS Some railroads allow the conductor to mount and dismount moving equipment, others require the train to stop before mounting or dismounting cars or engines.