Many view me as a champion of small model railroads. I’m really not. They’re just a means to an end. What I am is a strong believer in is finding ways to get those not actively engaged in the hobby actually in the game. Small, easy to achieve, layouts are just the most practical way of doing so.
I am a steadfast believer in the increased quality of life that comes from creating something by hand. While buying ‘stuff’ may give a short term high, much like a candy bar buzz, it quickly wears off leaving you where you started. The satisfaction that comes from creating something, however, is long lasting and therapeutic. For those that don’t have layouts, you owe it to yourself to find a way to do so. Small, simple, it doesn’t matter and is probably better for a first go around.
If most people acknowledge they would find having a small layout satisfying why don’t they build one? The first issue is that they don’t know how to go about it. I’ve addressed that at length in my books.
An equally large reason is that they don’t think they have the skills and are somewhat embarrassed at the prospect of putting something up that doesn’t measure up to their self imposed standards. I’m going to address the skill issue here. No skills? No problem. You can still have a decent looking layout and if you follow along could have one by the New Year.
How could that be? We all see the ‘magic bullet’ commercials on television that promise weight loss, instant riches etc. with no expenditure of effort. We also know its so much hogwash. What makes model railroading different?Model railroading is different because we can compensate for entry level skills by careful selection of materials and color. The big three in producing a great looking model railroad are: scene composition, color selection, and material selection.
Follow along and I’ll show you how to have a surprisingly sharp looking layout in a few weekends. As I go through this I want to emphasize that, since the ultimate appearance is driven by material and color selection, it is very important that you use the exact items I discuss. No substituting! No freelancing! Use the specific colors and materials I suggest. Let’s get started. Here’s a step by step breakdown.
Design: For our basic plan let’s stick with the tried and true shelf style industrial switching layout. Operation potential is secured by selecting an industry that requires multiple car spots.
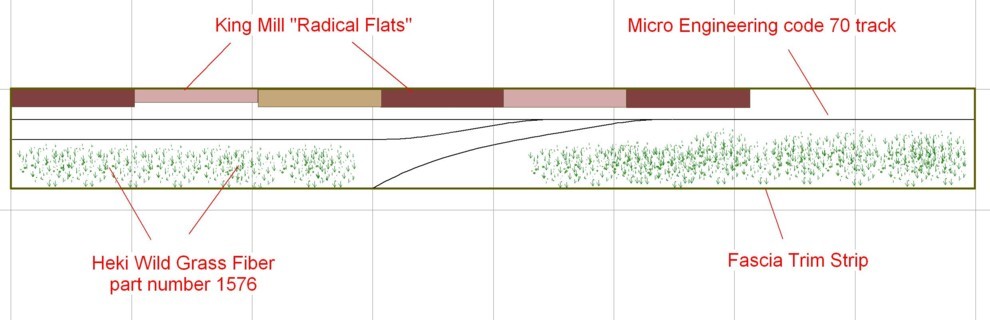
Bench work: Pick up an eight foot long by ten inch wide pine board from the hardware store. Mount this on the wall shelf style.
Front trim strip: This is extremely important and will go a long ways towards getting buy in from your spouse. Pick up some floor molding and tack it to the front of the shelf with panel board nails. Paint the front trim strip a semi-gloss dark olive. Actually, do this even if you don’t have a spouse.
Bench work surface: For this project we are going to skip any form of scenery surface. No foam base. No cork sub-roadbed. Paint the surface of the shelf your soil color. You want a very pale, muddy, light gray. If you can find it, Delta Ceramcoat “Mudstone” is a good color. I believe AC Moore has it. If not, it should be easy to find something close.
Track: Micro engineering code 70 flex track and turnouts. Not Atlas, not Walthers, Micro Engineering. Paint the track Rustoleum Brown Camouflage paint. Most hardware stores carry it. Do NOT substitute other colors! After painting, lay the track directly on the painted wood shelf surface. There is no cork sub-roadbed. Secure it with a few drops of white glue spaced six inches apart.
Soil base: For now we won’t worry about ballast or soils.
Grass: For the grass and brush pick up Heki 1576 Pasture Green Wildgrass grass fiber. Again, No substituting of products or colors! Use this exact product. Don’t even glue the grass down. Stretch it out, rip off patches and pat it loosely in place on the layout surface.
Structures: Pick up some of the Jefferson Street Radical flats from King Mill and place them along the back of the layout as your primary industry as well to serve as a backdrop.
Things to avoid: For now I suggest skipping a painted backdrop. If you feel compelled to do so, just paint an 18 inch tall pale blue band on the wall. No painted clouds, no painted trees, no painted hills. No photo murals.
All done! I think you’ll be surprised how good this looks. At his point you can finally say that you “have a layout” and a professional looking one at that. To say that it doesn’t count because it doesn’t meet some arbitrary square footage bench mark is the epitome of flawed thinking. It does count. The design also lends itself to fairly sophisticated operating sessions. After you’ve been up and running awhile you can go back and start refining the project with ballast, soil, and details. If there’s enough interest, and a few people actually take this to heart I’ll follow up with a future blog. Time to put down that iPad, get off the chat forums and hit the hardware store!
Operations

Here’s some ideas on how the layout could be operated. For lack of a better term the lead to the right that curves down to the fascia is the “main”. The term main would more likely mean the primary track through an industrial area as opposed to a class one main line for multi-unit, full blown freights. The arrangement with the main taking the diverging route through the turnout is not that common but does occur in the field. In terms of industries, keep in mind that many structures see a turnover in tenants over the years. A traditional brick structure may be a warehouse for awhile, then a plastics business, then a furniture business etc. The point being that within reason you could have the structure represent whatever industry you want. It’s very common for industries to locate their internal storage tanks inside the structure itself. This is handy for us modelers because we can simply represent the tanks with a hose out front. Examples of internal holding tanks taking rail cars include: chemicals, paint, corn syrup, and vegetable oil to name a few.
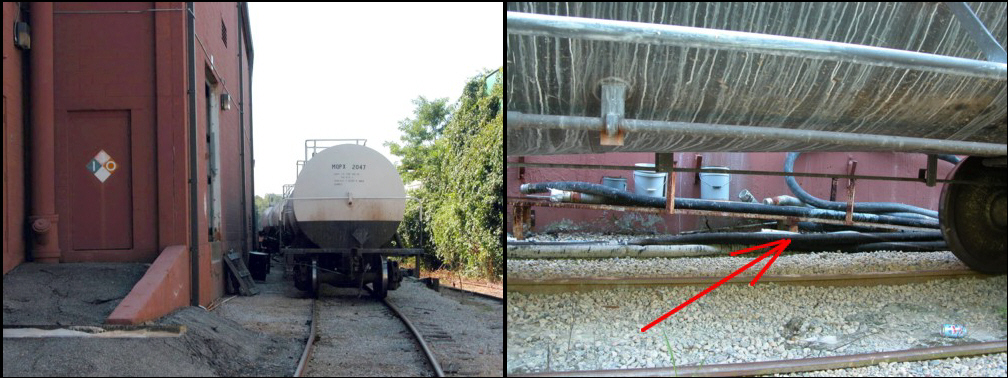
This plain Jane structure could house any number of industries. At the present the tenant is a paint manufacturer. The paint chemicals are unloaded into tanks located inside the structure. If the paint business vacated the site a totally different, rail served business could move in. Note the hoses next to the wall for unloading. Solder, painted with gray primer, is good for representing the hoses.
In the ‘No Skills’ track plan above the industry is multi-spot meaning specific cars go to specific locations (or spots). Boxcars go to one set of doors, tank cars next to the unloading hoses etc. Cars can be ‘double parked’ on the parallel track with unloading via car to car bridge ramps. Sorting and re-shuffling cars can be done on the section of the main that curves down towards the fascia. Add a gravel drive near the entrance to one of the spurs and the location can double as team track unloading.
Keep in mind though that the point of the ‘No Skills’ layout is not to be an intellectual exercise. Its sole purpose is to mobilize folks to get something, anything up on the wall. That ‘anything on the wall’ would also look pretty decent if the modeler follows the techniques and uses the materials and colors outlined in the first installment.