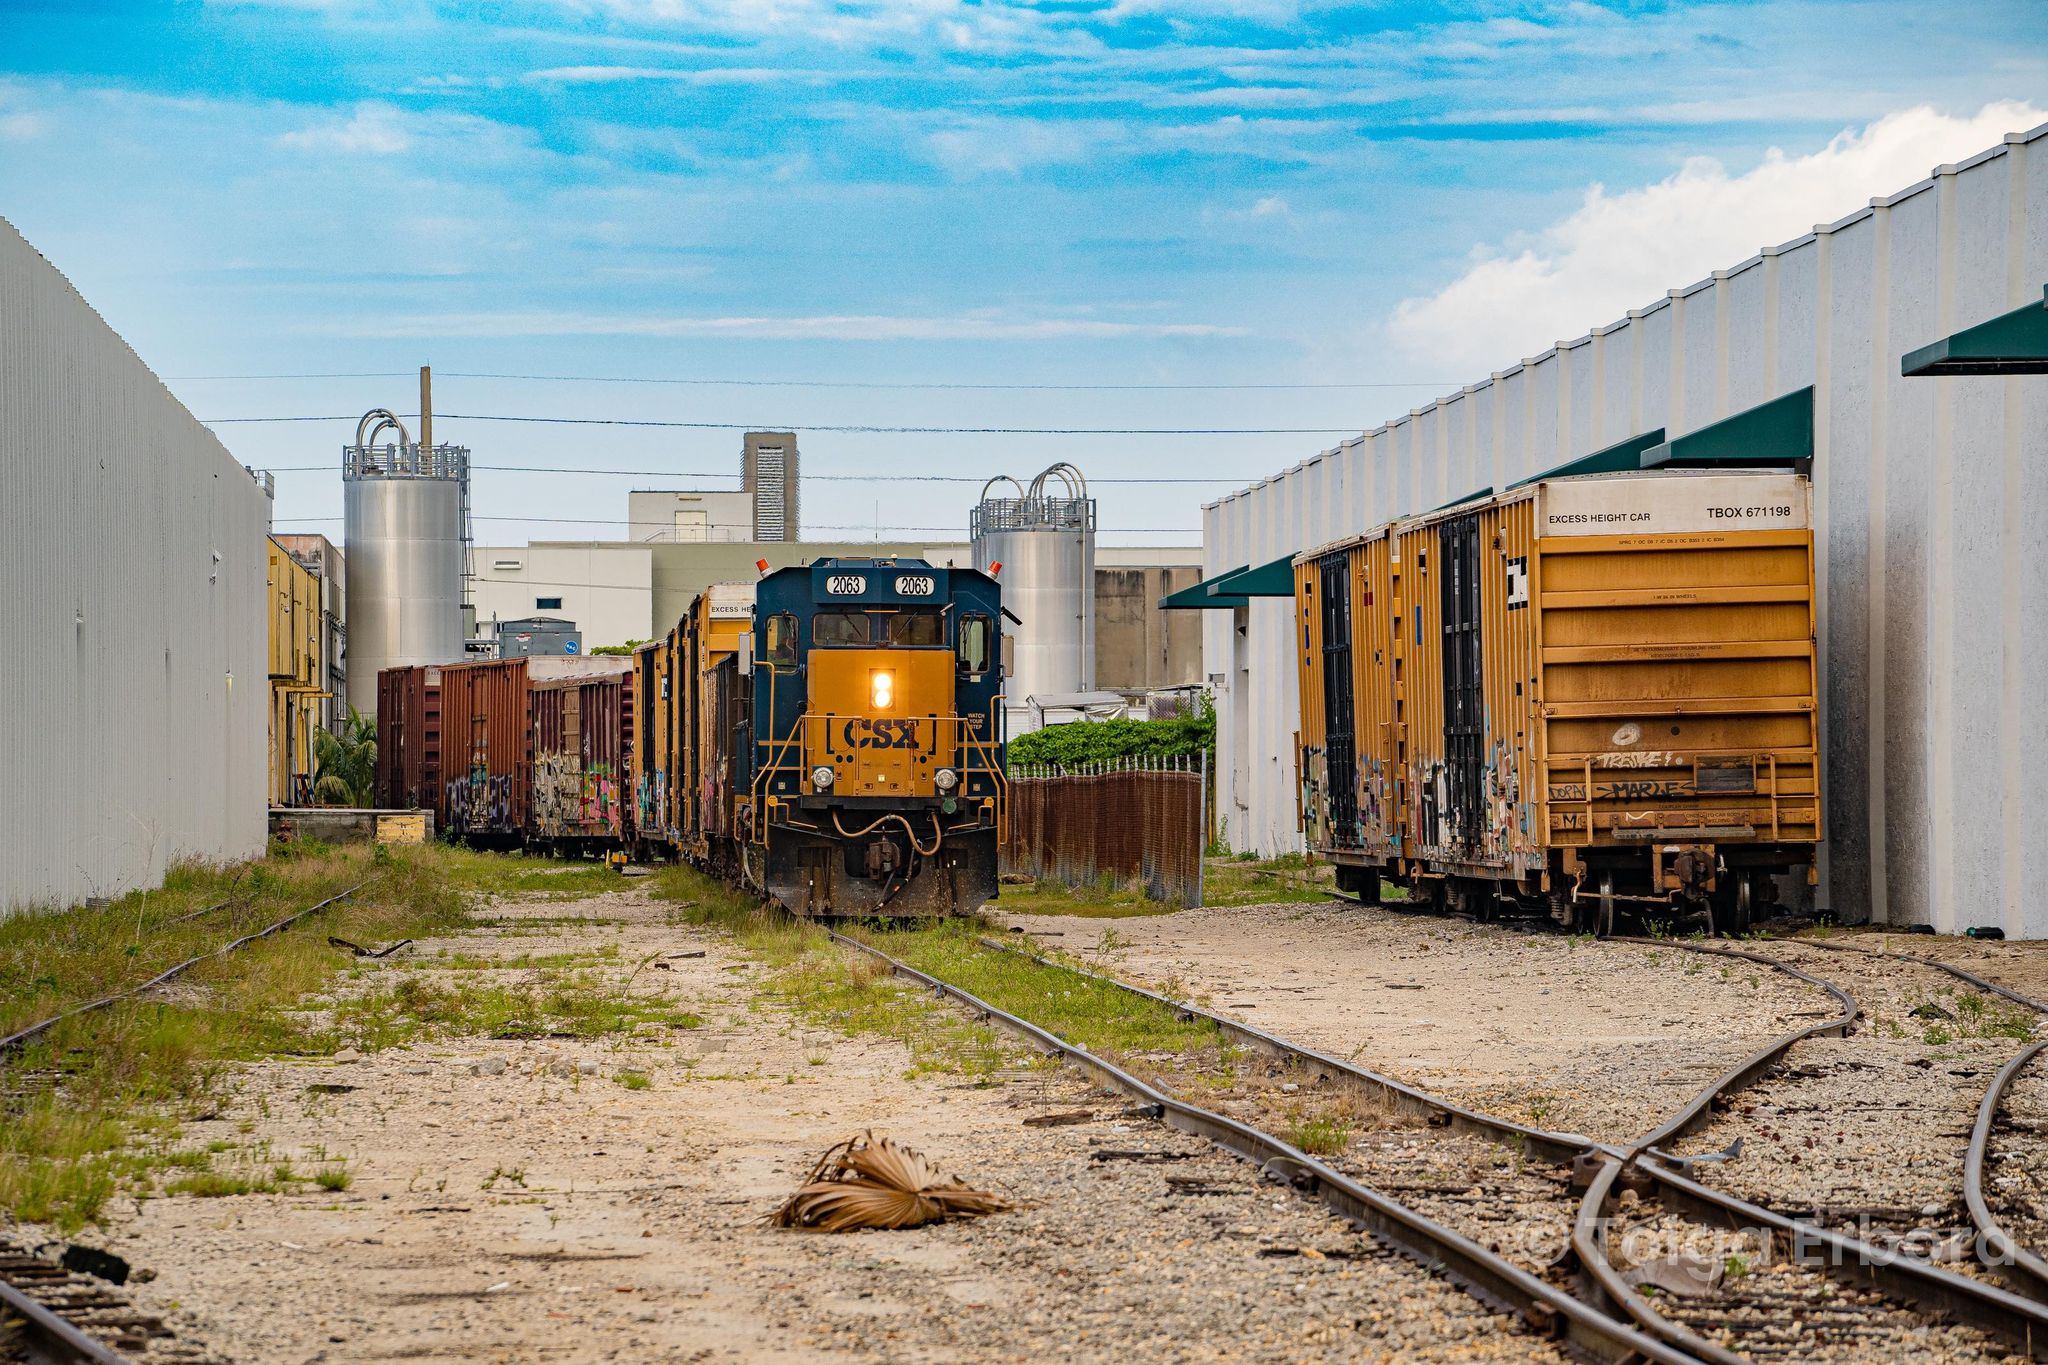
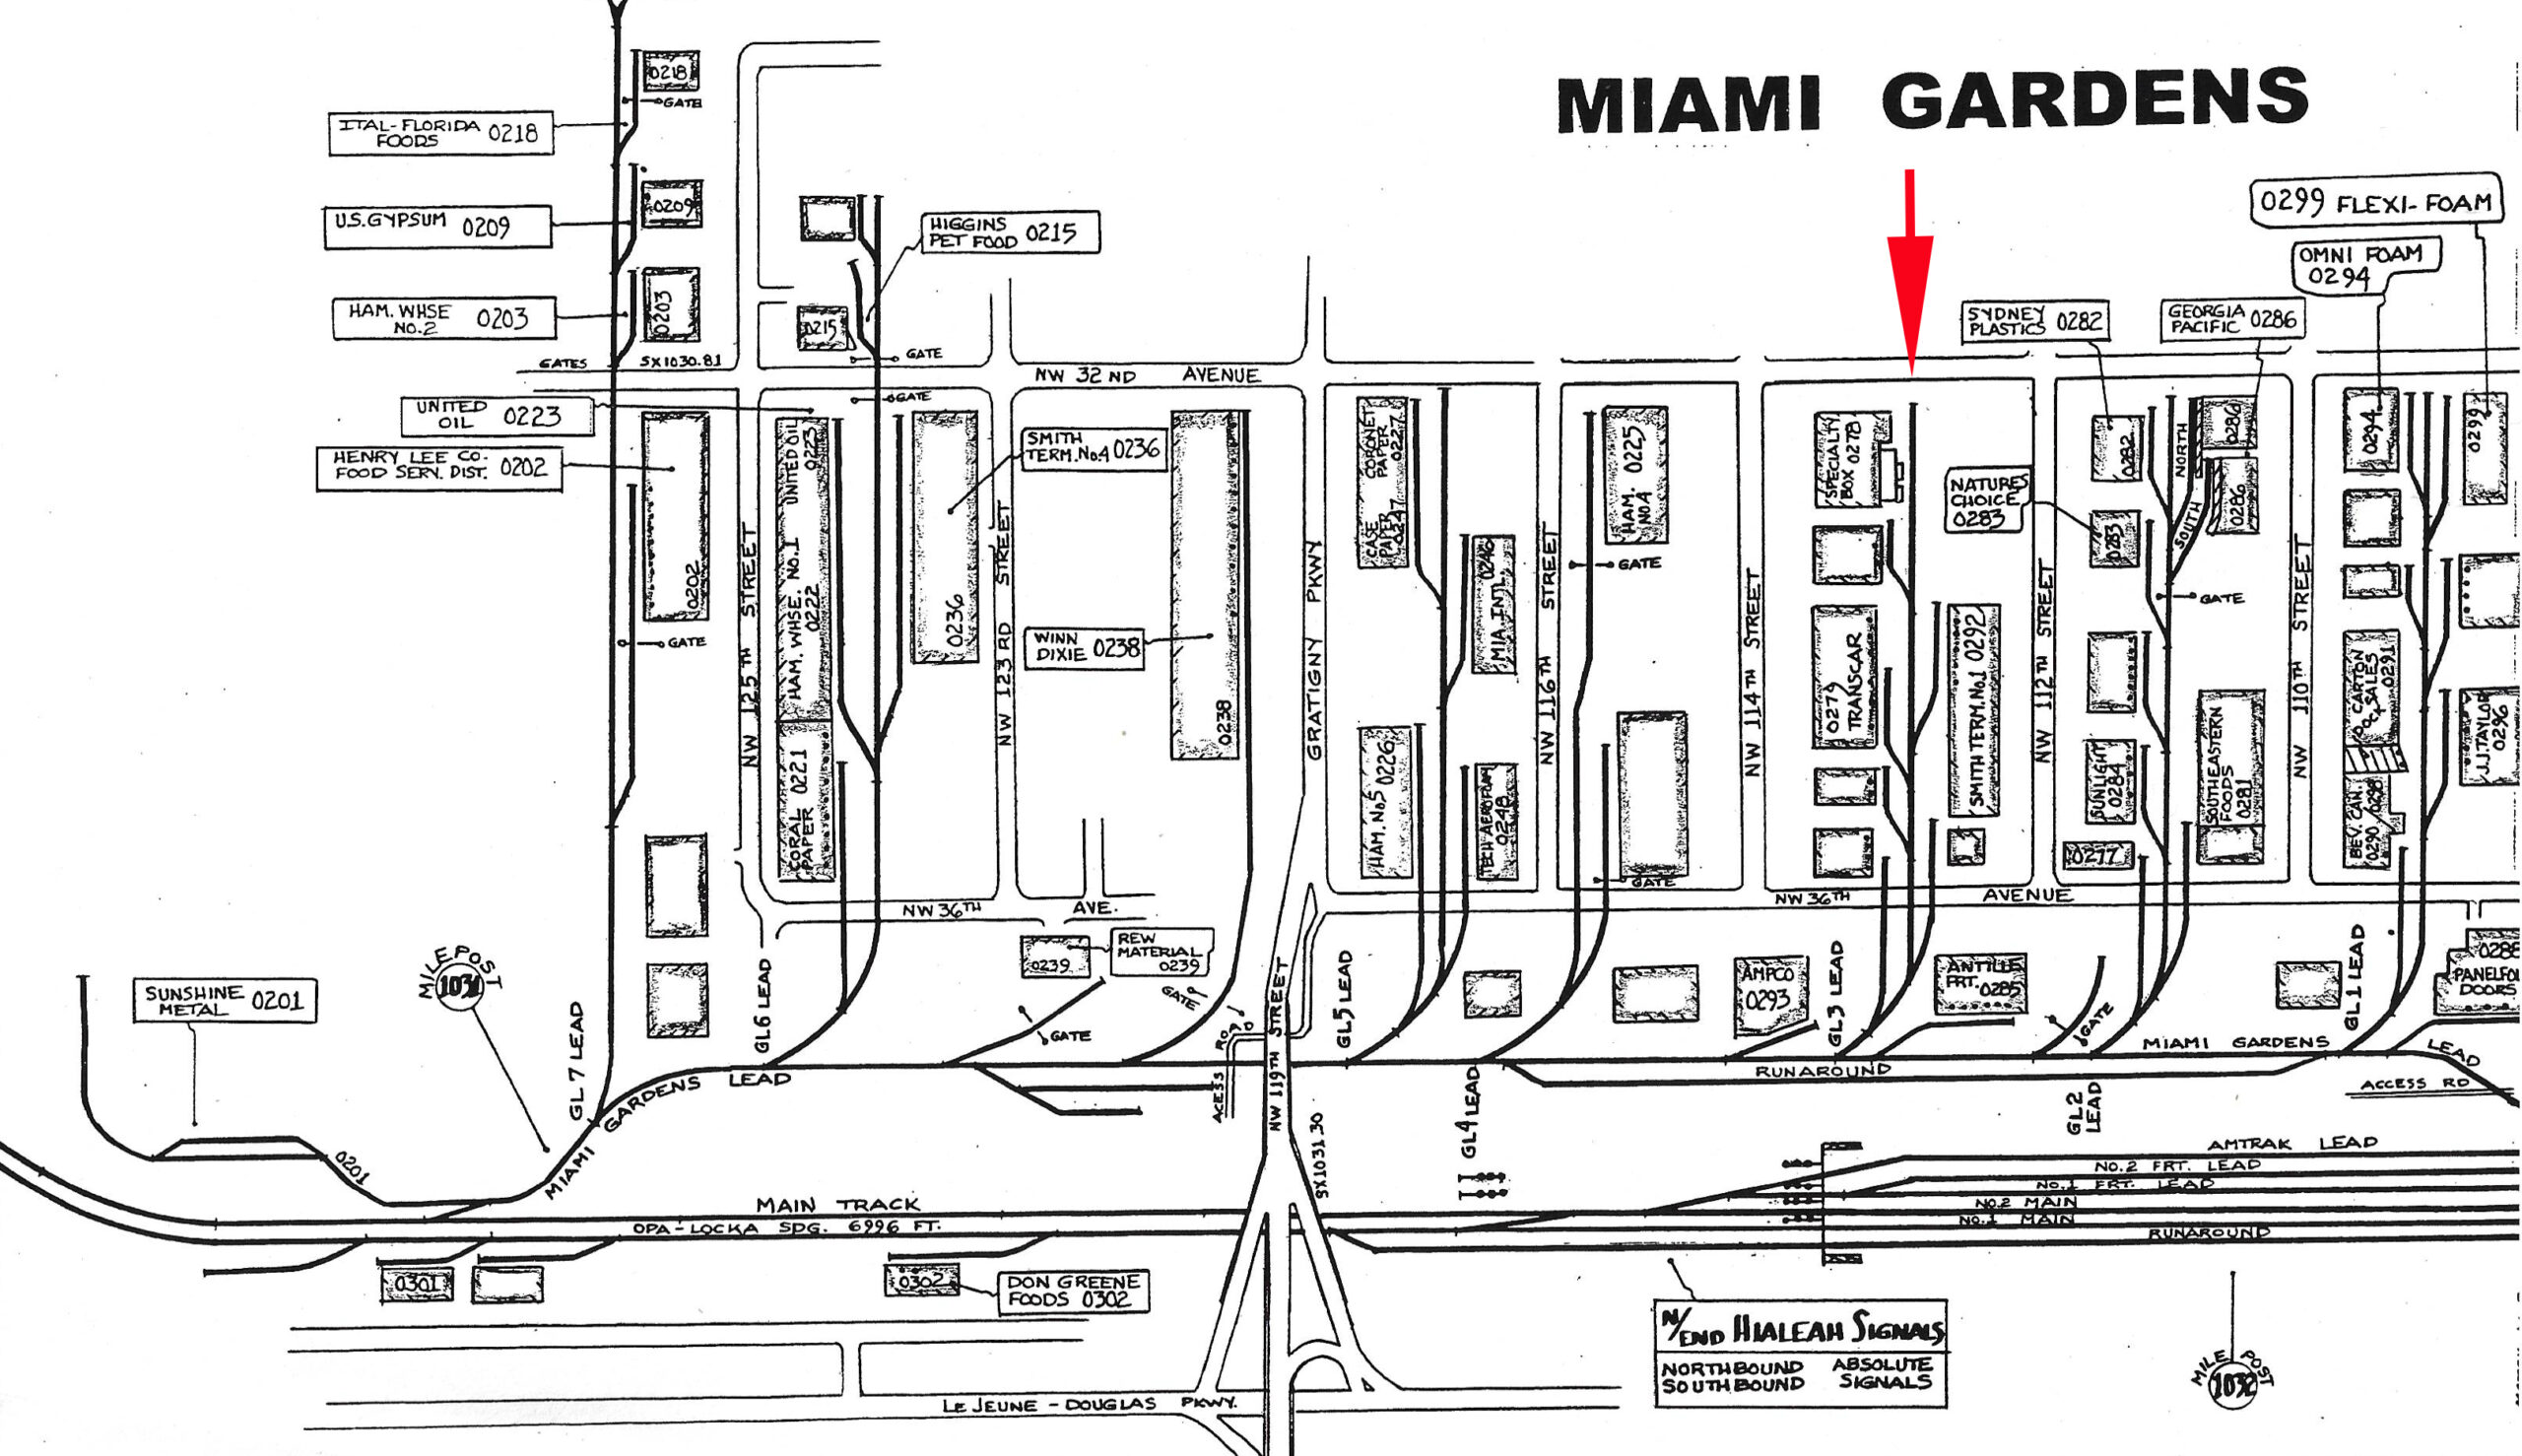
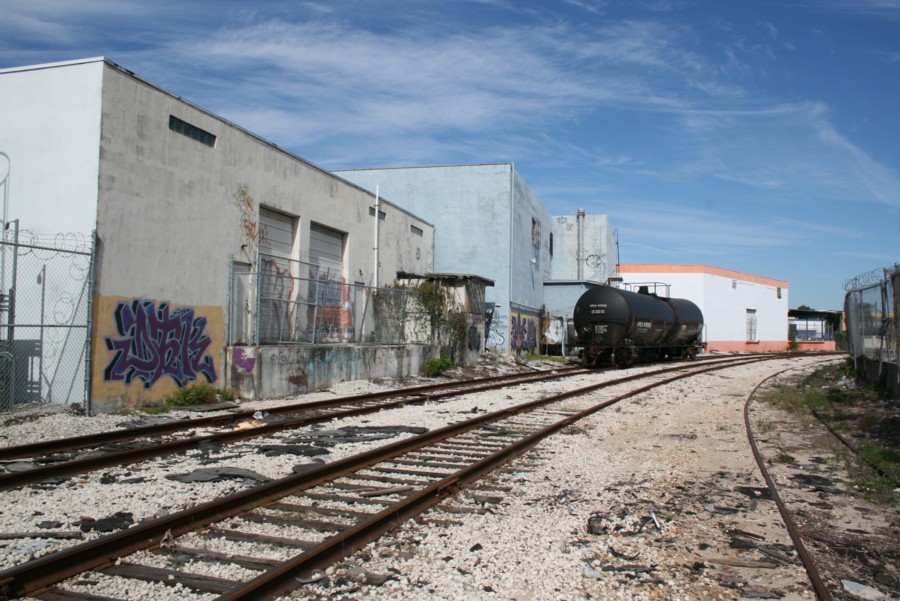
CSX has shaken up their service plan in Hialeah, particularly for the Gardens Lead. Previously split between jobs Y220 and Y322, Y220 was abolished some time ago in favor of a remote control job, Y190. Also heard from time to time is an evening Y290.
I was out and about and from listening to the scanner audio, heard Y19003 get permission to occupy the Amtrak Lead. CSX yard jobs typically use the Amtrak Lead to either shove to the handful of customers on the east side of Hialeah Yard, or work the Gardens Lead.
The Gardens Lead continues to be a hive of activity, with at least a dozen customers sprinkled throughout seven leads and a main track. The congestion around Hialeah Yard and demands of the Gardens Lead perhaps make remote control operations a viable answer, for now. Due to traffic conditions, and a full Hialeah Yard, cars continue to be sprinkled wherever they can, even on unused leads.
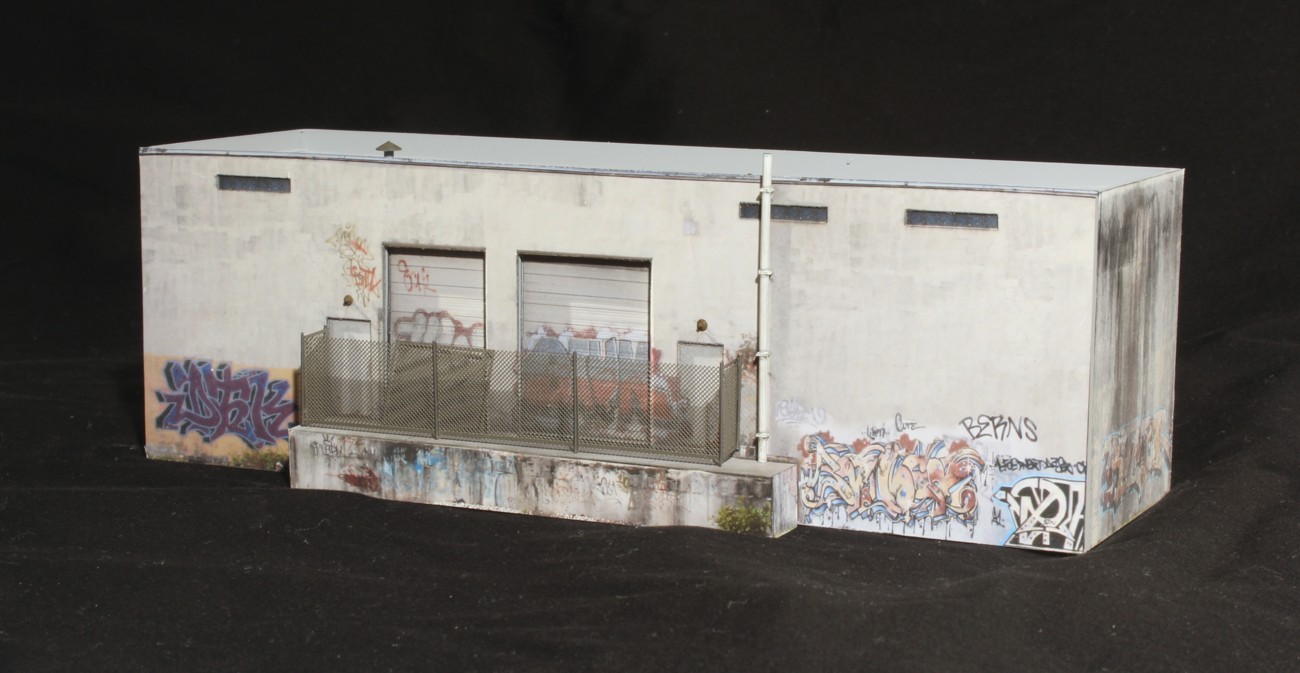
CSX Y19003, the first RCO symbol in quite a while in the Miami terminal, spots a boxcar at Kam Long on track GL3 within yard limits. Boxcars with various foodstuffs go here to be distributed by Kam Long through wholesale.
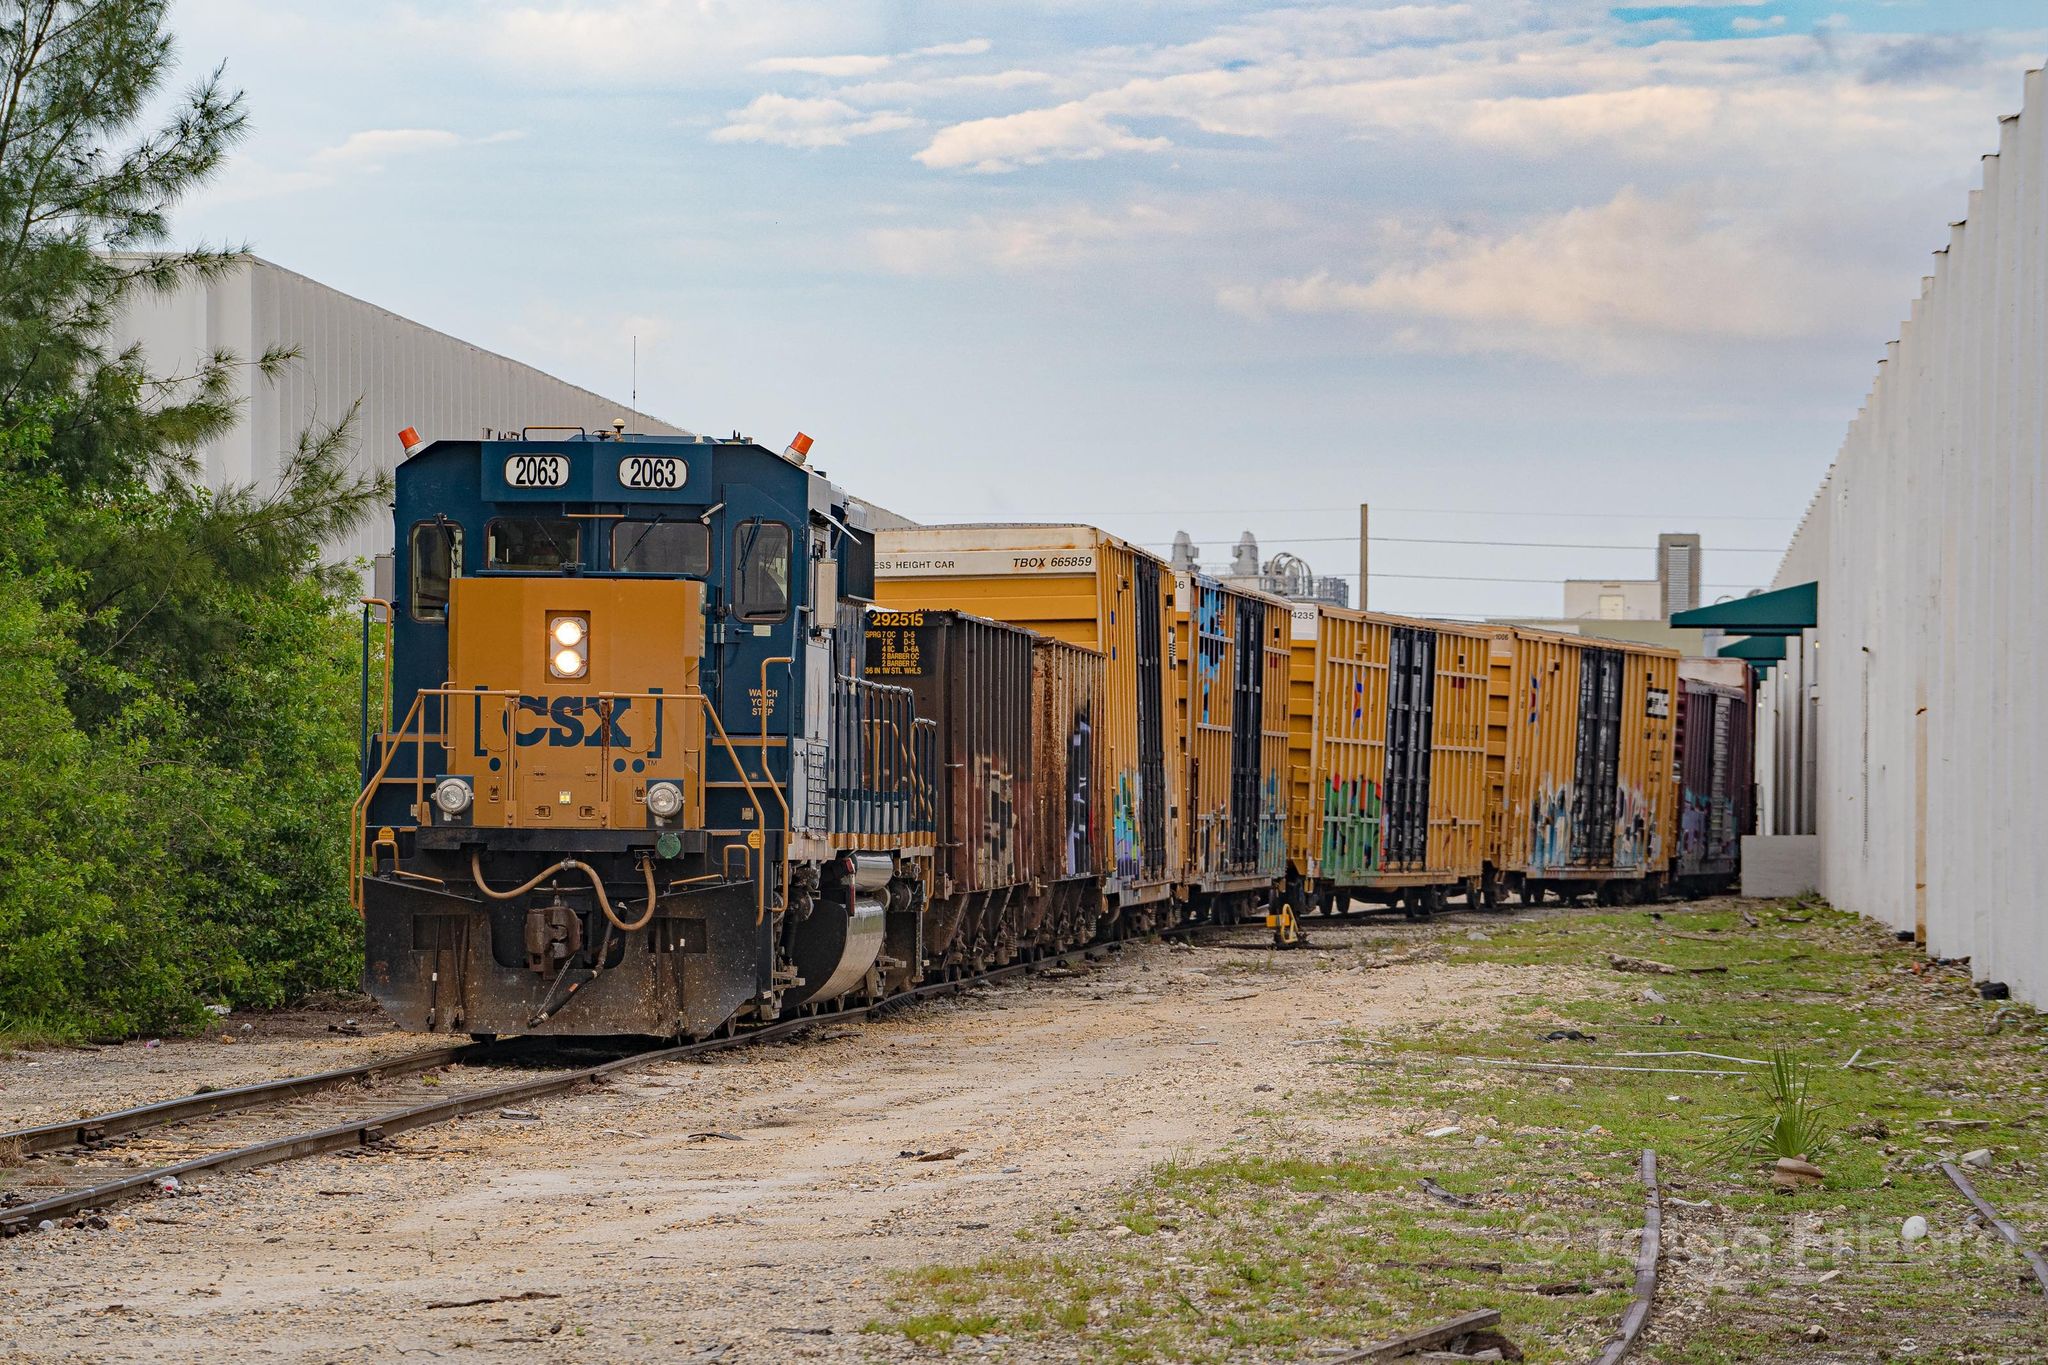
We also see it spotting one of the largest customers, Gulf Atlantic Warehouse. It may be your typical box with doors, but takes in and warehouses a whole variety of dry food products. The track leading in isn’t in the best of shape, evident with the cars leaning one way. I was anticipating seeing the TBOX scrape the wall of the building, but it was not close enough for that.
The switching action took about 40 minutes in total. A lot of details can be implemented to make the switch more exciting.
If these two customers don’t make the GL appear convincingly busy enough, Altira takes in pellets behind Kam Long over two leads.
The door spacing and spotting at GAW requires a lot of little nudges. I’ve seen the 2063 nudge back and forth to spot the boxcars no fewer than three times. This takes about 20 minutes for about four cars.
The track layout on GL3 alone makes for a 1.5-2 hour long operating session, especially if you have to spot and pull all customers, or rearrange cars.
You can see more of Tolga’s work on his Flickr page HERE.
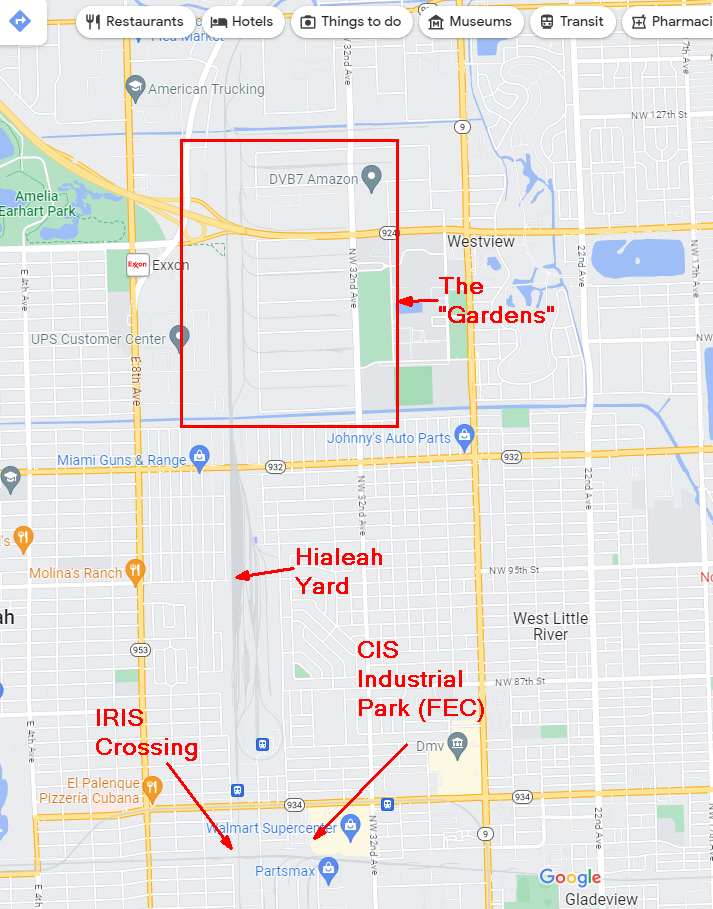
Map showing location of The “Gardens” just north of Hialeah Yard
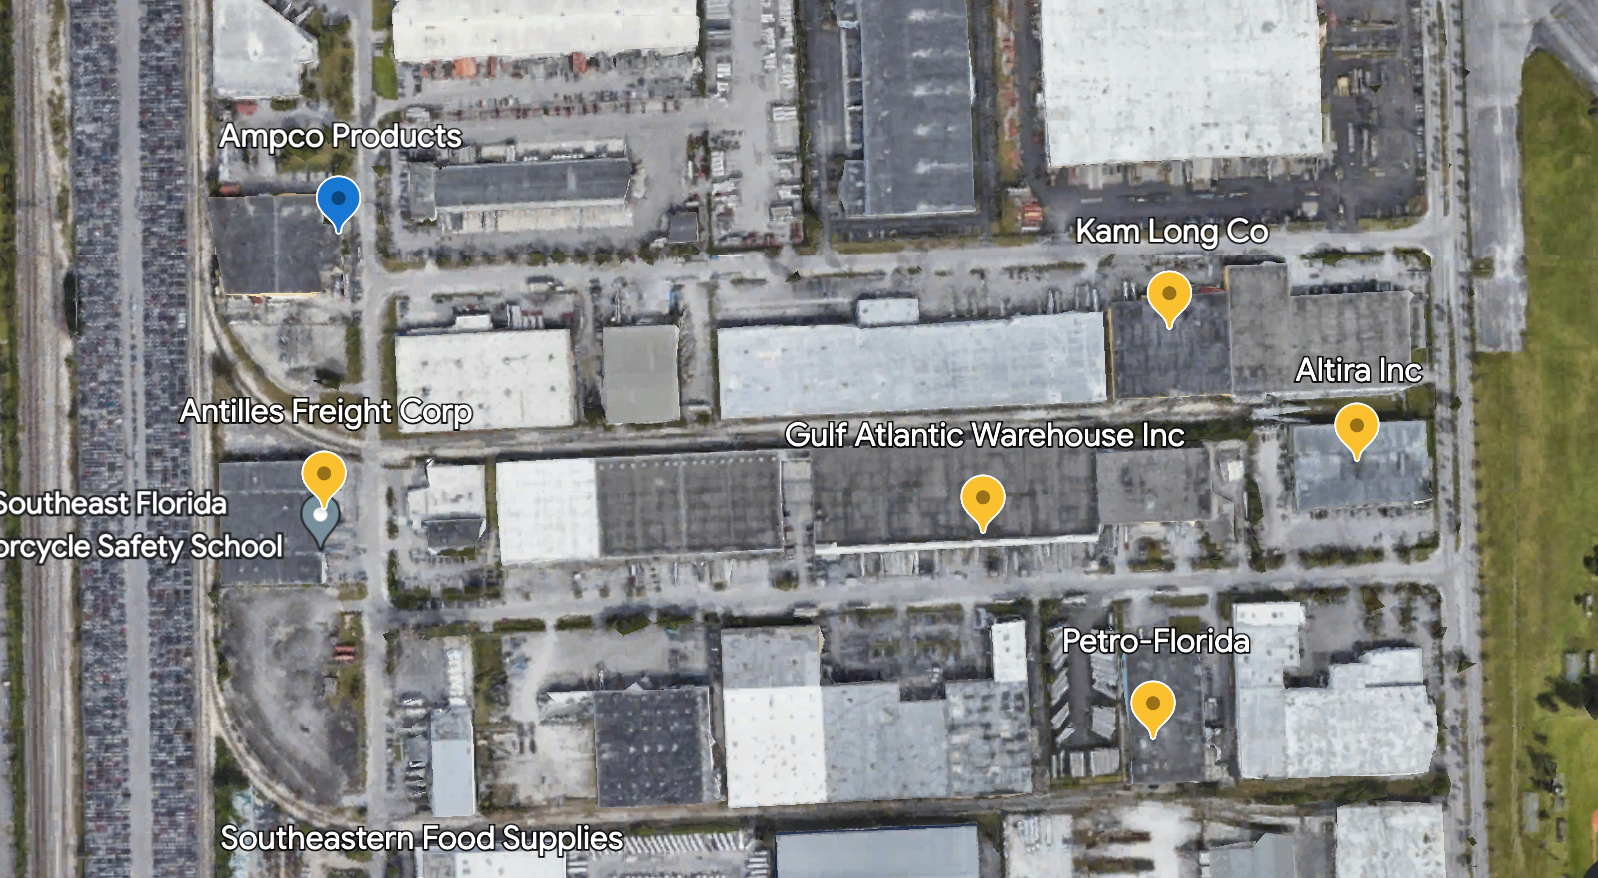
Close up aerial showing the lead with Kam Long and Gulf Atlantic.
The number of my books in print has reached the point where I felt it was time to set up a separate website just for them. Hopefully this adds some clarity. You can visit it at modelrrbooks.com. I’ve set up a separate page for each category (design, track plans, etc.). There is some overlap. The last page has all of the books listed.
I’m fairly far along on the next book which will be “Scenery For Switching Layouts” with a target release date of late summer/early fall. More details on that as we get closer.
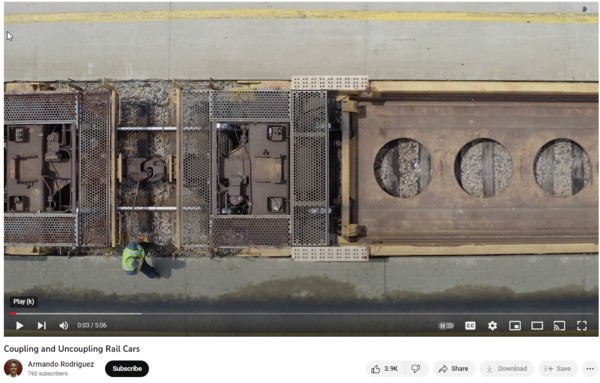
No, not THAT type of couple! I’m talking about coupling and uncoupling during operations. It’s the most fundamental of tasks. Even so, there are some things we can do to enhance the experience of operating our layouts.
To start, here’s an excellent video explaining how the big boys do it. After watching it, here some takeaways.
-After making a couple, especially if the next move will be a shove, the prototype always pulls back slightly to make sure they actually did lock the couplers. It’s called “stretching” (00:50 mark in the video). If you listen to scanner traffic carefully, from time to time you’ll here the conductor say “Give me a stretch”. Not doing so in real life has resulted in some pretty serious accidents. They “think” they have the car and begin the shove. They get to the end and stop but….the car keeps rolling. Not good. I always incorporate this practice when operating solo.
-Note the red zone procedures in the video. When I operate solo I don’t “talk to myself” but I do pause a second to visualize them doing this.
-In the real world when a loco. couples to a car, it’s like hitting a brick wall. The car being grabbed barely moves, if at all. Capturing that dynamic with our much lighter models can be hard to replicate. Having a car skate an inch or two after the locomotive grabs it is like nails on a chalkboard for me but it’s hard to control. The solution? Just hit your throttle’s brake key the instant you make the couple. Doing so gives you the hard stop you’re looking for. Remember to release the brake.
-The section on coupler alignment in the video is interesting. I’ve actually seen crews do that. Now I don’t feel so guilty about my less than perfect Kadee maintenance. Just align them like they do in the field.
-Shelf couplers? Most tank cars have them these days and Kadee makes some nice ones. The problem? The Kadee’s are too prototypical and can be a real bear to unhook. I gave up and went back to standards on all of my cars.
-Trip pins. Unless you use uncoupling magnets, the trip pins on your couplers serve no purpose whatsoever. They don’t look so great and can snag things. If you don’t need them, snip them off.
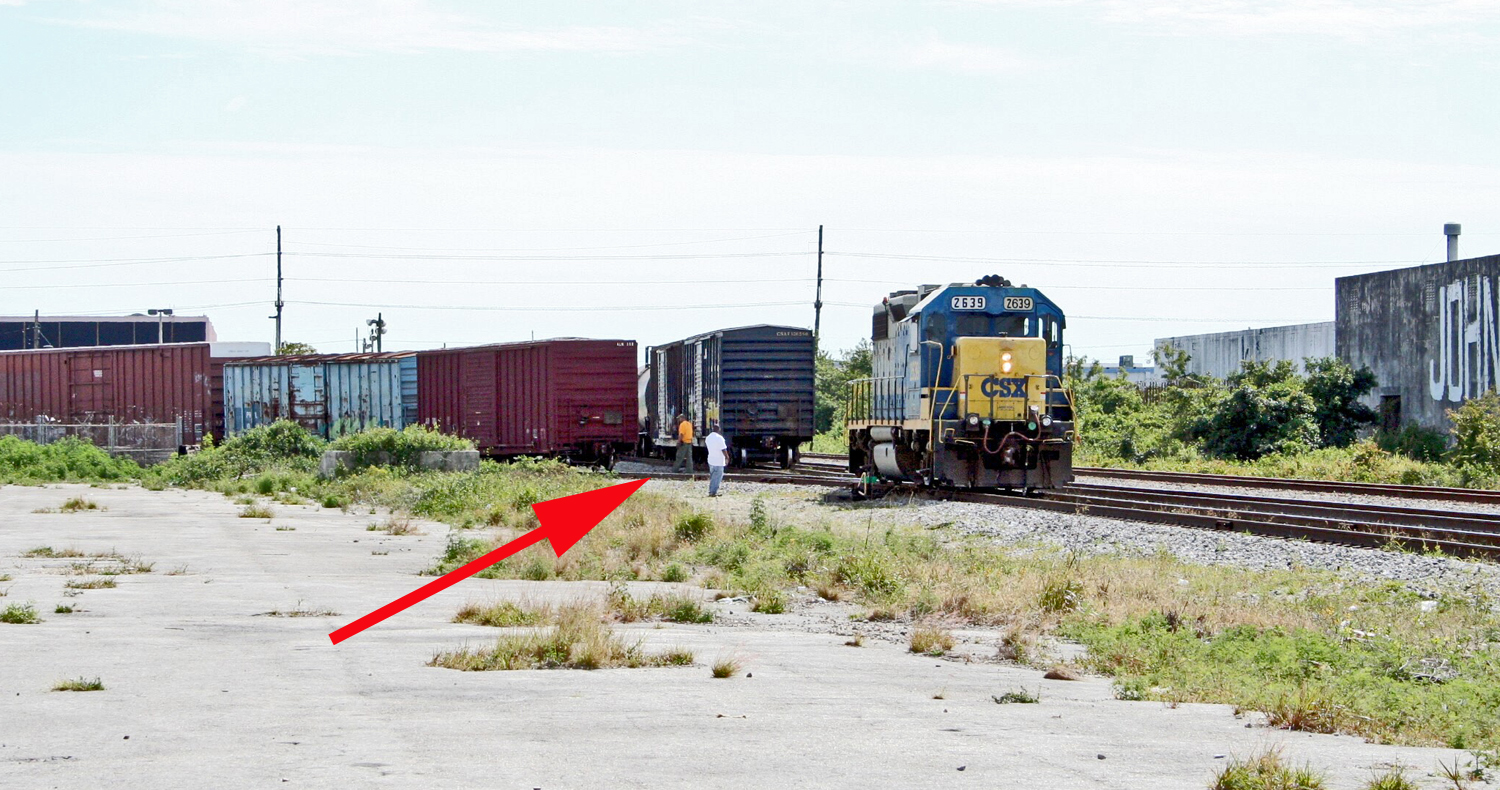
It’s 2006 at the East Rail Industrial park in Miami. The engineer has gotten out of the cab to talk strategy with the conductor about a plan of attack for handling an extremely complex switching situation. Pauses in the action like this are common in the real world.
Just because a comment is annoying and comes across as self-righteous, doesn’t mean there isn’t some truth to it. In fact, there may be a lot of truth it.
Case in point is the oft-repeated refrain, “It’s my model railroad and I’ll run it the way I want. If I want to have the Acela take a siding while my 1880’s logging train rolls by, that’s my business”.
True, it is his business. The annoying part about these self-righteous guys is that nobody ever told them otherwise and frankly nobody cares. Not only does nobody care what this dude does, they don’t give a rat’s ass what I do, or….sorry….what you do. They just don’t. Take that circus train, run it up to the coal mine, and pull those hoppers baby. God bless you. Have fun.
It’s pretty liberating when you think about it though, the concept of being totally selfish in how you run things. If you’re going to go that route, the selfish route, you may as well be good at it. That’s the problem, often we aren’t that good at being selfish, at developing a philosophy that maximizes the enjoyment we get from the hobby.
Case in point, the more you understand how an actual railroad operates, whether you chose to employ those practices or not, the more likely you are to enjoy running your layout. It’s the knowledge, not the implementation of prototype practices, that is the missing component.
Take the extreme of total ignorance when it comes to prototype operational and business practices. Designing a layout that will keep you entertained coming from that frame of reference is pretty damn expensive (and I’d be happy to build it for you!). It takes a LOT of track, a LOT of layout, a lot of industries, turnouts, rolling stock,…..a lot of “stuff” to keep you from getting bored. If your train rolls into town at 50mph, flat spots the wheels to stop on a dime, and does a quick car dump, your work at that industry will be done in seconds. Running things that way, if you want a thirty minute solo op. session, it may take twenty or more industries to fill that time. It takes a lot of money, and a lot of space, to build something that puts on that type of show. If that approach brings you enjoyment, then you don’t need me, or anybody else telling you the “right” way to do it. You don’t need other people telling you how to have fun. What matters is that you’ve gotten to that philosophy via a conscious decision not by default.
With just a little knowledge however, you might find you have even MORE fun at a lot less cost and with a lot less layout. As your knowledge of operations increases, the amount of layout needed to keep you entertained decreases. You don’t even need to employ most (or any) prototype practices to have more fun. Just knowing what would likely be happening in the real world as you go through the moves adds interest.
My friend Alex Bogaski was over for a visit recently and the discussion turned to using props to represent prototype practices, paperwork, etc. It can be taken too far… to the point of absurdity. Marching a 1:87 conductor down your layout for five minutes at scale walking speeds is getting a little out there. Alex made a great point, stating “I just visualize in my mind what they’d actually be doing as I go through switching moves. I don’t really use props”. That’s a really good middle ground.
You probably don’t need that many operational props. Just take frequent pauses as you operate the layout to represent setting brake wheels, throwing turnouts, walking, talking to customers, etc. Drink that beer. Sip that coffee. Think about what would actually be happening on the prototype as you take those breaks. How long should the pauses be? Whatever length keeps it fun.
Where do you get the knowledge? For me it’s watching YouTube videos, talking to more knowledgeable friends, rail fanning, and talking to actual railroaders. On YouTube just put in a search term along the lines of “Railroad Industrial Switching” and you’ll get plenty of clips. Here’s one example.
Knowledge isn’t limited solely to operational practices, business practices factors in also. Modelers, through their ignorance of how railroads work, skip a lot. This takes them back to the same swamp of needing more elements to keep them entertained. Common examples include spotting loads off spot and then re-spotting them when space frees up, team tracks, car storage, etc.
If you don’t presently have a layout, and are planning one, at least be aware of the ramifications of the two philosophical approaches to operations. If you come from a place of total ignorance as to how things are done in the field, you may need three or four hundred feet of layout and fifty turnouts to keep you entertained for a half hour. With at least some knowledge it may only take a hundred square feet and a half dozen turnouts PLUS you would likely enjoy the session more. Why? Because with that knowledge, as you run your models, the experience is enhanced by a background movie of actual practices playing out in your mind.
I’m not saying you should operate prototypically. For many, it just isn’t that interesting. I get it. What I am saying is that you owe it to yourself to understand both approaches, their ramifications, and consciously come up with a philosophy that maximizes your enjoyment. Don’t end up there be default, by benign ignorance. Be a selfish prick….like I am.
Have fun.
If this subject interests you, check out my book on switching operations HERE.
The first structure for the new East Rail layout is now a wrap. Photo above. In Miami there is a fairly broad range among industries in terms of how often they receive cars. The LPG companies, logistics warehouses, and scrap metal industries are worked frequently. Others only see a car or two a year. This structure falls into the “seldom if ever gets cars” category.
The inspiration for the project came from a structure on FEC’s CIS lead (Page 80 of my new book). For those that want to try your hand at photo wallpaper I’ve placed the image in the Photo Wallpaper section of the How To tab (scroll to the bottom).