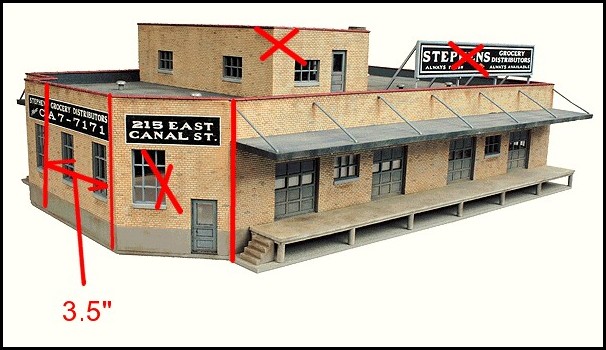
Walther’s Grocery Distributor would serve as an excellent foundation for a first kitbashing project
One of the questions on my commercial layout design questionnaire is, “what aspect of the hobby do you enjoy the most?”. The most common answer, one that invariably is given a “ten” by most modelers, is structure building. Across the board it is the area that consistently provides the most enjoyment to model railroaders. As the design progresses and takes shape using the modeler’s givens and druthers I’m often asked, ” I love kit “X” will it fit in spot A?”. Often the answer is no, followed by my reasoning that structure footprints shouldn’t drive layout design. Taking it further, the more detailed answer is “No, but….” No but if you modify the kit it WILL fit and you’ll have something unique on the layout. The discussion typically ends there.
For whatever reason, many modelers have a distinct discomfort with kitbashing (modifying a kit from it’s out of the box appearance). At first I though it was cost-related but really what it boils down to is a lack of confidence in one’s abilities. However for the modeler’s that can get past this, it opens up an entirely new world of possibilities. It really just takes a leap of faith to give it a go, a realization that an average outcome on the first few attempts is the price we pay for advancing our skills.
Look at the cost of a few kits (that may need to be discarded if you botch the attempts) as money well spent in our ongoing quest to get better, an “educational investment” if you will. However, we have several ways to get around this educational investment cost that some price-conscious modelers might benefit from. Some model kit stores offer multi-buy discounts (to encourage kitbashing, of course). You could also consider buying used or damaged kits on eBay, if you can find an eBay coupon that applies then this cost can be reduced further. All in all if you play it smart then you can get into kitbashing for a lower cost than you might think.
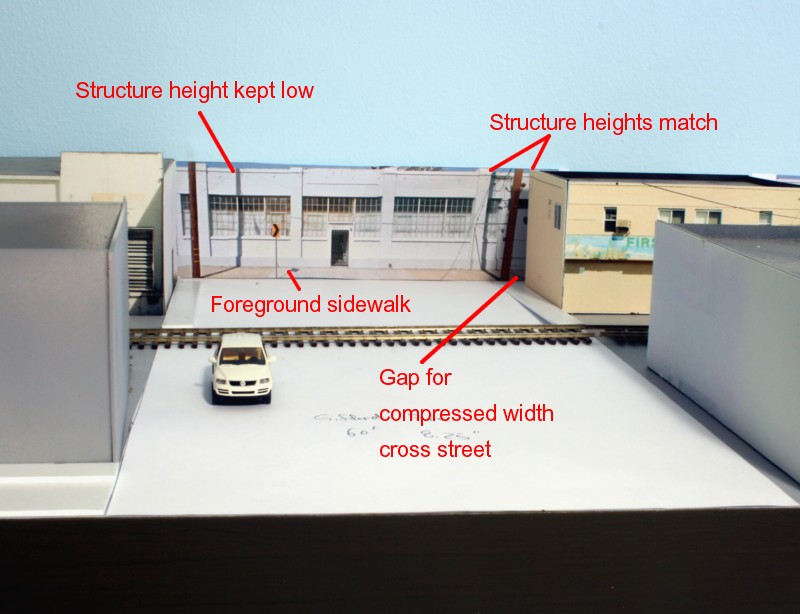
Here’s an idea for a sample project to get you started. Let’s say you need a large, car spot driven industry up against your backdrop to provide operational interest. For structures against a backdrop shorter and longer looks better. We also want a little depth, say 3.5 inches, as opposed to the narrow inch or so typical of most commercially available backdrop structures. One of my favorite kits is Walther’s Grocery Distributor (933-3760). This model would serve as an excellent foundation for a kitbashed backdrop building that looks like it “fits into the real world” and would provide a lot of operational bang for the buck. I’d approach it as follows.
-Purchase two or three of the Grocery Distributor kits.
-Glue the back walls (with the loading doors) from the kits together end to end. Put a strip of 1″ wide, .060″ styrene behind the joints to reinforce them. Make a thin slurry of Testor’s modeling putty and lacquer thinner and work it into the seam to disguise the joint. After construction, hide the joint with a downspout or section of .040″ spring wire (representing electrical conduit)
-Trim the width of the side pieces to roughly three and half inches. This is done by using a utility knife guided by a straight edge. Make multiple shallow passes until you are most of the way through the plastic and then bend and snap. Clean up the cut edge with sandpaper.
-Glue the now shortened side pieces to the now longer back wall.
-Discard the roof top structure and billboard
-Replace the doors with metal roll up doors from Rix/Pikestuff
-Replace the awning supports with .015″ spring wire.
-If you’re particularly ambitious, and comfortable with photoshop, replace with the windows with photos of prototype industrial windows. (actually you could do the same for the doors, use photos that is).
-Paint and “plant” on the layout.