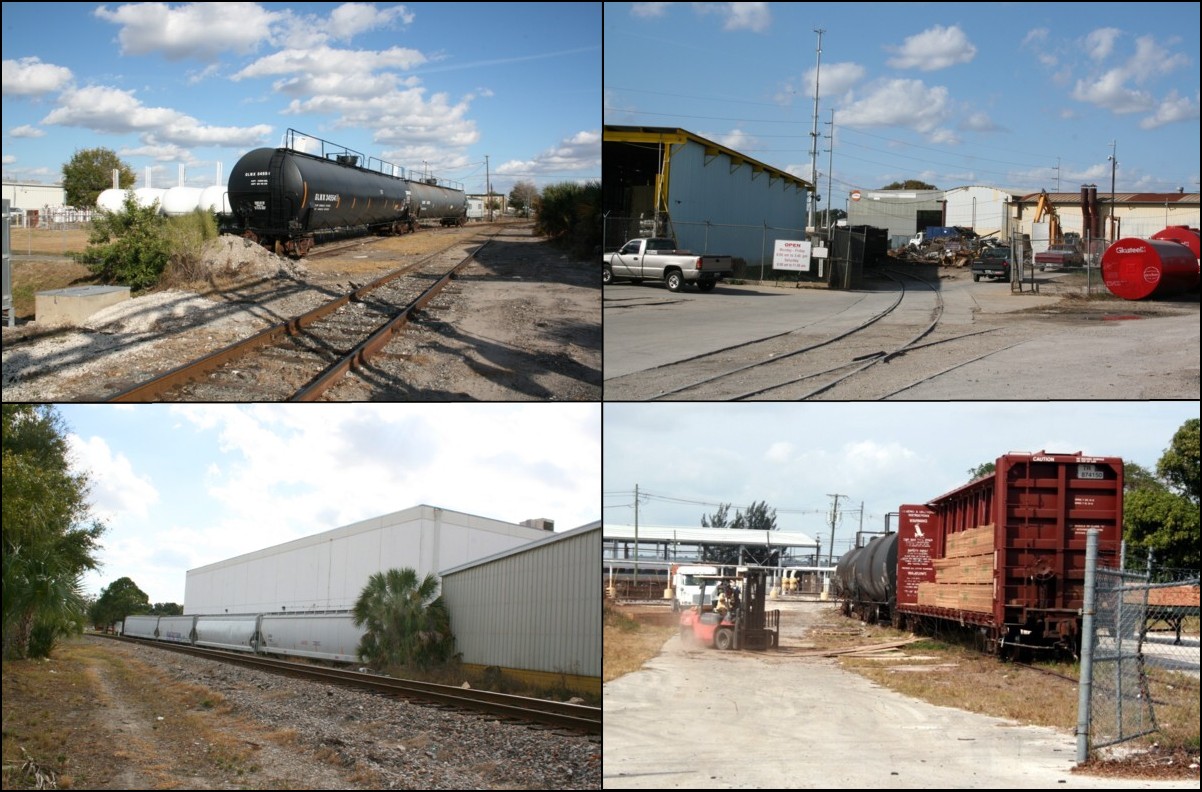
Model Railroad Blog

Capturing A Sense of “Mass”

Creative fulfillment aside, one the main reasons I model railroads is that I’m mesmerized by the full size version.   In particular, the sense of overwhelming mass and the stunning horsepower numbers it takes to move just a few cars.  (A GP38-2 tips the scales at 125 tons.)

As I watch YouTube videos such as THIS one (jump to the 1:25 mark), I’m struck by the difference between actual train dynamics and the movement of our plastic models.  Especially knawing to me is the subtle accordion like effect and jerking motion as the model freight cars snap back and forth with the rotation of the model loco’s motor shaft.  It’s subtle but it’s there.  Model trains move like plastic toys not hunks of steel that weigh hundreds of tons.


As the LAJ project moves forward, capturing this sense of mass is high on my list of experiments. To that end, some things that I think will work are:

Layout height:  The closer you can get the models to eye level, the more realistic the viewing experience.  Higher layout heights are a trade off though as they aren’t as easy to work on.  During construction you’ll be standing on a stool quite a bit.  Check

Sound:  The visceral sense of mass isn’t just visual, it’s auditory also.  The deep bass and high fidelity of the headphone system has done wonders.  Check.

Speed curves: Decoder pro makes setting the speed curves a snap.   A few computer key strokes allows you to get a much broader control range for the lower speed ranges the prototype typical runs under.  Check.

Hypderdrive and decoder tuning:  Section 8 of the Tsunami manual reads, “Setting Up the Hyperdrive Tsunami’s Hyperdrive system features high-frequency PWM drive for silent motor control along with load compensation (or back-EMF) to improve low speed operation and maintain constant speed regardless of changes to the motor load. There are four CVs associated with the load compensation feature: CV 10, Back-EMF Cutout CV 209, Kp Coefficient CV 210, Ki Coefficient CV 212, Back-EMF Feedback Intensity”  Friends have told me this tuning makes a huge difference.  I have yet to do this but it’s high on my list.

Trucks:   I’ve always assumed, without thought, that smoother running trucks are better. This is certainly true for over the road freights where you need to pull a lot of cars.  I’m beginning to wonder if trucks that don’t run so freely will give more realistic running qualities during switching.  I don’t know.  It’s a test worth performing.

Car Weight:  What would happen if I grossly overloaded the weight of my freight cars?  How would that change their dynamics?  It’s worth testing.  I’m not sure how practical this would be though for cars that would be difficult to add weight to such as tanks, gons, flats, etc.


To be continued…..


Some Vertical Details

IMG_6202s

I spent the better part of Saturday scratch building two utility poles and one cross buck for the Everett Avenue crossing.  I’m guessing I had about six hours into the project and the cost of materials probably didn’t crack a buck. (lots of recreational play value per dollar!)  On top of that, when I was done, I had something better looking than anything I could have purchased ready made.  This would be a good project for a student or deployed military because the parts are small, inexpensive, and will, without question, be needed once you get a layout.  They are also details that create a fair amount of visual impact.

Crossbucks

Take a Tichy plastic cross buck and shave the cast on post off.  Spray paint the back of the cross buck  dark gray.

For the post, take .041″ basswood (Midwest pn 8016) representing a 4×4 and paint that gray as well.  When the paint on the post has dried, give it a few swipes with 400 grit sand paper to get the “fuzzies” off of it.  Lightly spray it with flat with white spray paint and give it another pass with the sandpaper.

Glue the post to the cross buck plate.  Take two Ticky NBW castings, paint them with dark gray primer or camo. brown and glue them in place.  All done!

Utility Poles

You’ll need:

  • Bamboo skewers from the grocery store (pole heights vary but a common length is 40 feet with 6 feet of that buried in the ground)
  • .0416″ x .0625″ basswood (Midwest pn 8017) representing 4×6 cross arms.  Cut to  scale 8 foot lengths. (8 feet is a common length although some cross arms are longer)
  • Insulators scavenged from Atlas telephone poles
  • .015″ Music Wire (K&S makes this)
  • Yellow decal stripes from your scrap box
  • Tan or earth colored solvent based paint

Lightly dilute your paint and stain the poles and cross arms.  Mark the center of the cross arms.

Start with the top cross arms.  There are two of these, back to back on the top.  Glue them roughly a foot down from the top of the pole.  Next, glue one more single cross arm a scale 6 feet below the top arms.  For adhesive use a thicker viscosity CA.  Snip off a half inch long piece of music wire, bend it in an “L” with 1/4″ sides, glue it beneath the cross arms and paint it a dark gray.

Take a spare Atlas telephone pole, spray it a light gray, snip off the insulators and glue them in place on the cross arms with CA.

Some streetside poles have yellow reflective tape near the bottom, I simulated these with yellow decal stripes from my scrap box.

Utility pole styles vary greatly and it’s simply a matter of looking at your window to get some ideas.


Working With Powdery Soils

IMG_6200

Working with powdery soils is difficult from the standpoint of getting a flat, smooth surface, free of ridges, bumps, and craters.  There are two challenges.  First is applying the material smoothly.  Second is applying the adhesive without disrupting your application.

To get a smooth application, avoid pouring the material from a cup.  Instead, use a fine meshed sifter.  Pour your material into the sifter and lightly bounce it up and down and swing it side to side until you’ve covered your entire surface area.  If additional smoothing or dress up is needed use large, soft, flat brushes.

Next comes applying the adhesive.  I prefer dilute matte medium from Scenic Express.  Pick up a spray bottle that produces a super fine, gentle, mist.  Fill it with a water and add a touch of rubbing alcohol or detergent to aid in breaking up the surface tension.  Spray your soil base that so that it’s saturated but not puddling.  I use an eye dropper to apply the matte medium.  If you’re not careful applying the drops, you’ll end up with unsightly ridges or craters.  Start at the edge of your soil area and liberally apply the adhesive around the edges.  Wait a moment and let the capillary action draw it into the soil as far as possible.  To hit the remaining dry areas, hold the dropper just a hair above the surface and very gently squeeze out a drop.  Again, see how far the capillary action carries it.  Repeat until the entire surface is saturated.  If you end up with any ridges or bumps lightly smooth them out with a flat, smooth, brush.

The Quest For “Perfect” Research

As prototype modelers a large part of our job, and a fun part at that, is researching our prototype.  Although there are a variety of sources for trying to pin down the elusive clue as to what the “typical” situation was in the area we model, by and large we are totally dependent upon photos.  We may be able to augment it here and there but for the most part the photos carry the lion’s share.  The problem is that a photo only shows what the situation was the fraction of a second the lens was opened.  I’ve stood on weed-choked rights of way, surely abandoned, only to be surprised seconds later by a locomotive coming around the corner.  An aerial photo may show an entire town totally devoid of freight cars.  Does that mean rail service has been abandoned?  Could be, particularly in this day and age.  However, it might mean that the local came by an hour before the shot and swept away the empties.

SBD1

 For almost ten years, Bing Birdseye has consistently shown Seaboard Terminals totally devoid of cars.  Surely rail service has been discontinued, right?


Case in point, Miami’s East Rail industrial park.  When I first started researching it in 2006, the busiest customer was Seaboard Terminals Warehouse.  On the day of one of early my site visits the local was wrestling with spotting no less than a dozen cars.  Then, for reasons unknown, all rail service appeared to abruptly stop in 2007 or 2008.  The track was maintained but from 2008 through 2015, a period that included three site visits, I never saw a car spotted there again.  Bing Birdseye and Google Streetview backed that up.  Not one car.   I had long since concluded that this once vibrant industry had given up the ghost as far as rail service was concerned.

Sbd2

By chance I happened to check Bing’s traditional aerial view and found this shot, dated 2015, showing that I was wrong, Seaboard was still rail served.


Last week while researching how to find time stamps on Bing Birdseye (and learning you can’t) I came across a post that stated time stamps were posted on Bings traditional aerial view.  Out of curiosity I went back to East Rail with Bing Aerial and to my considerable surprise, guess what popped up in the image?  Two high cubes spotted at Seaboard and documented with a time stamp of February 2015.  I was wrong.  They were still taking cars.  The takeaway is that the only “perfect” research is living in the area and dropping by the site every week or so, or having an inside contact at the railroad that works the job frequently.  Photos will only tell you so much.