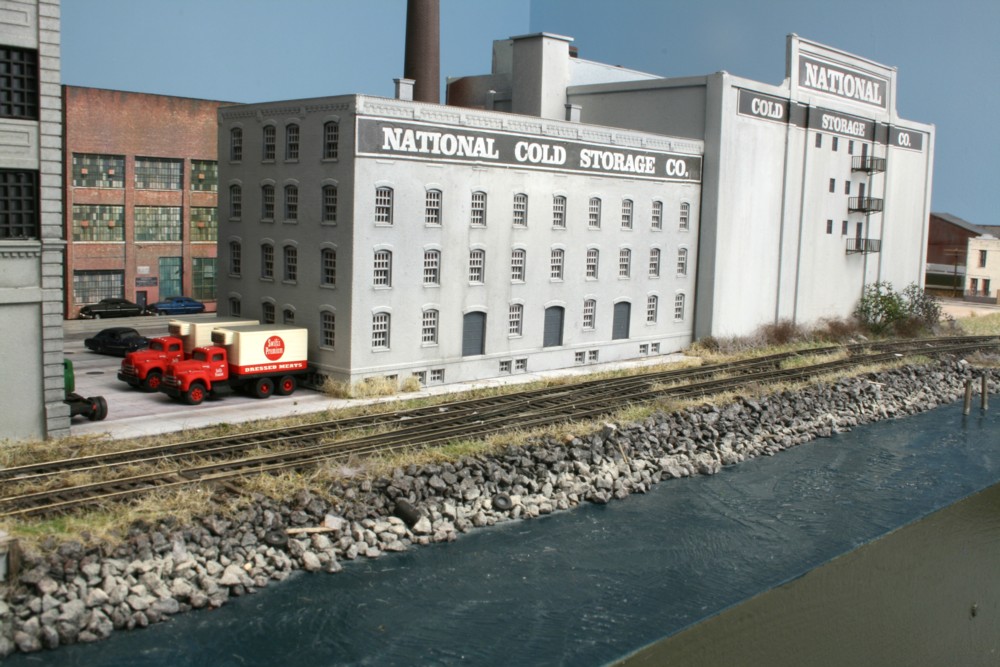
Model Railroad Blog

Bond Plumbing Feb. 21

The Bond Plumbing Supply, quasi building flat is complete and “in the bag”. Very nondescript, it tucks into the corner of the Downtown Spur layout hardly drawing notice…..which was the goal. It also served the secondary purpose of kick starting me out of the builders slump we all go through.

Bond Plumbing Supply

We’ve all been there, the inevitable “rut” where you just can’t get motivated and have no momentum. In my case this frequently happens when there seems to be a fairly long laundry list of difficult projects standing in the way of any forward progress. Such is the case with the Brooklyn Terminal layout….hand laid turnouts, steam locomotives that have stopped behaving, you name it, one hurdle after another.

To snap myself out of it I look for something easy, anything that can marked as an achievement even at the smallest level. I put the BT layout aside for now and decided to go back to the Downtown Spur (Yes, it is still there!). An easy project is the nondescript Bond Plumbing Supply warehouse between 12th and 13th Avenues. This will be a quasi building flat….not as thick as a full structure but not wafer thin either.

To start, I built a core out of one of my favorite materials, PVC “wood” found in the dimensional lumber section of most big box lumber stores. The PVC is dimensionally stable, easy to cut, and accepts adhesives. I glued the PVC core together with MEK and tapped in a few panel board nails for good measure.

Next up is the photo wallpaper laminates. Since the structure is right next to the street, images were easily captured from Google Streetview and then cleaned up with the photo editors. I’m about half way through at this point. It’s nice to be able to make some progress on….SOMETHING!

Earth Toned Static Grass, 2/4/19

The muddy, brownish gray, dead grass shown in this Tolga Erbora photo is one of the most common scenic features of what we do. Unfortunately, there is no commercially available product to represent it.

The image above illustrates perfectly the brownish/gray tone I’ve been trying to replicate with my do-it-yourself static grass dying project. Finally, I think I have it dialed in.

Before we start, we need to make our own neutral brown powdered dye because the Proceon MX Chocolate brown is way to red. For our purposes we’ll call our concoction “Custom Brown”. Since you’ll need a fair amount of it, make a mid-sized batch and put in a canister or ziplock bag. Mix 3 parts Proceon MX “Bright Green” #097 and 2 parts Proceon MX “Chocolate Brown” #119 and set it aside for future use.

Now that we have our batch of “Custom Brown” mixed up, time to get work. Following the dying instructions from previous blogs, put your 3 cups of water in a pan. Dump in 3/16 teaspoons of our “custom brown” in the water as well as 3/32 teaspoon Warm Black Proceon #128. Dump in some Woodland Scenics FS620 4mm Straw colored static grass and dye as per previous blogs and let dry. It should be a soft nutmeg color.

Once that’s done, take the nutmeg colored static grass, put some in a plastic yogurt cup and pour in an India Ink wash of 1 tsp ink/pint of alcohol. Let dry. That’s it! It should look like what you see in the photo above.