Model Railroad Blog

Our Quest for Realism

SMaywood1

It’s our ongoing quest, how do we create something that  looks like a “model of a railroad” NOT a “model railroad”, not a toy train set.  The answer lies in studying prototype photos, I mean really studying them and trying to get a handle on what we’re looking at.  It’s not easy and it’s not something where spending money will help solve. The most difficult aspect is often determining what color we’re looking at and how we re-create it.

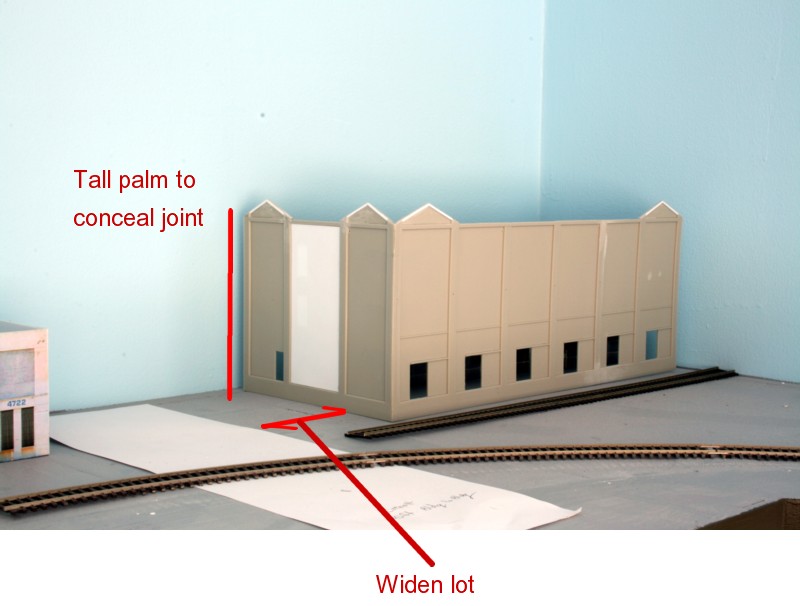
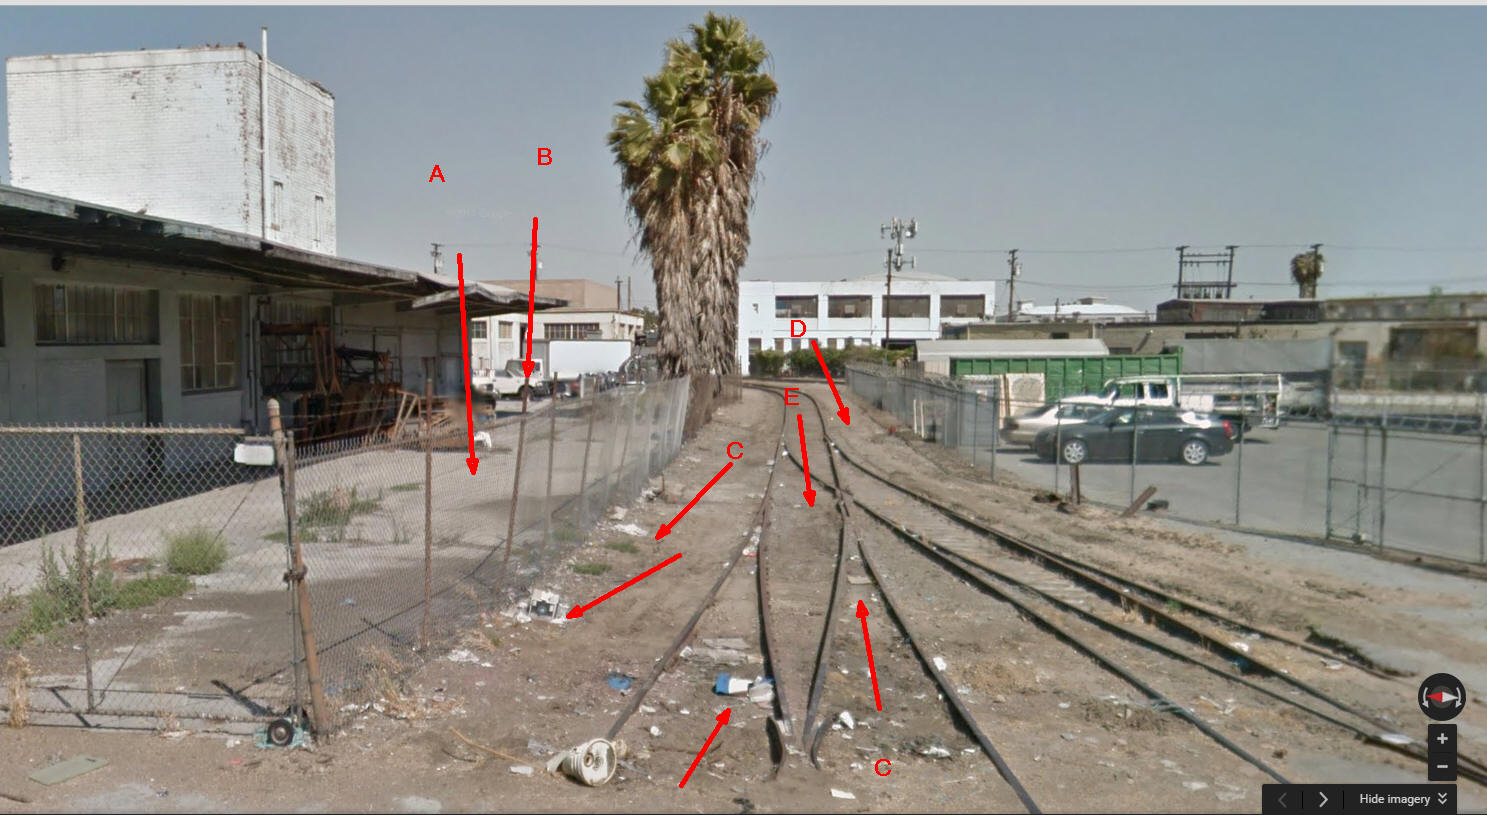
The image above was taken on South Maywood facing east.  Let’s break it down and come up with a plan of attack.

A and B:  Chain link fences are everywhere.  The eye knows what they’re supposed to look like and it certainly knows when we get it wrong.  They are a “mutha” to model accurately and one of the most common tip offs that a photo is of a model not the prototype.   Note the fineness of the prototype mesh and rusted posts.   The only way to really do this right is to use wedding “thule” aka bridal veil material (very inexpensive and found at stores such as JoAnn Fabrics).  The mesh comes in gray, and rusty brown as well as white.  Since you are building from scratch, you have the opportunity to get the post diameter right.  Assuming they are two inches in diameter,  .022″ wire would be correct.

C:  The trash.  Note the color (mostly white), the size, and how it accumulates against barriers such as fences, and the volume.  I’ve found the tissue that is stuffed in gift bags to work well for white paper trash.  Simply copy the photo as to size and distribution.

D:  The soil and ballast.  This is a tough one.  What the heck is that color and how do you copy it?  A sub-conscious tip off that we are looking at a toy is overly uniform color.  Note the subtle color transitions from muddy tan to muddy gray.  Note the fineness of the soil.  First off, to dial this in I’d practice on a scrap first.  I typically use Arizona Rock and Mineral products.  I think I’d use their “Low Desert Soil” as a base but this is a larger size aggregate so you’ll need to run it through a wire strainer first.  They also make blends called “industrial dirt” and “asphalt”.  I’d experiment with mixing these into a variety of small batches of the low desert soil as well as sprinkling it on as on overlay.

Other things to note: the pale gray of the faded ties, the soil covering most of the ties, the stains on the asphalt behind the fence, the broken asphalt at the bottom edge of the photo (this is the shoulder of S. Maywood).

One of the things I love about model railroading is that it is such a level playing field.  Exceptional results are available to everybody that is committed to putting in the time, study, and practice, and commitment.  You can’t buy the solutions to the challenges in this post and those solutions are as available to the young student and retiree on a fixed income as they are to a person of means.

Federal Cold Storage

IMG_5672

I’ve mentioned a number of times how much I rely on mock ups to test scene composition. Call it my blind spot, but I have a hard time visualizing exactly what things will look like when viewed in two dimensions on paper. My original plan was to put a low, one story building in the corner “L” of the layout. Tall buildings abutting the backdrop can be problematic visually, especially the thinner they are. I placed my planned, one story, subject in the corner location and it left me totally unmoved. Placed in the corner it just looked “wrong”. Breaking convention, at least in this location, I needed something taller. The answer was easy to find in the iconic Federal Cold Storage building a few blocks away. I “think” the width of the structure, along with some judiciously placed trees will get me by the backdrop transition problem. With the change in the layout, I’ll probably have to rethink other features such as the cold storage door, but I think the new layout can accommodate it better.

The model is based on a kitbashed RJ Frost kit from Walthers. There is always some interpretation involved in creating the look you want. There is also an art to avoiding the land mines that ultimately result in that hard to define “model railroady” look. As cool as the sign is on top, I have a hunch this will look better if I omit it. As bitter of a pill as it is to swallow, I’ll also need to allocate a fair amount of space for the lot out front to avoid the toy look.

FCS2

Hitting the Target of Design Success, Part 2

Appalacian Rail FanB

Last week we discussed the importance of self awareness in hitting the target of a successful design.  Ultimately “success” is defined by a layout that actually gets built (or mostly so) and provides the level of enjoyment the owner wants.  It needs to target the areas of the hobby that the builder actually derives the most satisfaction from, not what the model community tells him he “should” be interested in.

Let me introduce you to Earl.  Earl actually exists, not individually but as a composite of people I’m typically approached by in my design business.  Age 67.  Recently retired. Not rich but financially secure.  Has wanted a layout his entire life but it’s always taken a back seat to work and family demands.  Limited modeling experience but very knowledgeable about the prototype.  Modeling activity has centered around some clubs and frequent attendance at train shows, at which he never leaves without dropping major bucks on rolling stock and structure purchases.

Earl has one major advantage, he knows himself (truth be told this is fairly rare but roll with me on this).  Earl has been exposed to operations and doesn’t give a rat’s rear about it.  He’s been told he ‘should’ design for ops. but it just doesn’t matter to him.  Earl loves structure building and has fond memories of rail fanning in Appalachia.   He wants a canvas consisting of long coal drags being pulled by big power through the valleys of Appalachia.  He has a large roster of both steam and diesel power as well as hundreds of coal hoppers.

The plan above is my design.  By conventional standards it is flawed.  There is no staging.  There is limited opportunity for switching.  Consisting of double track, there is no opportunity for train meets in an operational setting.  Why?  Because, as I said earlier, Earl doesn’t give a crap about operations.  Never did, never will.  The above plan is a platform to watch trains cruise through scenery, display his motive power, and populate his towns with structures.  In short it’s designed to his interests not the outside world’s.

Hitting the Target of Design Success, Part 1

What aspect of my ‘dream layout’ project is going to serve up, on a silver platter no less, the degree of satisfaction I hope to achieve?   Seems to be such an obvious question.  So basic, and yet very few of us ask it, probably because we really don’t know the answer,  As a result we end up with designs that leave us feeling luke warm about our railroad.  We spend more times sweeping cobwebs off of them than actually building something.

It can be hard to hit a target when you don’t really know for sure what the goal is in the first place.   At its core that is probably why model railroaders struggle so much with design.  We aren’t really sure how we define “success” for ourselves.  How can we come up with a successful layout design when we don’t even know what that looks, or “feels” like?

A successful design isn’t so much about the technical minutiae of curve radii, maximum gradient, or staging yards.  It’s more basic than that.  Regardless of the form it takes, a layout that delivers the degree of recreational enjoyment that the owner expected has served its purpose.  I’ve known many highly accomplished modelers who produced designs that, to my eye and everybody else’s, looked inspirational and well thought out.  For whatever reason though, as they got into it, they didn’t enjoy the process of working on their railroad.  They weren’t really inspired by what was coming together in front of them.  They had come up with an unsuccessful design.

Because self-awareness, in any aspect of our lives, is challenging at best, modelers often take a less well thought approach.   “I like the paint scheme on Santa Fe war bonnets so I’ll model that” or “Coal mines and ports are cool so I’ll be happy with a layout that incorporates those.”   We’ve all been there and then end result is a layout we get bored with quickly.


Here’s one way to get a handle on the lack of self-awareness that is the root of the problem.  In my experience modelers generally derive satisfaction from one (or more often a blend) of three main categories; visual satisfaction, satisfaction of assembly, and/or operational (or interactional) satisfaction.   If we know which of those areas drives us, and build a layout that hits that target, we’ll find ourselves chomping at the bit to hit the layout room more often.


Visual Satisfaction:  Often we want to be transported to a time and place that evokes pleasant memories.   If there is a collection of scenes, real or imagined, that puts us in a good place simply by viewing them, that’s a compelling reason to create them in miniature.  In short, we just like looking at what we’ve created much as with a painting or photo hanging on our wall.

Satisfaction of Assembly:  Whether it’s woodworking, electronics, or our hobby of model railroading the basic act of taking a pile of “nothing” and toiling to make it “something” can be tremendously rewarding …o.k. for some people anyway.  I use a questionnaire as part of my layout design business and one of the key questions is “what aspect of the hobby do you enjoy most?”  Structure building is consistently at the top of the list (wiring is last in case you were wondering).

Operational Satisfaction:  Finally, there is the satisfaction of making our miniature machines run through the paces using the same procedures that their full size counterparts do in the real world.  If this is your cup of tea, scenery or beautifully weathered rolling stock, may not even be necessary to achieve your goal.  If satisfying operations is your goal, you’ll need to be totally clear on two things.  First is the type of operations you enjoy (main line, passenger, TT&TO, switching, locals, etc.).  Second, and often overlooked, is a realistic assessment of how long your operating sessions will last.  If you have two 90 minute commutes to your day job during the week, operational satisfaction may just mean unwinding for a half hour in the evening switching a few industries.  If that’s the case, you don’t need a layout that will sustain a four hour session.

Before picking up your compass and graph paper, maybe we are better served by stepping back and giving some hard thought to what actions we want to be engaged in to enjoy the hobby.  If we can get a real handle on that, the chances of hitting the target of successful design increases immensely.


In the next installment we’ll look at a hypothetical example illustrating how this can be put in to practice.