The Elephant in the Corner of the Room
The constructive criticism received on the LAJ practice video fell into two areas, the white balance and the bit of choppiness in sound transitions. Noted, but also very simple to fix. The purpose of the exercise was to experiment with some techniques but primarily to unearth the challenges that lie in producing higher quality model railroad videos, something that moves closer to cinematography and further from “model railroady” works.
When all was said and done, the biggest problem, and it is a big one, is the lighting and backdrop. Model railroad still photography frequently, and model railroad videos almost always, are typified by a flat muddiness to the images. Part of this is related to not using the correct lighting and part of it has to do with the unique challenges and problems created by our 2D backdrops. Backdrops are the elephant in the corner of the room when it comes to model railroad photography. Model railroad backdrops tend to muddy up in images, show skewed perspectives, and snare shadows of vertical objects (ever see a shadow of a telephone pole when you look into the real sky?)
With still photography, we can work around the problem. By becoming more skilled with the use of photofloods we can inject shadows and contrast into our images. Problematic backdrop issues can be resolved simply with an online editor which can be used to delete the offending background and cropping in a better image. Software such as Corel’s Knockout 2 allows background removal with almost microscopic laser precision, totally free of white artifacts and halos.

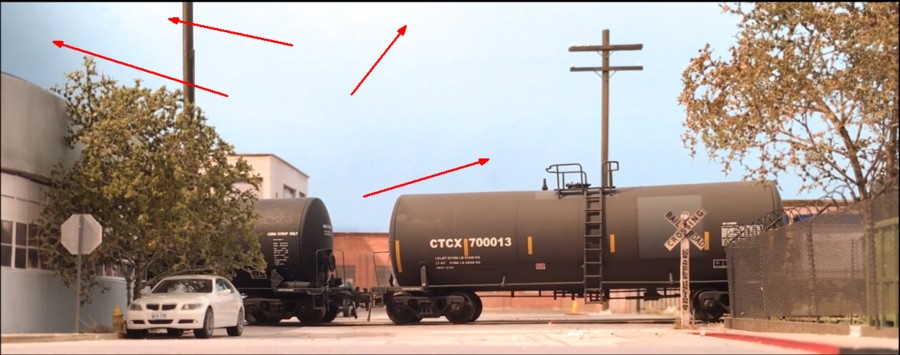
The image above is a still photo. The existing backdrop was simply the walls of the room which had been painted sky blue. Although the wall looks totally fine in person it presents as a blue-gray muddy sea in photos. Using Knockout 2 I was able to delete it and replace it with an actual sky. This edit alone totally transforms the image (note: I’ve moved to the philosophy of using low drama, cloudless sky photos as I think they are less distracting). Note also how I was able to position the photo floods to inject shadows into the photo which drape across the building faces and vehicle hoods. Ideally, this is what I’d like to move to with the videos, the absence of muddiness in the sky and more defined shadows. Therein lies the enormous challenge and my central focus moving forward.
Now, contrast the still image with the screen capture of the practice video. I inserted a more brilliantly colored blue poster in the back which helped a little but note the flatness and muddiness in the color. Notice the burnouts and shadows. Although I used the same lighting as the still photograph, the shadows didn’t really snap out. My current video editor is Adobe Premiere Elements. Perhaps due to the challenges of video, I find it much wimpier and less powerful than the still counterpart, Adobe Photoshop. I’ve experimented with Green Sky, Blue Sky, and Chroma Key with lackluster results. Even when I did show signs of progress the borders and artifacts around my edits were apparent.
If any of my blog readers have experience with more advanced, more precise video background removal tools and techniques I’d love to hear from you. Perhaps a video editor that does this for their day job.