The camera lens gives us tremendous power to interpret and frame our scenes in a way we find personally appealing.
There are two primary reasons we build model railroads. First is the satisfaction of creation and assembly. The second reason, which often plays out sub-consciously and tends be emotionally driven, is much more powerful. We want to be transported to a time, place, or experience that is deeply meaningful to us.
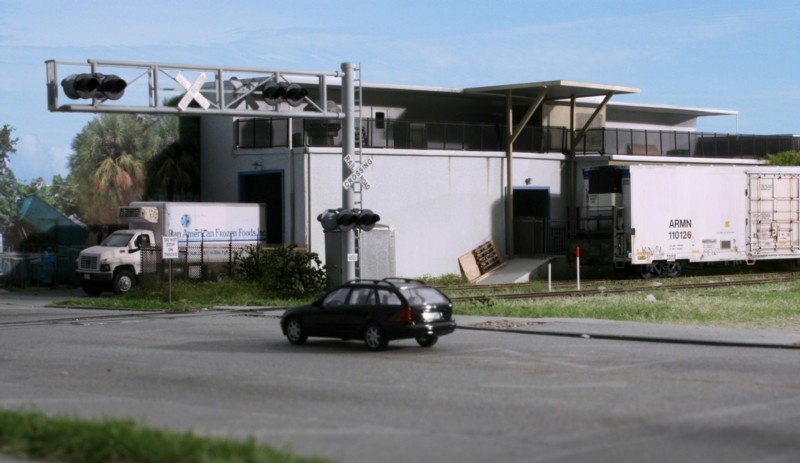
There are two points of view, two ways of visually experiencing our layouts. The first way, obviously the most common, is to simply stand there and look at it. One thing this method has going for it is simplicity. You just open your eyes and gaze! Without realizing it though, just looking at a layout is problematic. It’s an unrealistic point of view. There is a disconnect between what we see looking at a layout with the naked eye and what we would expect if we were standing rail side looking at an actual railroad. The angles are totally different and the eye catches all sorts of nasty things such as the surrounding room, the fascia, etc. Standing and looking at our layouts give us a helicopter view which, no matter how well executed, generally drives home the reality that they are still plastic toys.
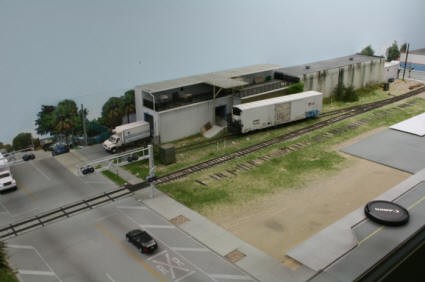
Basic, un-edited, ‘helicopter view’ model railroad shot
There’s another option. We can alter, interpret, and transform the point view in such a way that our models do look like the compelling subjects that capture our imagination to the point where we spend a lifetime modeling them. The way we attain this more deserving viewpoint is through the camera lens, through the magic of photography. The camera allows us to present our work in breathtaking ways that makes us view our hobby in an entirely new light.
As modelers we are in the entertainment business. A well produced movie that is emotionally compelling makes no apologies for the cinematic tricks that were employed to get us there. Not only is there no apology for the techniques, they are celebrated. The same should hold true for model railroad photography. Whether it be lighting, photo stacking software, background removal software, or photo editing tools, any photographic technique that enhances our hobby experience should be employed without a second thought.
The goal of hobby photography is often misunderstood. It’s a totally personal, totally selfish pursuit which, at its core, is about experiencing your layout the way you intended to. It’s about finding a way to visually experience and be transported into your creation. The camera allows us to frame and present the model as we actually intended. As a modeler gains experience, hones his craft, becomes more and more adept at building, the viewing angle issue looms larger. The better the model, and over time you do get much, much better, the more you miss out by not having your work presented in the best possible light. Who misses out? You do. Skilled modelers that don’t make the minimal effort to acquire the basic photography skills do a tremendous disservice to themselves. I feel bad for them because they are selling themselves short from the standpoint of not seeing their fine efforts viewed in the most favorable light.
I often ask myself why there is so much resistance among modelers when it comes to improving their photography. The first reason is basic human nature, the inertia associated with trying something new. There is the misconception that photography is much more difficult than it actually is. The digital era has shortened the learning curve to the point where, with a few days of trial and error, the novice can achieve excellent results.
The second misconception is about cost. There is the misguided belief that the necessary tools are more expensive than they are. The nature of our times is that photographers upgrade to new equipment long before the original has worn out. This results in a vast market of high quality, low cost, used equipment that is perfectly acceptable.
In terms of basic equipment and associated costs, this is what you’re looking at (brands just suggestions):
- Lighting. Use tungsten 3200K photo floods. (for small subjects simply shoot outdoors in natural sunlight) : Lighting is THE most critical aspect of effective photography, even more so than the camera itself. Start with two tungsten photo bulbs. Without this most basic purchase you are wasting your time with the entire photographic process. After my blog on the futility of relying on fluorescent lighting for photography I got a lot of push back from my blog readers. I remain un-apologetic, un-repentant! Buy decent lights or don’t bother. One brand is Eiko 500 watt tungstens. Cost: $10 to $20 total.
- Digital Single Lens Reflex Camera (Digital SLR): A good starting point would be a Canon Rebel. Cost on ebay (used): $160 to $220
- Photo editing software. Suggested brand: Adobe Elements. Cost on ebay (used): $15
- Tripod: Suggested brand Slik. Cost on ebay (used) $65
You’ve spent decades building models and gotten to the point where you are pretty darn good at it. Don’t you owe it yourself to reap the rewards and experience your models in the best possible light? I think you do.