For layout photography lighting I use two fixtures containing tungsten bulbs. I remove the reflector from one of the fixtures and use that for the ‘sun’.
I’ve been getting a lot of questions lately as to what type of layout lighting is best. The answer really should be broken into two parts, one being what is the best room lighting and the other being what is the best for photography.
As far as room lighting goes, and I think this is what most people are asking, I don’t think it matters that much for normal viewing and running trains. I use ordinary fluorescents now and couldn’t tell you what temperature or CRI (color rendition index) I have in the fixtures as I write this. My ambivalence goes back to the early days of my East Rail layout. Given the small layout size I thought, why not go for the best, state of the art, fluorescents I could track down. I studied. I did research online. I drove across town to purchase specialty daylight fluorescents with a very high CRI. With much anticipation, I installed the bulbs, hit the switch, and……. I think totally underwhelmed would be the best way to describe the impact. I suppose it’s subjective but I didn’t think the time and effort optimizing the bulbs gave a proportionate visual payoff. From that point onward I stopped worrying about it much and just try to get fluorescent bulbs of matching temperatures.
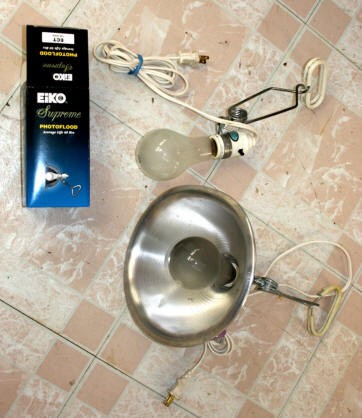
The best lighting for photography is a totally different subject. For everyday room lighting, fluorescent are inexpensive and can light an entire room brightly and without throwing off a lot of heat. However….when it comes to photography they are a no-go. Photos shot under fluorescents are flat, lifeless, and muddy. They are awful. No matter how much time you spend in photoshop, it comes back to the old adage of, ‘you can’t polish a turd’. The good news is that excellent photographic lighting is very simple and inexpensive. You will need two tungsten bulbs from a photography store (say seven bucks each) and two inexpensive clamp on reflectors from the hardware store. Put a bulb in one reflector, clamp it to a chair back or trash can, put it several feet to your back and point it the ceiling. This will throw off a good canopy of diffuse light. Remove and discard the reflector from the second fixture and insert the bulb. This will be your sun. Hold it in your hand about four feet from the model and shine it down from a 45 degree angle or whatever sun angle you prefer. Experiment with different sun angles and distances. Set your camera on the tungsten light setting and aperture priority. I generally set the exposure compensation to +.75 or +1.0. Take some shots, see what you have, and make adjustments until you have what you want.