Sooner or later you’ll run into a situation where you have a malfunction with your wiring. By employing a methodical, systematic troubleshooting plan often the problem can be found quickly. In almost all cases the problem is very minor. The three most common problems in order of frequency are:
- No power at all
- A short circuit
- Some power but not enough (often caused by a partial short or loose connection)
Generally malfunctions occur while running the layout. The culprit is likely to be found in the action you took moments before the problem surfaced. Do a mental playback on what you were doing when the problem occurred. For example, did you just flip a toggle, run through a turnout, connect a new track feed?
No Power
The most common problem is one of no power at all. Fortunately this is usually the easiest to track down and fix. It may be a case of replacing the EIN: RAFI Switches, reattaching a loose cable, or perhaps the simplest solution of all: making sure everything is plugged in and turned on. Don’t laugh, this is often the problem! Along these same lines, make sure all your plugs are securely plugged in.
Ask yourself, ‘is everything dead, everything in one area, or just one device’? Take a small test bulb and apply it across the leads of the power supply. If the bulb lights, you know you have power at the source. Continue to move the bulb down the circuit, testing as you go until you hit the point where it won’t light. You’ve then found the area of your problem. Check for loose connection screws or a defective component.
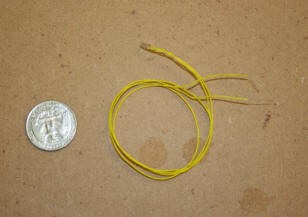
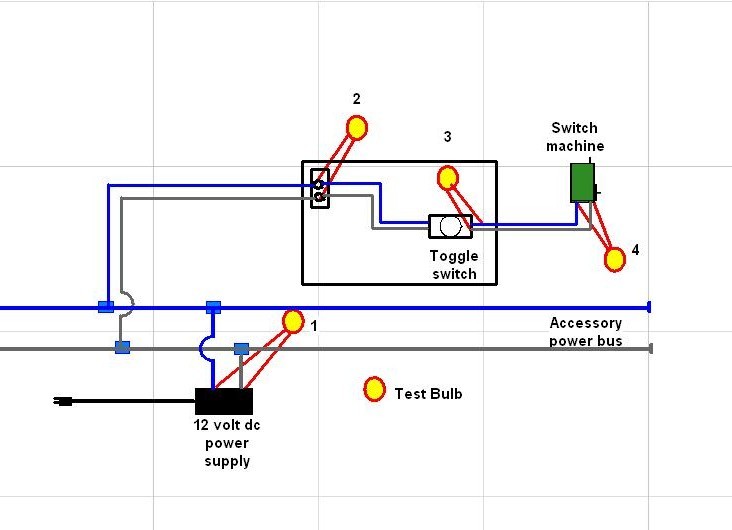


A quick, simple and effective way to check a circuit is with an inexpensive grain of wheat bulb. Placing the bulb wires across the leads at various points in the circuit will quickly tell you how far down the circuit you have power. When you reach a point down circuit where the bulb no longer lights, then you’ve isolated the location of your problem. The diagram on the right shows how this procedure can be used to check a non-operational switch machine. The bulb is first use to check the power supply, then the control panel power tap, toggle switch and finally the switch machine. If you get all of the way to the end of the circuit and the bulb is still lighting you can assume the switch machine is bad.
You can make life easier for yourself if you make it possible to quickly disconnect the power leads from specific areas. For example, lets say your layout is powered by switch machines. Group your machines so they powered from control panels around the layout. Make it possible to quickly unplug a specific control panel from the accessory circuit. This is illustrated in the photo below.
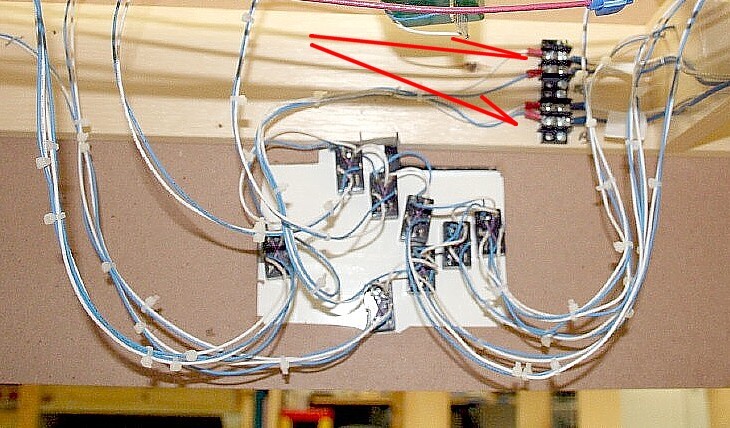

In this photo you are looking at the back of a switch machine control panel with eight toggles. The red arrow shows a terminal block that feeds in power to all eight toggles. If only the switch machines powered by this panel are dead you’ve isolated the problem to being either a loose connection at the power tap or a short within this group of toggles and switch machines. You can apply this system another way. Lets say all of your switch machines have gone dead and you know your power supply is good. If your switch machines are broken up into say five control panels, isolating the problem becomes easier. Unhook the power tap screw from all the control panels. Hook the panels up one at a time and test. Eventually, you’ll get to a control panel/switch machine group that won’t work. Now you’ve narrowed the problem down.
Short Circuit
Short circuits are generally pretty easy to find. Most DCC systems have an audible buzzer to alert you of a short. Accessory circuits, unfortunately don’t give such warning. If you’re lucky, the fuse on your accessory power supply will trip. If not, usually the power supply or a component will burn out. Again, when looking for a short start with the last action you took before the failure occurred.
Common causes of short circuits are:
- A metal object laying across the rails (screw driver, metal rule, etc.)
- A locomotive that has run backwards through a turnout that hasn’t been aligned
- Locomotive wheels off the track and bridging both rails (often at turnouts)
- Locomotive with wide wheels spans both rails at a turnout frog
NOTICE HOW OFTEN THE WORD TURNOUT AND SHORT APPEAR IN THE SAME SENTENCE! THIS GIVES YOU A CLUE AS TO ONE OF THE FIRST PLACES TO CHECK. CONTINUING ON….
- Wires of opposite polarity that have come in contact with one another. This is most likely to occur at the connection point to a component where the bare/un-insulated ends of the wire may get bumped and come in contact with one another.
- Internal switch machine failure. This is rare but does happen.
Partial Power
This is not as common. Generally a circuit or component works or it won’t. Indications of partial power would be things like very sluggish performance (such as very slow switch machines, dim bulbs etc.)
Common causes are:
- Loose power source connection
- Partial short (just a tiny strand of wire touching something of opposite polarity) Good luck finding this problem!
- A bad switch machine in a cluster of switch machines
- Too small of a power supply to handle the load.
As you are building your layout it is wise to test as you build. By doing so you can be reasonably assured that any electrical problems are the result of your last action. I always connect track feeders to the circuit with the power on. If I get a pair reversed I know it immediately. You don’t want to be in a situation where you’ve wired in fifty leads, installed one set backwards, and then have to go back and find which one you did wrong. Murphy’s law says it will be the last of the fifty you check!