From the emails I receive, I can tell folks struggle with how to optimize the printed image output quality for their photo wallpaper. It can be confusing so let’s go through a short primer. There are essentially two steps. First, you need to save the photo in a way that maximizes how many ink dots are laid down on the photo paper. More dots equates to crisper images. When you print you’ll want to ensure this is as high as possible to make the final result clean and clear. Second, you need to instruct your printer what to look for and what do with the image it is dealing with.
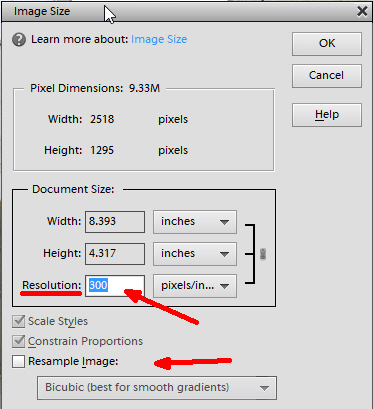
Setting your image resolution (measured in dots per inch or dpi) is essentially producing an instruction for your printer for the time in the future you do the printout. For day to day use, say printing out your boarding pass, low resolution is fine and saves ink. For our modeling purposes, however, we need something higher or the image will appear to be fuzzy. 250 dpi is good enough, magazines want to see 300 dpi so I go with 300. To set the resolution In Adobe photoshop go to: Image-Resize-Image Size to pull up the screen you see above. Un-check “Resample Image” and then enter a value of 300 in resolution. HIt “ok”. (You tend to hit the point of diminishing returns above 300dpi so setting it at say, 600, won’t produce a noticeable improvement.)

Next, we need to tell the printer what to do. I’ve had much better luck with glossy photo paper than matte and never use ordinary typing paper. Load your glossy photo paper in the printer and in Adobe Photoshop hit: File-Print, to bring up the screen above. Once you have the menu pulled up you need to tell the printer what type of paper it is dealing with or you’ll end up with a mess. Go to box 2, hit “change settings” and select the appropriate paper. Next, you need to tell the printer how large to print out the image. Using bricks, doors, or cinder blocks you can usually tell how tall a structure is. In the photo above the building is fifteen feet tall. 15 feet x 12 inches/foot divided by 87 for HO (160 for N) tells me that a fifteen foot tall building printed out to scale should be two inches tall (2.06 for you engineers). In box 5 select “custom print size”. A second screen will come up prompting you to input the height of your image. Finally, you can save paper and get multiple images on a sheet if you control where on the paper the image prints out. Where arrow three is shown above, un-check “center image” and set the top and left margins. In the example above I set them at 1.0 inches.
Hit “print” and you’re good to go! If the printing quality is still poor, it may be a case that it is time to invest in a new printer.